Caramelized BBQ Boneless Chicken Thighs in the Oven: Recipe!
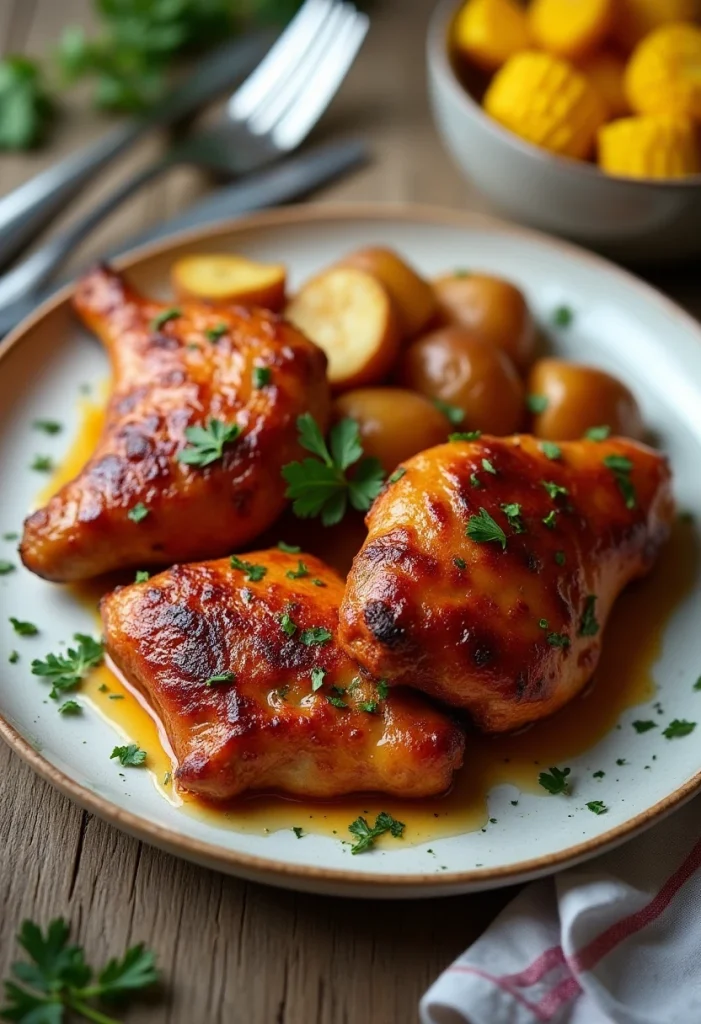
If you’re craving something sticky, savory, and wonderfully satisfying, these Caramelized BBQ Boneless Chicken Thighs are exactly what you want in the oven tonight. They’re juicy in the middle with a glossy, deep mahogany glaze that clings to every bite, and they deliver that crave-worthy sweet-smoky balance you usually only get from a grill. Best of all, the process is simple and reliable, making it perfect for busy weeknights or an easy weekend dinner.
Expect tender, flavorful chicken with a lacquered finish that looks like you fussed for hours—yet everything happens right on a sheet pan. With a few pantry staples, a hot oven, and a couple of brush-and-broil rounds, you’ll end up with beautifully caramelized thighs that pair well with anything from slaw and cornbread to roasted vegetables or a crisp salad.
- Why These Oven-Baked Caramelized BBQ Boneless Thighs Are Irresistible
- What You’ll Need: Ingredients for Caramelized BBQ Boneless Chicken Thighs in the Oven
- How to Make Them: Step-by-Step Guide to Caramelized BBQ Boneless Chicken Thighs in the Oven
- Timing & Prep Details to Keep You On Track
- Pro Tips So Your BBQ Thighs Turn Out Perfect
- Nutritional Snapshot (Approximate, Per Thigh)
- Frequently Asked Questions
- A Warm Send-Off: Final Thoughts
Why These Oven-Baked Caramelized BBQ Boneless Thighs Are Irresistible
This recipe celebrates what boneless chicken thighs do best: stay juicy and flavorful, even at high heat. The oven’s dry heat concentrates the sauce as it cooks, giving you that glossy, clingy finish without needing a grill. It’s straightforward, adaptable, and consistently delicious.
Expect a perfect harmony of sweet from honey and brown sugar, tangy from vinegar and mustard, and smoky warmth from paprika and your favorite BBQ sauce. With just a few simple steps, you’ll achieve the kind of caramelized crust that makes people go back for seconds.
What You’ll Need: Ingredients for Caramelized BBQ Boneless Chicken Thighs in the Oven
- 2 pounds boneless, skinless chicken thighs (about 8 pieces) — The star of the dish; thighs stay juicy, tender, and forgiving, even with high-heat roasting and broiling.
- 1 tablespoon neutral oil (canola, avocado, or light olive oil) — Helps the seasoning adhere and encourages even browning in the oven.
- 1 teaspoon kosher salt — Draws out moisture for better browning and seasons the meat throughout.
- 1/2 teaspoon black pepper — Adds gentle heat and rounds out the sweetness of the glaze.
- 1 teaspoon smoked paprika — Brings smoky depth that mimics the flavor of outdoor grilling.
- 1 teaspoon garlic powder — Provides savory backbone and aroma without burning like fresh garlic might.
- 1/2 teaspoon onion powder — Adds subtle sweetness and complexity to the seasoning blend.
- 1 tablespoon brown sugar — Helps kickstart caramelization on the chicken before the glaze goes on.
- 1 cup BBQ sauce (your favorite brand or homemade) — The base of the glaze; choose a sauce you love since its flavor concentrates during roasting.
- 2 tablespoons honey or maple syrup — Boosts shine and stickiness, giving that classic lacquered finish.
- 1 tablespoon apple cider vinegar — Adds acidity to balance the sweetness and brighten the sauce.
- 1 teaspoon Dijon mustard — A touch of sharpness that rounds out the glaze and helps emulsify.
- 1 tablespoon soy sauce or Worcestershire sauce — Deepens umami and saltiness for a more robust flavor.
- 1/4 teaspoon red pepper flakes (optional) — For a hint of heat without overwhelming the sweet-smoky profile.
- 1 tablespoon butter (optional) — Swirled into the warm glaze at the end for extra gloss and richness.
- Chopped parsley or sliced green onions (for serving) — Fresh finish that brightens each bite.
- Lemon wedges (optional) — A squeeze of citrus just before serving lifts the sauce and cuts richness.
How to Make Them: Step-by-Step Guide to Caramelized BBQ Boneless Chicken Thighs in the Oven
- Preheat smart and set up the pan. Place an oven rack in the upper-middle position and heat the oven to 425°F (220°C). Line a rimmed baking sheet with foil for easy cleanup. For maximum caramelization and airflow, set a wire rack on top; if you don’t have one, place the thighs directly on the foil-lined sheet.
- Pat the chicken dry. Trim excess fat if needed. Pat the thighs thoroughly with paper towels. Dry surfaces brown better and help the glaze adhere.
- Season generously. In a small bowl, mix salt, pepper, smoked paprika, garlic powder, onion powder, and brown sugar. Toss the thighs with the neutral oil, then sprinkle the seasoning blend all over, coating both sides.
- Optional quick rest. If you have time, let the seasoned thighs sit at room temperature for 15–20 minutes. This brief rest helps the salt penetrate and promotes even cooking.
- Start the roast. Arrange the thighs in a single layer with a little space between each piece. Roast for 10–12 minutes to start rendering fat and develop color.
- Stir together the glaze. While the chicken begins roasting, mix BBQ sauce, honey (or maple), apple cider vinegar, Dijon, soy or Worcestershire, and red pepper flakes (if using). Warm it gently in a small saucepan if you like—it makes brushing easier and helps the glaze cling. If you’re adding butter, swirl it in off the heat for extra gloss.
- First glaze and flip. Remove the pan, brush a generous layer of glaze on the top of each thigh, then flip and brush the other side. Return to the oven for another 7–8 minutes.
- Second glaze for shine. Pull out the pan again and add a second coat of glaze all over. Roast 3–5 more minutes. The sauce will be bubbling and deepening in color.
- Broil to caramelize. Switch the oven to broil (high) and move the pan to the top rack. Broil 1–3 minutes, watching closely. The sugars go from perfect to burnt quickly; stay near the oven. You’re looking for glossy, slightly charred edges and a deep mahogany sheen.
- Check doneness. Use an instant-read thermometer. Thighs are safe at 165°F (74°C), but for best tenderness, aim for 175–190°F (79–88°C). The connective tissue melts at higher temps, yielding silkier, juicier meat.
- Rest and serve. Let the chicken rest 5 minutes so the juices settle and the glaze sets. Brush on any remaining pan juices. Shower with parsley or green onions, and finish with a quick squeeze of lemon if desired. Serve hot.
Timing & Prep Details to Keep You On Track
Roasting and glazing move quickly once you get started, so gather and measure ingredients before the oven preheats. Here’s a clear timeline to help you plan:
| Prep Time | 10–15 minutes (trimming, seasoning, mixing glaze) |
| Optional Rest | 15–20 minutes for better seasoning penetration |
| Roast Time | 20–25 minutes total before broiling |
| Broil Time | 1–3 minutes (watch closely) |
| Rest After Cooking | 5 minutes to set juices and glaze |
| Total Time | 40–50 minutes (including optional rest) |
You’ll know the chicken is ready when the glaze is deep and glossy, the edges have a bit of char, and the internal temperature meets your preferred target (165°F for safe and juicy, 175–190°F for ultra-tender thighs). The rest at the end is key—don’t skip it.
Pro Tips So Your BBQ Thighs Turn Out Perfect
- Dry thoroughly, then season. Moisture is the enemy of caramelization. Patting dry helps the initial browning and prevents a watery glaze.
- Use a wire rack if you have one. It promotes even heat circulation and keeps the bottoms from stewing in juices, which yields better texture.
- Glaze in layers. Two brushings plus a quick broil develop that lacquered finish. Layering is how you build flavor and shine.
- Watch the broiler like a hawk. Sugars can tip from gorgeous to burnt in seconds. Stand by the oven and check every 20–30 seconds.
- Thermometer = confidence. Thighs are forgiving, but a quick temp check ensures you hit that tender, melt-in-your-mouth range.
- Balance your sauce. If your BBQ sauce is very sweet, add more vinegar or Dijon. Too tangy? A touch more honey evens it out.
- Cut evenly or group by size. If your thighs vary in size, place larger pieces toward the edges of the pan and smaller ones in the center for more even cooking.
- Make it your own. Stir a little chipotle in adobo or a dash of liquid smoke into the glaze for extra depth. Freshly cracked black pepper is fantastic right before broiling.
- Reheating tip. Warm leftovers at 325°F, covered, 10–12 minutes, then uncover and broil 1 minute to revive the glaze.
Nutritional Snapshot (Approximate, Per Thigh)
Nutrition will vary based on the brand of BBQ sauce and the size of the thighs, but here’s a helpful estimate for one glazed boneless, skinless thigh (about 1/8 of the recipe):
| Calories | 285 |
| Protein | 24 g |
| Total Fat | 13 g |
| Carbohydrates | 16 g |
| Sugars | 14 g |
| Sodium | 680 mg |
| Fiber | 0–1 g |
For a lighter version, use a reduced-sugar BBQ sauce, reduce added honey, and skip the butter. For a lower-sodium take, choose low-sodium sauces and seasonings.
Frequently Asked Questions
Can I use chicken breasts instead of thighs?
Yes, but adjust the method. Pound breasts to an even thickness, roast at 425°F for 10 minutes, glaze and flip, then roast 5–8 minutes more and broil briefly. Remove at 160°F and rest to 165°F. Breasts cook faster and dry out more easily, so watch the temperature closely.
What if I don’t have a wire rack?
No problem. Use a foil-lined sheet pan and avoid overcrowding. For a crisper bottom, preheat the empty sheet in the oven for 5 minutes before adding the chicken, and drain any pooled juices halfway through roasting before glazing.
Can I prep these ahead?
Absolutely. Season the thighs up to 24 hours in advance and refrigerate. Mix the glaze and store separately. When ready, roast as directed, then glaze and broil. Bringing the chicken closer to room temperature for 15–20 minutes before roasting helps it cook evenly.
A Warm Send-Off: Final Thoughts
There’s something undeniably comforting about a pan of glossy, caramelized BBQ chicken coming out of the oven. It’s the kind of dish that fills the kitchen with a cozy aroma and gathers everyone around the table—no special occasion required. With just a few pantry ingredients and a reliable technique, you’ll have a go-to recipe that’s equal parts impressive and easy.
Whether you serve these thighs with buttery corn, a crisp chopped salad, or roasted potatoes, they always bring smiles. If you can, make a little extra—you’ll want leftovers for sandwiches or wraps the next day. Here’s to effortless cooking, a little bit of caramelized magic, and moments shared over a delicious meal.