Easy Cheesy Ground Beef Enchiladas | Quick Weeknight Recipe
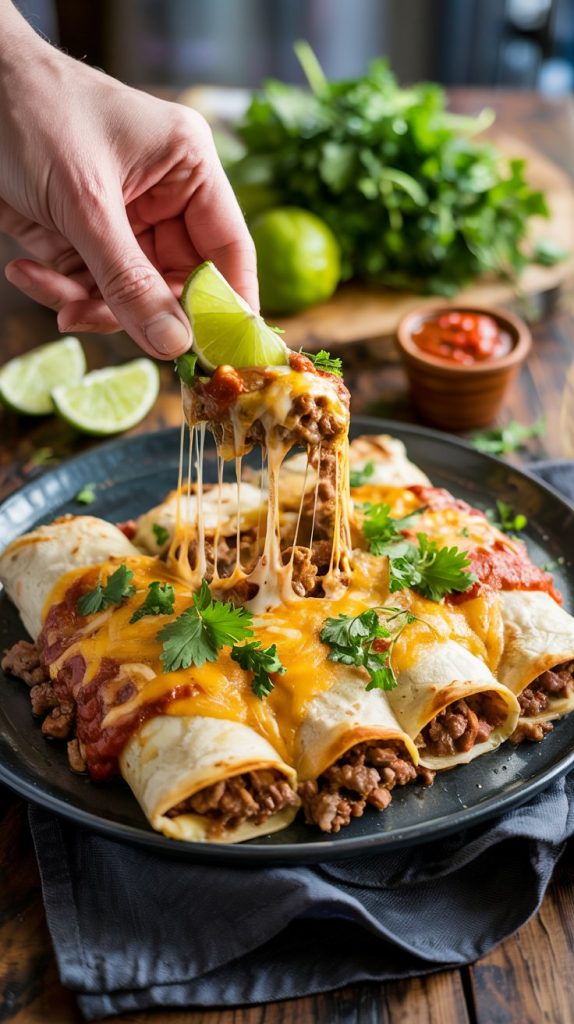
If you’re craving a cozy, crowd-pleasing dinner with minimal fuss and maximum flavor, these Easy Cheesy Ground Beef Enchiladas are the answer. Picture tender tortillas wrapped around seasoned ground beef, smothered in a rich red enchilada sauce, and blanketed with bubbly, golden cheese. This is the kind of meal that fills the kitchen with irresistible aromas and brings everyone to the table fast. Expect a straightforward recipe, a short ingredient list, and plenty of chances to make it your own—whether you like it mild and melty or spicy and bold. By the time you pull the pan from the oven, you’ll have a pan of comfort ready to slice, serve, and savor.
What Makes These Easy Cheesy Ground Beef Enchiladas Irresistible
These enchiladas are the perfect blend of cozy and quick. They rely on a few pantry staples, come together in under an hour, and deliver all the classic Tex-Mex flavors you love—without complicated steps. The beef is seasoned and juicy, the tortillas soften into the sauce, and the cheese melts into a creamy blanket over the top. It’s a weeknight hero that feels special enough for company. Plus, you can tailor the heat level, swap in different cheeses, and even add beans or veggies to make it more hearty. The result is a reliable go-to that’s easy to master and always satisfying.
Gather Your Ingredients for Easy Cheesy Ground Beef Enchiladas
- 1 lb (450 g) ground beef (85–90% lean): The savory, meaty base that gives the filling its hearty flavor and texture.
- 1 small yellow onion, finely chopped: Adds sweetness and depth to the beef as it cooks.
- 2–3 garlic cloves, minced: Bright, aromatic punch that builds classic enchilada flavor.
- 1–2 tablespoons chili powder: The main seasoning backbone; choose mild or hot depending on your preference.
- 1 teaspoon ground cumin: Earthy warmth that complements the chili powder.
- 1/2 teaspoon dried oregano: A subtle herbal note that rounds out the spice blend.
- 1/2 teaspoon smoked paprika (optional): Adds gentle smokiness that tastes like a slow-cooked sauce.
- Kosher salt and black pepper, to taste: Essential for balancing and highlighting every flavor.
- 1 (4 oz/113 g) can diced mild green chiles (or 1 jalapeño, minced): For a soft heat and tang; use jalapeño if you prefer more kick.
- 2–2 1/2 cups red enchilada sauce (store-bought or homemade): The saucy blanket that keeps everything moist and delicious.
- 1 cup black beans, drained and rinsed (optional): Adds heartiness, fiber, and a creamy texture.
- 1 cup corn kernels (fresh, frozen, or canned; optional): Sweet pops of flavor that pair beautifully with the beef.
- 10–12 small corn tortillas (6-inch), or 8 small flour tortillas (8-inch): The wrapper; corn offers classic flavor, flour is extra pliable.
- 2–3 cups shredded cheese (Cheddar, Monterey Jack, or Pepper Jack): Melts into a bubbly, golden top and creamy filling.
- 2 tablespoons neutral oil (canola or vegetable): For sautéing and lightly greasing the baking dish.
- Fresh cilantro and sliced green onions (for garnish): Bright, fresh finish on a rich dish.
- Lime wedges (for serving): A squeeze cuts through richness and wakes up the flavors.
- Sour cream or Mexican crema (for serving): Cool and tangy; balances the spice and adds creaminess.
How to Make Them: A Step-by-Step Walkthrough
- Preheat the oven and prepare the pan. Heat your oven to 375°F (190°C). Lightly oil a 9x13-inch (23x33 cm) baking dish. A thin slick of oil helps keep the tortillas from sticking and tearing.
- Sauté the aromatics. In a large skillet over medium heat, warm 1 tablespoon of oil. Add the chopped onion and cook until translucent and tender, 4–5 minutes. Stir in the garlic and cook 30 seconds, until fragrant.
- Brown the beef. Add the ground beef to the skillet. Cook, breaking it up with a spoon, until it’s no longer pink and has some browned bits, 5–7 minutes. If there’s a lot of grease, drain off most of it. Leaving a little fat keeps the filling juicy.
- Season generously. Sprinkle in the chili powder, cumin, oregano, smoked paprika (if using), salt, and pepper. Cook 30–60 seconds to toast the spices.
- Add chiles and optional mix-ins. Stir in the diced green chiles (or jalapeño). If using, add the black beans and corn. Pour in about 1/2 cup of enchilada sauce to moisten the mixture. Simmer 2–3 minutes, taste, and adjust seasoning. You’re aiming for a flavorful filling that’s moist but not soupy.
- Soften the tortillas. For corn tortillas, wrap in a damp paper towel and microwave 45–60 seconds, or warm in a dry skillet 15–20 seconds per side. Flour tortillas usually need just a quick warm. Warm tortillas roll without cracking.
- Sauce the baking dish. Spread 1/2–3/4 cup of enchilada sauce over the bottom of your prepared dish. This keeps the first layer from drying out or sticking.
- Assemble the enchiladas. Working one tortilla at a time, add 2–3 tablespoons of the beef mixture along the center. Sprinkle with a little cheese. Roll snugly and place seam-side down in the dish. Repeat with remaining tortillas and filling. Don’t overfill—neat rolls cook more evenly.
- Top with sauce and cheese. Pour the remaining enchilada sauce evenly over the rolled tortillas, making sure every surface is coated. Scatter the rest of the cheese over the top. If you like extra saucy enchiladas, hold back a little more sauce for serving.
- Bake until bubbly. Slide the dish into the oven and bake 18–22 minutes, until the cheese is melted and the edges are bubbling. For a golden top, broil for 1–2 minutes at the end, watching closely.
- Rest and garnish. Let the pan rest 5–10 minutes before serving—this helps everything set. Top with chopped cilantro and green onions. Serve with lime wedges and a dollop of sour cream.
- Make it your own. Swap ground turkey for beef, use Pepper Jack for extra heat, or tuck in sautéed spinach or peppers. This recipe is flexible—use what you love and what you have.
Time & Prep At-a-Glance
Prep time: 20 minutes
Cook time: 20–25 minutes
Total time: About 45 minutes
Yield: 4–6 servings (10–12 small corn tortillas or 8 small flour tortillas)
You’ll know the enchiladas are ready when the sauce is actively bubbling around the edges and the cheese has fully melted. Letting them rest for a few minutes is key—it keeps the rolls intact and makes serving easy. They’re at their best hot and fresh, but they also reheat beautifully for quick lunches.
Storage: Refrigerate leftovers in an airtight container up to 4 days. Reheat, covered, in a 350°F (175°C) oven for 15–20 minutes or in the microwave until warmed through.
Freezer-friendly: Assemble but don’t bake; wrap tightly and freeze up to 2 months. Bake from frozen, covered, at 375°F (190°C) for 25–30 minutes, then uncover and bake 10–15 minutes more until hot and bubbly. Or thaw in the fridge overnight and bake as directed.
Pro Tips for Guaranteed Success
- Warm the tortillas first. Pliable tortillas roll cleanly and won’t crack. A quick microwave steam works wonders for corn tortillas.
- Season to taste. Beef, beans, and cheese all benefit from a little extra salt. Taste the filling before assembling.
- Balance the sauce. Add a splash to the filling to keep it juicy, but don’t overdo it—too much can make it messy to roll.
- Cheese smartly. Use a blend (Cheddar for sharpness, Monterey Jack for melt, Pepper Jack for heat). Shredding cheese yourself melts more evenly.
- Don’t skip the rest. A short 5–10 minute rest after baking helps the sauce settle and the rolls hold their shape.
- Go for a quick broil. A minute or two under the broiler gives you those irresistible browned, bubbly cheese spots.
- Customize the heat level. Mild sauce and green chiles keep it family-friendly; jalapeño or hot sauce turns it up a notch.
- Drain if needed. If you have excess beef fat, drain most of it. Too much grease can make the enchiladas heavy.
A Quick Nutrition Snapshot
Approximate per serving (6 servings), using 1 lb 85% lean beef, 12 corn tortillas, 2 cups enchilada sauce, and 2 1/2 cups shredded Cheddar/Jack blend:
- Calories: ~520
- Protein: ~33 g
- Carbohydrates: ~27 g
- Total Fat: ~30 g
- Saturated Fat: ~13 g
- Fiber: ~4 g
- Sodium: Varies widely by sauce and cheese; estimate ~850–1000 mg
These numbers will vary based on your tortilla choice (flour tortillas are typically higher in calories and carbs), cheese type, and the specific brand of enchilada sauce. For lighter enchiladas, use extra-lean beef or ground turkey, reduce cheese slightly, and choose a lower-sodium sauce.
Your Questions, Answered
Can I use flour tortillas instead of corn?
Yes. Flour tortillas are easy to roll and tend to be more forgiving. They make slightly softer, cushier enchiladas. Corn tortillas offer that classic flavor and a little more structure. If using corn, always warm them so they don’t crack. If using flour, choose smaller (8-inch) tortillas so they fit in a 9x13-inch pan.
How can I make these enchiladas spicier or milder?
For milder enchiladas, use a mild red sauce and canned mild green chiles, and skip jalapeños. For more heat, add minced jalapeño or chipotle in adobo to the filling, choose a medium or hot enchilada sauce, or use Pepper Jack cheese. Taste the filling as you go so you land at your perfect heat level.
Can I make them ahead or freeze them?
Absolutely. Assemble, cover tightly, and refrigerate up to 24 hours before baking; add 5–10 minutes to the bake time. To freeze, assemble but don’t bake; wrap well and freeze up to 2 months. Bake from frozen at 375°F (190°C) for 25–30 minutes covered, then 10–15 minutes uncovered, or thaw overnight and bake as directed. Leftover baked enchiladas also freeze well in portions for easy lunches.
A Few Final Words
Making enchiladas has a way of turning a regular evening into a little celebration. The sizzling pan, the melty cheese, the first slice through layers of saucy tortillas—there’s a simple joy in every step. Whether you keep them classic or customize with your favorite add-ins, these Easy Cheesy Ground Beef Enchiladas are a warm, reliable dish you can share with the people you love. Cook once, gather everyone, and enjoy every cheesy, saucy bite. And if you’ve got leftovers, consider it tomorrow’s gift to yourself.