Apple Pie Toast: Easy Recipe, Cozy Cinnamon Breakfast Treats
If you’ve ever wished you could eat apple pie for breakfast without turning on the oven, Apple Pie Toast is your answer. Imagine buttery cinnamon apples spooned over golden toast, finished with a touch of vanilla and a whisper of lemon to brighten every bite. It’s cozy, familiar, and ready in minutes—no rolling pins or pie tins required. This recipe gives you the same nostalgic comfort of a classic dessert, but in a quick, weekday-friendly format. Expect warm spices, tender apples, and just the right balance of sweetness and texture that makes each slice disappear faster than you’d think.
What Makes This Apple Pie Toast Irresistible
Apple Pie Toast brings together the best parts of a homemade pie—caramelized fruit, fragrant cinnamon, and a buttery finish—without the fuss. It’s easy enough for a relaxed morning, yet special enough to serve to guests alongside coffee. The topping cooks in a single pan, so cleanup is simple. Most importantly, you can adapt it to your tastes: use the bread you love, adjust the sweetness, or add a creamy swirl of yogurt or a crunchy sprinkle of nuts. It’s a fast, flexible treat that feels like a hug in food form.
What You’ll Need on the Counter
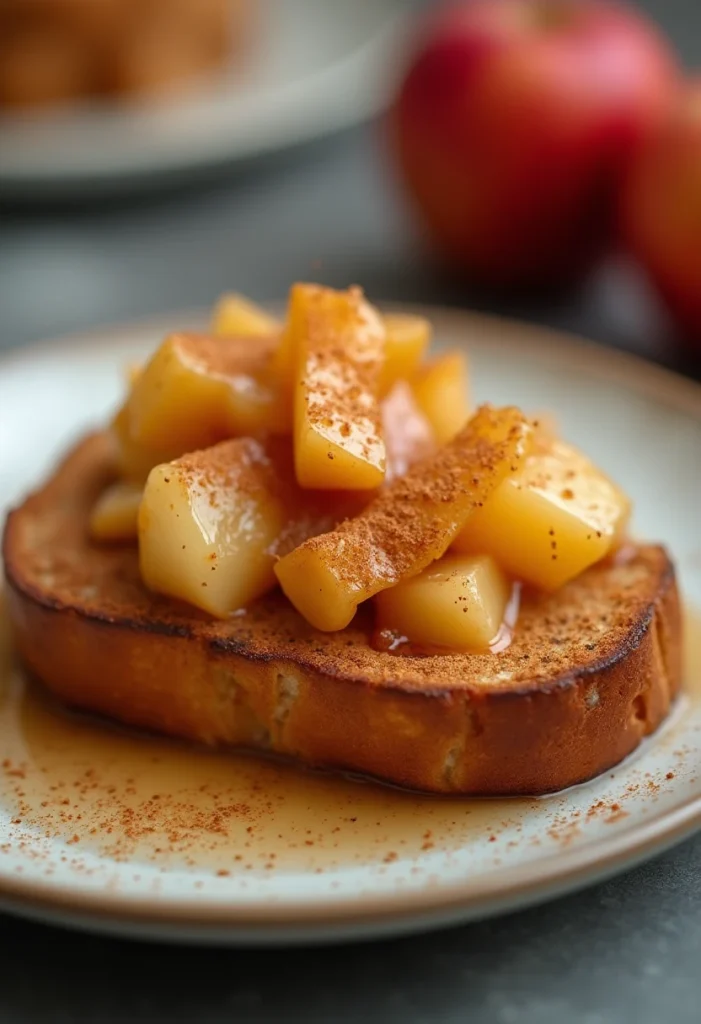
- Good toasting bread (2 thick slices; 80–120 g total) – Sturdy slices like brioche, sourdough, or country-style bread hold up to the warm topping without turning soggy.
- Apples (1 large or 2 small; about 200–250 g) – Choose a firm, tart-sweet variety such as Honeycrisp, Pink Lady, or Granny Smith for flavor that shines and texture that doesn’t collapse.
- Unsalted butter (1.5 tablespoons; 21 g) – Helps the apples caramelize and adds that “pie-like” richness.
- Brown sugar (1.5 tablespoons; 18 g) – Provides gentle sweetness and a hint of molasses depth; you can substitute granulated sugar if needed.
- Ground cinnamon (1 teaspoon) – The warm spice that defines classic apple pie flavor.
- Pure vanilla extract (1/2 teaspoon) – Rounds out the sweetness and brings a bakery-style aroma.
- Fresh lemon juice (1 teaspoon) – Brightens the apples and balances the sugar so the topping doesn’t taste flat.
- Pinch of fine salt – Enhances all the flavors and keeps the sweetness in check.
- Water (1–2 tablespoons), as needed – Helps loosen the pan juices if the apples look dry before they soften.
- Optional richness: Cream cheese or Greek yogurt (2–3 tablespoons) – A creamy layer under the apples adds tang and contrast; Greek yogurt is a lighter, protein-rich option.
- Optional crunch: Chopped toasted nuts (1–2 tablespoons) – Pecans or walnuts bring texture and a toasty note.
- Optional finishing touch: Maple syrup or honey (to taste) – Drizzle for extra gloss and sweetness, especially if your apples are very tart.
How to Make It, One Easy Step at a Time
- Prep the apples: Peel if you prefer (skins can stay on for color and fiber), core, and slice into thin wedges or small cubes for faster cooking.
- Heat the pan: Set a medium skillet over medium heat and add the butter. When it melts and foams, swirl to coat the pan.
- Start the caramelization: Add the apples, brown sugar, cinnamon, and a pinch of salt. Stir to coat. If the pan looks dry, add 1 tablespoon of water.
- Cook until tender: Sauté for 5–7 minutes, stirring occasionally, until the apples soften and the juices turn glossy and syrupy. If needed, add a splash more water to prevent scorching.
- Finish with aroma: Turn the heat to low. Stir in the vanilla and lemon juice. Taste and adjust sweetness or lemon to your liking.
- Toast the bread: While the apples finish, toast your bread to a deep golden crunch. If using cream cheese, let the bread cool 30 seconds so it spreads easily.
- Layer it up: Spread cream cheese or Greek yogurt on the toast if using. Spoon the warm apple mixture generously over the top, letting the syrup soak slightly into the bread.
- Add texture: Sprinkle with chopped toasted nuts, if you like, for a satisfying crunch.
- Optional drizzle: Finish with a thin ribbon of maple syrup or honey for an extra sheen and sweetness.
- Serve right away: Apple Pie Toast is best enjoyed warm, when the bread is crisp and the apples are silky.
Timing and Prep at a Glance
This recipe moves quickly once you start. Plan on about 15 minutes from start to finish.
- Prep time: 5 minutes (slice apples, gather ingredients).
- Cook time: 6–8 minutes (apples), 2–3 minutes (toasting bread).
- Total time: Approximately 15 minutes.
- Servings: 2 generous toasts (easily doubled for more).
When is it ready? The apples should be tender but not mushy, with a lightly syrupy sauce clinging to them. The toast should be crisp enough to hold the topping without bending. If you like a slightly thicker sauce, let the apples simmer a minute or two longer to reduce.
Pro Tips for Toast That Tastes Like Pie
- Choose the right apple. A mix of tart and sweet apples makes the flavor more layered. If you have two varieties, use half of each.
- Mind the heat. Medium heat is your friend—too hot and the sugar may scorch before the apples soften; too low and they’ll steam rather than caramelize.
- Don’t skip the salt. A tiny pinch amplifies the cinnamon and sweetness, preventing the topping from tasting one-note.
- Adjust sweetness at the end. Apples vary. Taste the cooked topping and add a touch more sugar or maple syrup only if needed.
- Keep the toast sturdy. Thick slices of sourdough or brioche hold up best to the juicy topping. Lightly buttering the toast creates a barrier for even more crunch.
- Make it ahead-friendly. Cook the apples up to 3 days in advance and refrigerate. Reheat gently in a skillet or microwave before assembling.
- Level up the spice. Add a pinch of nutmeg, cardamom, or allspice for a more complex, bakery-style flavor.
- Go dairy-free. Swap butter for coconut oil and use a plant-based yogurt or skip the creamy layer altogether.
- Try an air fryer finish. After topping the toast, air-fry at 350°F (175°C) for 2–3 minutes for extra-crisp edges and lightly caramelized apples on top.
Nutrition at a Glance
Nutrition will vary based on your bread, sugar adjustments, and optional toppings. The estimate below is for one serving (one topped slice) made with sturdy bread, butter, brown sugar, and no nuts or cream.
| Per Serving | Amount (Approx.) |
|---|---|
| Calories | 280 kcal |
| Protein | 5 g |
| Total Carbohydrates | 44 g |
| Dietary Fiber | 4 g |
| Total Sugars | 19 g |
| Total Fat | 10 g |
| Saturated Fat | 6 g |
| Sodium | 210 mg |
Make it lighter: Use whole-grain bread, reduce the sugar to 1 tablespoon, and swap butter for 1 tablespoon of coconut oil or 1 teaspoon butter plus a splash of water. Boost protein: Add a layer of Greek yogurt or a dollop of cottage cheese under the apples.
Your Questions, Answered
Which apples work best for Apple Pie Toast?
Firm, flavorful apples like Honeycrisp, Pink Lady, or Granny Smith hold their shape and deliver a bright, balanced taste. Mixing two varieties gives the topping more complexity.
Can I make this without refined sugar?
Yes. Replace the brown sugar with 1–2 tablespoons of maple syrup or honey. Start with less, taste, and adjust at the end. You may need slightly less butter or a tiny splash of water to keep the sauce from reducing too quickly.
How do I store and reheat leftovers?
Store the apple topping separately in an airtight container for up to 3 days. Reheat gently in a skillet over low heat or in the microwave until warm. Toast fresh bread just before serving for the best texture.
A Sweet Note to Finish
Apple Pie Toast is the kind of simple pleasure that turns any morning—or afternoon snack—into a small celebration. It’s quick enough for busy days, yet cozy enough to bring everyone to the table for a shared treat. With just a few pantry staples and one pan, you can create something warm, fragrant, and deeply satisfying. Try it once, and you’ll likely find yourself making it again and again, experimenting with toppings and spices to make it your own. May each slice bring you comfort, a bit of creativity, and a moment of calm to savor.