No-Knead Roasted Garlic Rosemary Bread Recipe | Crispy Crust
If the smell of warm bread makes you feel instantly at home, this No-Knead Roasted Garlic Rosemary Bread is about to become your new favorite ritual. It’s everything you want in a loaf: a crisp, golden crust that crackles when you slice it, a tender, airy interior, and a rich, savory perfume of sweet roasted garlic and piney rosemary. Even better, it’s downright simple—no kneading, no special skills, just time and a bit of gentle handling. You’ll mix a shaggy dough, let it rest, shape it briefly, and slide it into a hot pot. The oven takes care of the rest.
Here’s what you can expect: a bakery-style loaf with minimal effort, a recipe that fits easily into your day, and a deeply satisfying payoff. Whether you’re serving it alongside soup, making the world’s best grilled cheese, or tearing off chunks to dip in olive oil, this bread is rustic comfort at its finest.
- Reasons You’ll Fall for This No-Knead Roasted Garlic Rosemary Loaf
- What You’ll Need: Ingredients for No-Knead Roasted Garlic Rosemary Bread
- From Dough to Golden Crust: Step-by-Step Guide
- Timing & Prep: What to Expect From Start to Finish
- Pro Tips to Make Your Loaf Shine
- Nutritional Snapshot (Per Slice, About 1/12 of the Loaf)
- Your Questions, Answered
- A Warm Send-Off: Final Thoughts
Reasons You’ll Fall for This No-Knead Roasted Garlic Rosemary Loaf
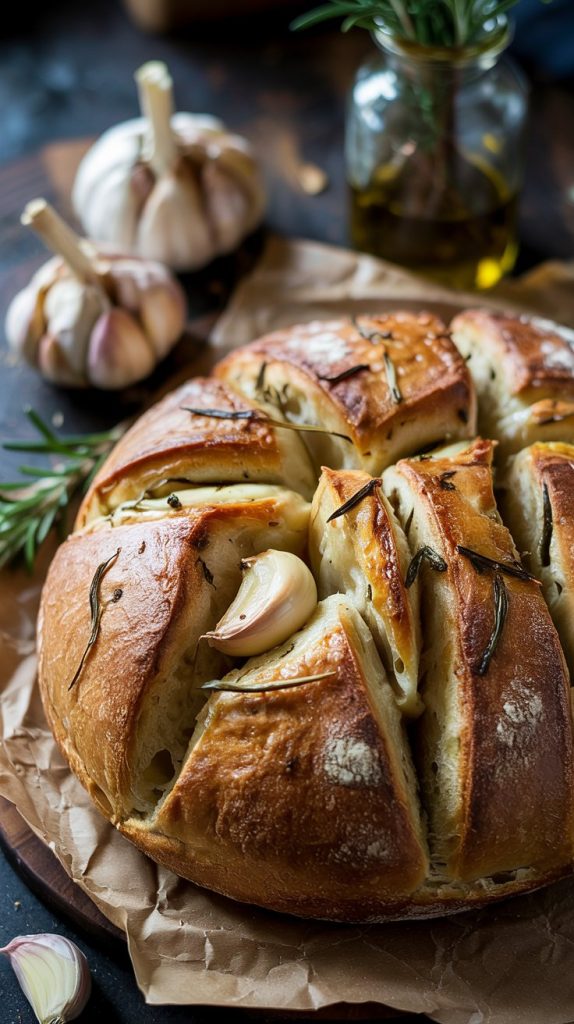
There’s a magical moment when you lift the lid off a hot Dutch oven and see your bread fully risen, caramelized, and singing as it cools. That’s the joy of this recipe. It’s special because the technique leverages time, not muscle, to build flavor and structure. Roasted garlic lends a mellow, buttery sweetness rather than sharpness, while rosemary perfumes every bite. The result is a loaf that looks and tastes artisan, yet the process is relaxed and approachable. If you can stir, you can make this bread.
What You’ll Need: Ingredients for No-Knead Roasted Garlic Rosemary Bread
- Bread flour – 3 cups (360 g): Provides extra protein for a chewier crumb and better structure. You can substitute all-purpose flour for a slightly softer interior.
- Warm water – 1 1/2 cups (360 ml), about 95–105°F (35–40°C): Hydrates the dough and helps the yeast wake up. Warm (not hot) water speeds fermentation.
- Instant or active dry yeast – choose one:
- Overnight method: 1/4 teaspoon instant yeast (slow rise, best flavor)
- Same-day method: 3/4 teaspoon instant yeast (faster, still delicious)
Yeast is the lift and the flavor builder. Less yeast = longer, more complex rise.
- Kosher salt – 1 1/2 teaspoons: Enhances flavor and strengthens gluten. If using fine table salt, use a little less (about 1 1/4 teaspoons).
- Fresh rosemary – 2 tablespoons, finely chopped: Earthy, aromatic balance to the sweet garlic. Dried rosemary works in a pinch; use 2 teaspoons and crush it slightly.
- Garlic – 1 large head: Roasting transforms it into soft, caramelized cloves that melt into the crumb.
- Olive oil – 1–2 teaspoons: For roasting the garlic and adding a hint of richness. Not required in the dough itself.
- Honey or sugar – 1 teaspoon (optional): Gently encourages browning and rounds the flavor.
- Extra flour or cornmeal – for dusting: Helps prevent sticking during shaping and transfer.
- Parchment paper: Makes it easy and safe to lower the dough into a hot Dutch oven.
- Flaky sea salt – a pinch (optional): Sprinkle on top before baking for a delicate, salty finish.
From Dough to Golden Crust: Step-by-Step Guide
- Roast the garlic. Preheat your oven to 400°F (205°C). Slice the very top off the garlic head to expose the cloves. Drizzle with 1–2 teaspoons olive oil and a pinch of salt, wrap tightly in foil, and roast for 35–45 minutes until the cloves are soft, deep golden, and fragrant. Let cool, then squeeze out the cloves and roughly mash. Set aside.
- Mix the dry ingredients. In a large bowl, whisk together the flour, salt, rosemary, and yeast (plus the honey/sugar if using). This ensures even distribution and avoids pockets of salt or yeast.
- Add the water and stir. Pour in the warm water and stir with a wooden spoon or hand until you have a shaggy, sticky dough with no dry streaks. It won’t be smooth—this is perfect. Resist the urge to add extra flour right now.
- Choose your rise:
- Overnight (best flavor): Cover the bowl with plastic wrap or a lid and let it rest at room temperature for 12–18 hours, until doubled and bubbly.
- Same-day (faster): With 3/4 teaspoon yeast, let rest for 3–4 hours in a warm spot until puffed and jiggly.
The surface should be dotted with bubbles and feel alive when you jostle the bowl.
- Prepare your workspace. Lightly flour a clean counter. Gently scrape the dough out using a spatula or dough scraper—it will be sticky.
- Add the roasted garlic. Pat the dough gently into a rough rectangle. Dot the surface with the mashed roasted garlic. Fold the dough like a letter (left over center, right over center), then fold top to bottom. This tucks the garlic inside without mashing it into paste. Handle gently to keep those bubbles intact.
- Shape into a tight round. With floured hands, cup the dough and rotate it, pulling the surface taut against the counter in small circles. This creates tension for a good rise. Place the seam side down on a sheet of parchment.
- Second rise (proof). Dust the top lightly with flour and cover with a towel. Let rest 30–60 minutes. If the dough relaxes and spreads slightly, that’s fine; it should look puffy and spring back slowly when poked.
- Preheat the oven and pot. While the dough proofs, put a Dutch oven (with lid) in your oven and preheat to 450°F (232°C) for at least 30 minutes. A thoroughly preheated pot is key to a great oven spring and crust.
- Score and bake. Just before baking, sprinkle the dough with a pinch of flaky salt if you like, and use a sharp knife or razor to score a 1/2-inch deep slash across the top. Lift the dough on the parchment and carefully lower it into the hot Dutch oven. Cover and bake 30 minutes.
- Finish uncovered. Remove the lid and bake another 15–20 minutes, until the crust is deep golden-brown and the loaf sounds hollow when tapped. Internal temperature should read about 205–210°F (96–99°C).
- Cool completely. Lift the bread out and cool on a rack for at least 1 hour before slicing. This wait lets the crumb set and prevents gumminess.
- Serve and store. Enjoy warm, or at room temperature with butter, olive oil, or alongside soup. Store leftovers in a paper bag or wrapped in a kitchen towel at room temperature for 1–2 days, or slice and freeze up to 2 months. Refresh in a 350°F (175°C) oven for 10–12 minutes.
Timing & Prep: What to Expect From Start to Finish
Plan for flexibility. If you choose the overnight method, you’ll spend about 20 minutes of hands-on time spread across roasting garlic, stirring the dough, shaping, and baking. The long, hands-off rise (12–18 hours) happens while you get on with your day—or while you sleep. If you’re in a hurry, the same-day version gets you bread in about 4–5 hours total, with a bit more yeast lending speed.
Here’s a sample timeline using the overnight approach:
- Evening, Day 1: Roast garlic (45 minutes). Mix dough (5 minutes). Cover and leave at room temperature overnight.
- Morning/Afternoon, Day 2: Shape and proof (45–60 minutes). Preheat pot (30 minutes). Bake (45–50 minutes). Cool (1 hour). Enjoy!
Your bread is ready to slice when it’s fully cooled and the crust has set. If you can’t resist, at least wait 30 minutes before cutting; the crumb will be slightly more moist but still lovely.
Pro Tips to Make Your Loaf Shine
- Use a kitchen scale if you can. Measuring by weight yields consistent results, especially with sticky, high-hydration doughs.
- Mind the water temperature. Lukewarm water wakes yeast; hot water kills it. Aim for pleasantly warm to the touch.
- Adjust for humidity. If the dough looks dry, add a tablespoon of water at a time. If it’s soupy and unmanageable, add a tablespoon of flour. Slight stickiness is ideal.
- Let the dough tell you when it’s ready. Look for bubbles, a jiggly surface, and a soft, airy feel. Time is a guide; signs are the truth.
- Don’t overwork the garlic. Folding it in during shaping helps keep little pockets of flavor without turning the loaf gray from overmixing.
- Get that pot blazing hot. The preheated Dutch oven traps steam, which is essential for a lofty rise and glossy crust.
- Score with confidence. A decisive 1/2-inch slash directs expansion and prevents random blowouts. A razor blade or bread lame works best.
- No Dutch oven? Bake on a preheated sheet or stone; place a metal pan on the lower rack and add 1 cup hot water at the start for steam. You can also invert a metal bowl over the loaf for the first 20 minutes to trap moisture.
- Flavor twists. Swap rosemary for thyme, or add lemon zest, black pepper, or a handful of grated Parmesan. Olives or sun-dried tomatoes are lovely—fold into the dough during shaping so they don’t weigh it down early.
- Don’t slice too soon. As the bread cools, steam redistributes, finishing the baking process inside. Cutting early compresses the crumb.
Nutritional Snapshot (Per Slice, About 1/12 of the Loaf)
These numbers are approximate and will vary based on exact ingredients and slice size, but here’s a helpful estimate:
- Calories: ~120
- Protein: ~4 g
- Total Carbohydrates: ~24 g
- Dietary Fiber: ~1 g
- Total Fat: ~1.5 g
- Saturated Fat: ~0 g
- Sodium: ~230 mg
- Sugars: ~1 g
This loaf is naturally dairy-free and vegan as written (the small amount of honey is optional; swap with sugar or omit if preferred).
Your Questions, Answered
Can I use all-purpose flour instead of bread flour?
Yes. All-purpose flour works well and yields a slightly more tender crumb. Use the same weight (360 g) or the same volume (3 cups), and expect the dough to be just a touch stickier; dust your hands lightly with flour during shaping if needed.
What if I don’t have a Dutch oven?
You have options. Preheat a heavy baking sheet or pizza stone to 450°F (232°C). Shape the loaf on parchment, slide it onto the hot surface, and create steam by adding 1 cup hot water to a preheated metal pan on the lower rack. Alternatively, cover the loaf with an inverted metal mixing bowl for the first 20 minutes, then remove it to finish browning.
Can I add cheese, olives, or other mix-ins?
Definitely. Fold in up to 1 cup of add-ins during the shaping step (with the roasted garlic). For moist ingredients like olives, pat them dry first. For cheese, grated hard cheeses like Parmesan or shredded Gruyère work beautifully and boost browning.
A Warm Send-Off: Final Thoughts
Bread has a way of bringing people together, and this No-Knead Roasted Garlic Rosemary Bread is a lovely invitation to slow down and savor. It’s the sort of loaf you set in the middle of the table, where hands reach in for a piece, conversation picks up, and the kitchen feels like the heart of the home. With a few simple steps and a little time, you’ll pull a golden, fragrant boule from the oven that looks like it came from a bakery—but it’s yours, and it tastes like comfort.
When you’re ready, make it once just as written. Next time, make it your own—add lemon zest, swap the herbs, or sprinkle with cheese. However you spin it, this bread rewards patience with deep flavor and a stunning crust. Enjoy the process, enjoy the aroma, and enjoy every slice.