No-Knead Ciabatta with a Light and Airy Crumb - Easy Recipe!
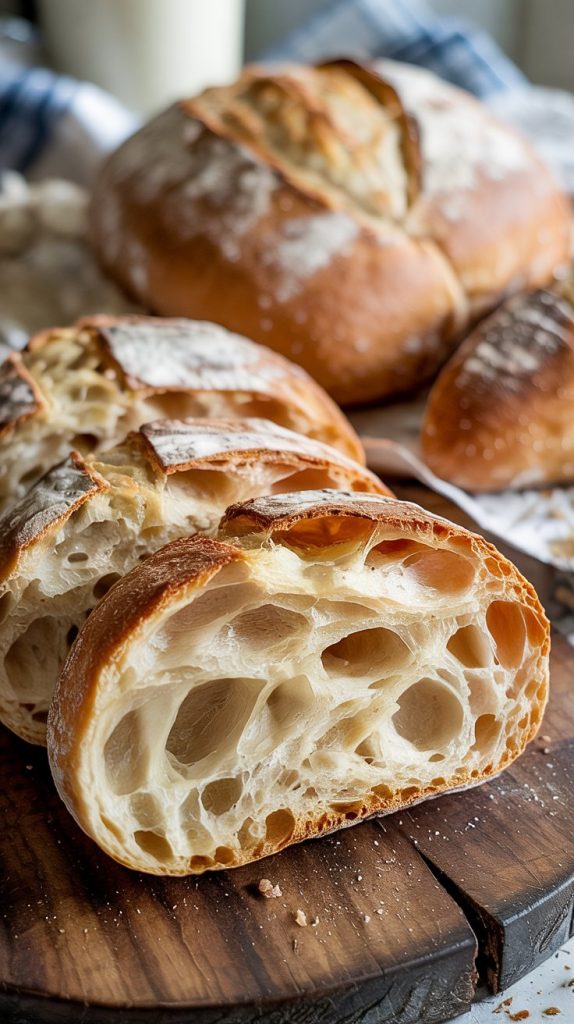
There’s something magical about pulling a rustic loaf of ciabatta from your oven and hearing that gentle crackle as it cools. This no-knead version gives you all the hallmarks of great bakery bread — a thin, crisp crust, a deeply flavored crumb, and those beautiful, irregular air pockets — with hardly any hands-on effort. Expect a dough that does most of the work on its own while you rest, plus a few gentle folds to build structure. It’s the kind of recipe that invites you in, doesn’t stress you out, and rewards you with a loaf that’s perfect for sandwiches, dipping in olive oil, or simply pairing with butter.
- Why You’ll Love This No-Knead Ciabatta with a Light and Airy Crumb
- Ingredients for No-Knead Ciabatta with a Light and Airy Crumb
- Step-by-Step Guide to Making No-Knead Ciabatta with a Light and Airy Crumb
- Timing & Preparation Details
- Tips for Success
- Nutritional Snapshot
- Frequently Asked Questions
- Final Thoughts
Why You’ll Love This No-Knead Ciabatta with a Light and Airy Crumb
This ciabatta is all about simplicity and results. With minimal mixing and zero kneading, you’ll get a dough that transforms into a light, open crumb and crackling crust. Long, slow fermentation does the heavy lifting, developing deep flavor and that irresistible aroma you’d expect from a bakery. The dough is high-hydration (which sounds technical, but simply means wetter than average), creating those sought-after holes. If you’ve ever wanted artisan bread without the fuss, this is the one to bake. No fancy equipment is required — just a bowl, a scraper, and your oven.
Ingredients for No-Knead Ciabatta with a Light and Airy Crumb
- Bread flour (500 g) – Higher protein helps build strength for an open, airy crumb.
- Water, cool (400–420 g) – High hydration (80–84%) encourages large holes and a moist interior.
- Instant yeast (1/4 teaspoon) – A tiny amount supports a long, slow rise and rich flavor.
- Fine sea salt (10 g) – Balances flavor and moderates yeast activity for even fermentation.
- Olive oil (1 tablespoon) – Adds subtle tenderness and a fragrant, Mediterranean note.
- Honey or sugar (1 teaspoon, optional) – Gently boosts yeast activity and browning.
- Rice flour or semolina (for dusting) – Prevents sticking; rice flour stays drier than wheat flour.
- Additional bread flour (for shaping) – A light dusting keeps the soft dough manageable.
- Parchment paper – Makes moving delicate dough to the oven much easier.
Step-by-Step Guide to Making No-Knead Ciabatta with a Light and Airy Crumb
- Combine the dough.In a large bowl, whisk the bread flour, instant yeast, and salt. Add the water, olive oil, and honey (if using). Mix with a sturdy spoon or your hand until no dry patches remain. The dough will be sticky and shaggy — that’s exactly right.
- Rest briefly, then fold.Cover the bowl and let the dough rest for 15 minutes. With damp hands, perform a set of stretch-and-folds: grab one edge, stretch it up, fold it over the center; rotate the bowl and repeat 4–6 times. This builds strength without kneading.
- Repeat folds for structure.Let the dough rest 20–30 minutes and repeat the stretch-and-fold set. Do this 2–3 times total over 60–90 minutes. You’ll notice the dough becoming smoother and bouncier.
- Long, slow fermentation.Cover tightly and let the dough rise at cool room temperature (68–72°F / 20–22°C) until very puffy, bubbly, and roughly doubled, 8–12 hours. Nighttime is perfect: mix in the evening, bake the next day. For extra flavor, refrigerate the dough after the first 2 hours of room-temp rest and fold, then let it cold-ferment 12–24 hours. Bring to room temperature before shaping.
- Prepare the baking setup.Place a baking stone or inverted heavy baking sheet on the middle rack and a metal pan on a lower rack for steam. Preheat the oven to 475°F (246°C) for at least 45 minutes. This thorough preheat builds strong oven spring.
- Flour the surface generously.Dust a work surface with a 50/50 mix of bread flour and rice flour. Gently scrape the dough out of the bowl with a wet or lightly oiled spatula. Try not to deflate those precious bubbles.
- Light pre-shape.With floured hands, coax the dough into a loose rectangle. Give it a soft letter-fold (right third over center, left third over center) to gather strength. Let it rest 15–20 minutes, seam side down, covered with a clean towel.
- Divide and shape “slippers.”Cut the dough into two equal rectangles. Gently stretch each piece into a long, narrow slab — about 10–12 inches — keeping the surface full of bubbles. Transfer to a parchment sheet dusted with rice flour. Create “rails” by folding the parchment up between the loaves so they don’t spread too wide.
- Final proof.Cover loosely with a towel and proof at room temperature until puffy, 35–60 minutes. You’ll see small bubbles on the surface and feel a light, jiggly texture when you nudge the dough. A fingertip gently pressed into the edge should spring back slowly.
- Steam and bake.Slide the parchment with the loaves onto the preheated stone or sheet. Quickly pour a cup of hot water into the steam pan and close the oven. Bake 10 minutes with steam, then vent the steam by briefly opening the door and reduce to 450°F (232°C). Continue baking 10–15 minutes until the crust is a deep golden-brown and the loaves sound hollow when tapped. Internal temperature should read 205–210°F (96–99°C).
- Cool for best texture.Transfer to a rack and let cool at least 45 minutes before slicing. Patience is key — the crumb finishes setting as it cools, which helps you get those glossy holes and avoids gumminess.
- Serve and enjoy.Slice horizontally for sandwiches, tear into chunks for dipping in olive oil and balsamic, or toast lightly and top with tomatoes, basil, and a drizzle of oil. The crust will sing as it cools — a sign you did it right.
Timing & Preparation Details
This bread thrives on time more than effort. Here’s a friendly roadmap so you know what to expect.
| Active mixing and folds | 20–25 minutes total (spread over 1–1.5 hours) |
| Bulk fermentation (room temp) | 8–12 hours, until doubled and bubbly |
| Optional cold ferment | 12–24 hours in the refrigerator (for deeper flavor) |
| Final proof | 35–60 minutes, until puffy and jiggly |
| Bake time | 20–25 minutes |
| Cooling | 45–60 minutes before slicing |
When is it ready to enjoy? As soon as the loaves are fully cooled and the crumb has set, you’ll get the cleanest slices and the most satisfying texture. If you’re impatient (it happens!), tear off an end and listen to that crisp crust crackle.
Tips for Success
- Weigh your ingredients. Precision matters with high-hydration doughs. A digital scale makes results consistent and stress-free.
- Keep your hands damp, not floured, when folding. Wet hands glide over sticky dough without tearing the gluten structure.
- Don’t be tempted to add extra flour. The dough should feel loose. Extra flour tightens the crumb and reduces those lovely holes.
- Temperature guides fermentation. Cooler rooms slow the rise; warmer rooms speed it up. Aim for 68–72°F (20–22°C) during bulk fermentation for steady development.
- Use rice flour for dusting. It resists absorbing moisture, keeping the surface dry and helping you shape without sticking.
- Steam equals oven spring. If you don’t have a steam pan, place ice cubes on a preheated metal tray or spritz the oven walls (avoid the lightbulb and glass door). Work quickly to keep heat in.
- Stone, steel, or inverted sheet — all work. A stone or steel stores more heat for better spring, but a heavy, preheated baking sheet also makes excellent ciabatta.
- Watch the dough, not the clock. Look for visual cues: a bubbly surface, a jiggly feel, and gentle spring-back on the poke test.
- Let it cool fully. This is the difference between a slightly gummy interior and a beautifully set, glossy crumb.
- For even bigger holes: Extend the cold ferment to 24 hours and be extra gentle when shaping to preserve gas pockets.
Nutritional Snapshot
Approximate values per serving, assuming 10 servings from two medium loaves. Values vary by flour brand and exact hydration.
| Calories | ~200 kcal |
| Protein | ~6 g |
| Carbohydrates | ~39 g |
| Total Fat | ~2 g |
| Fiber | ~1.5 g |
| Sodium | ~350–450 mg |
Note: Omitting the olive oil reduces fat slightly; adding more oil for finishing increases it. For lower sodium, decrease the salt, but keep at least 6–7 g for proper dough behavior.
Frequently Asked Questions
Can I use all-purpose flour instead of bread flour?
Yes. All-purpose flour works, though your dough will be a touch softer and slightly less structured. To compensate, reduce the water by about 10–15 g, and be gentle during shaping. You’ll still get excellent bread with a light, open crumb.
Do I need a stand mixer or special equipment?
No. This is truly no-knead. A bowl, spoon, and your hands are enough. A bench scraper helps with handling sticky dough, and parchment paper makes transferring loaves easy. A stone or steel improves oven spring, but a preheated baking sheet also works well.
How should I store and refresh ciabatta?
Keep the loaf at room temperature in a paper bag or loosely wrapped in a towel for up to 2 days to preserve the crust. For longer storage, slice and freeze in a sealed bag for up to 2 months. To refresh, bake at 350°F (177°C) for 8–10 minutes (or toast slices) until the crust is crisp again.
Final Thoughts
Baking ciabatta at home is one of those small joys that feel big — minimal effort, comforting aromas, and a loaf that looks and tastes like it came from a beloved neighborhood bakery. With a few folds, plenty of rest, and a hot oven, you’ll coax incredible character from simple ingredients. Most importantly, this bread is made to be shared: torn at the table beside a bowl of olive oil, layered into sandwiches, or served with soup on a cozy evening. Enjoy the process, celebrate the crackle, and let this no-knead ciabatta bring a warm, delicious moment to your kitchen.