Healthy Banana Bread Gluten Free | Easy Moist Recipe How-To!
There’s something undeniably comforting about a warm slice of banana bread. This version keeps all the cozy, familiar goodness you love while leaning into ingredients that feel good in your body: whole-food sweetness, hearty flours, and no gluten in sight. It’s tender and moist, lightly sweet, and pleasantly aromatic with cinnamon and vanilla. Most importantly, it’s simple and dependable — the kind of loaf you can bake on a quiet afternoon and enjoy all week.
If you’re new to gluten-free baking, consider this recipe a friendly introduction. You’ll use a blend of almond and oat flours for a soft, sliceable crumb that holds together beautifully, plus a touch of tapioca for bounce. I’ll walk you through every step, share helpful tips, and offer substitutions so you can make this loaf your own. Expect a forgiving batter, a kitchen that smells amazing, and a loaf that tastes like a warm hug.
- What Makes This Gluten-Free Banana Bread So Lovable
- What You’ll Need: Ingredients & How Each One Helps
- How to Make It: A Clear, Friendly Walkthrough
- Timing & Preparation Details to Plan Your Bake
- Helpful Tips to Guarantee Great Results
- Nutritional Snapshot per Slice (Approximate)
- Questions Bakers Often Ask
- A Warm Send-Off: Enjoy Every Slice
What Makes This Gluten-Free Banana Bread So Lovable
Healthy doesn’t have to mean dry or dull. This gluten-free banana bread balances nourishment with flavor and texture you’ll truly crave. It’s naturally sweetened with ripe bananas and a drizzle of maple syrup, and it bakes up soft and tender with a golden top. Thanks to a smart mix of almond and oat flours, you get gentle structure and lovely moisture — no crumbly slices here. It’s versatile, too: add nuts for crunch, chocolate for indulgence, or keep it plain and classic. Best of all, the batter is quick to stir together, and the loaf keeps well for days.
What You’ll Need: Ingredients & How Each One Helps
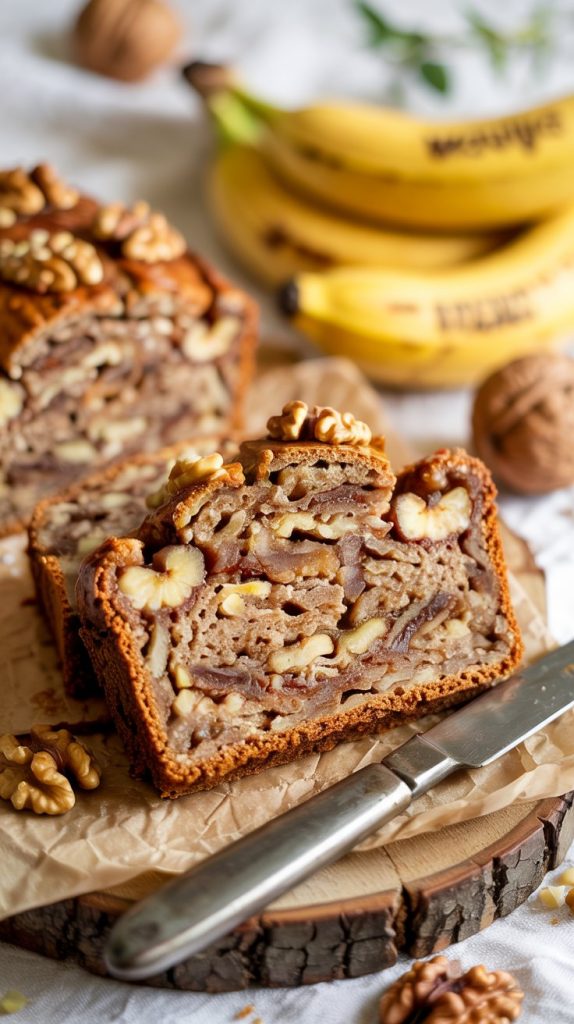
- 3 very ripe bananas (about 1 1/3 cups mashed; 320–350 g) — The star of the show. They add natural sweetness, moisture, and classic banana aroma. The riper (speckled/brown) the better.
- 2 large eggs — Provide structure, stability, and lift for a sliceable crumb.
- 1/2 cup (120 g) plain Greek yogurt or dairy-free yogurt — Keeps the loaf tender and moist while adding a bit of protein. Yogurt also balances sweetness.
- 1/4 cup (60 ml) pure maple syrup — Light, natural sweetness and gentle caramel notes. Honey works, too.
- 3 tablespoons (42 g) melted coconut oil or light olive oil — Adds richness and keeps the bread soft for days.
- 2 teaspoons vanilla extract — Warm, aromatic flavor that complements banana and cinnamon.
- 1 1/2 cups (145–150 g) almond flour — Creates a plush, tender crumb with a nutritious boost of healthy fats and protein.
- 1 cup (100 g) certified gluten-free oat flour — Adds structure and gentle chew; brings fiber and a wholesome taste. Certified GF oats ensure the loaf is gluten-free.
- 2 tablespoons (16 g) tapioca starch — A small but mighty binder that lightens the texture for a better rise. Arrowroot or cornstarch can stand in.
- 2 tablespoons (14 g) ground flaxseed — Adds fiber, a mild nutty taste, and extra binding power.
- 1 1/2 teaspoons baking powder — Helps the loaf rise for a light, tender interior.
- 1/2 teaspoon baking soda — Reacts with the acidic yogurt and bananas to lift the batter.
- 1 teaspoon ground cinnamon — Warm spice that makes the banana flavor feel cozy and rounded.
- 1/2 teaspoon fine sea salt — Balances sweetness and sharpens flavor.
- Optional mix-ins (choose up to 3/4 cup total): chopped walnuts or pecans for crunch, gluten-free dark chocolate chips for a treat, or blueberries for a juicy burst. Mix-ins make the loaf your own.
How to Make It: A Clear, Friendly Walkthrough
- Preheat and prep. Heat your oven to 350°F (175°C). Grease a 9×5-inch (or 8.5×4.5-inch) loaf pan and line it with a parchment sling for easy removal. Tip: Leave some parchment overhang so you can lift the loaf right out.
- Mash the bananas. In a large mixing bowl, mash the ripe bananas until mostly smooth with just a few small lumps. You should have about 1 1/3 cups mashed banana. This consistency helps the batter combine evenly.
- Whisk the wet ingredients. Add eggs, yogurt, maple syrup, melted oil, and vanilla to the bowl. Whisk until well combined and glossy. Make sure the oil isn’t hot or it can scramble the eggs.
- Combine dry ingredients. In a separate bowl, whisk together almond flour, oat flour, tapioca starch, ground flaxseed, baking powder, baking soda, cinnamon, and salt until no clumps remain. This even distribution ensures a uniform rise.
- Bring it all together. Add the dry mixture to the wet and stir with a spatula until just combined. The batter will be thick but spreadable. Avoid overmixing to keep the crumb tender.
- Fold in your favorites. If using nuts, chocolate chips, or blueberries, gently fold them in now. Keep total mix-ins to about 3/4 cup so the loaf bakes evenly.
- Pan and smooth. Scrape the batter into the prepared loaf pan. Smooth the top with a spatula, and if you like, sprinkle a few extra nuts or chocolate chips over the surface.
- Bake. Place on the middle rack and bake for 50–60 minutes. The top should be deeply golden and a toothpick inserted in the center should come out with a few moist crumbs, not wet batter. If the top browns too fast, tent loosely with foil around the 40-minute mark.
- Check doneness with confidence. For the most reliable read, use an instant-read thermometer. The center should register about 200–205°F (93–96°C). This prevents gummy centers and underbaking.
- Cool patiently. Let the loaf rest in the pan for 10–15 minutes, then lift it onto a wire rack to cool completely, at least 60 minutes. Resist slicing early — it sets the crumb and keeps slices neat.
- Slice and enjoy. Use a serrated knife for clean slices. Serve warm or at room temperature, plain or with a thin swipe of nut butter or yogurt.
- Store for freshness. Once fully cool, wrap tightly and keep at room temperature for up to 3 days, or refrigerate up to 1 week. Freeze slices (well-wrapped) for up to 3 months.
Timing & Preparation Details to Plan Your Bake
| Prep Time | 15 minutes |
| Bake Time | 50–60 minutes |
| Cooling Time | 60 minutes (minimum) |
| Total Time | About 2 hours, mostly hands-off |
| Yield | 1 loaf (about 12 slices) |
| When it’s ready | Once the center reaches 200–205°F and the loaf cools for at least 1 hour; flavor deepens by the next day. |
Good to know: If you used many juicy mix-ins (like blueberries), the loaf may need an extra 5–10 minutes in the oven. Tent with foil to protect the top if needed.
Helpful Tips to Guarantee Great Results
- Use very ripe bananas. The browner the better. Speckled bananas are sweeter and mash more easily, lending moisture and flavor.
- Measure flours accurately. If you have a kitchen scale, use it. Otherwise, fluff, spoon, and level your flours to avoid a dense loaf.
- Mind the mix-ins. Keep to about 3/4 cup total so the loaf bakes evenly. If adding chocolate, choose gluten-free chips.
- Don’t overmix. Stir just until the dry ingredients disappear. Overmixing can toughen the crumb and reduce rise.
- Watch the bake color. If the top is browning quickly, loosely tent with foil for the last 10–15 minutes to prevent overbrowning.
- Check temperature. An internal temp of 200–205°F in the center is a reliable signal that your loaf is set.
- Cool completely before slicing. This is the secret to neat, bakery-style slices and a perfect texture.
- Make it yours. For extra spice, add nutmeg or cardamom. For texture, top with a sprinkle of oats or chopped nuts before baking.
- Allergy-friendly swaps. Nut-free? Replace almond flour with 3/4 cup additional oat flour plus 1/2 cup gluten-free all-purpose blend and 1 more tablespoon tapioca. Egg-free? Use 2 flax “eggs” (2 tbsp ground flax + 6 tbsp warm water, rest 10 minutes) and add 1 extra tablespoon oil.
Nutritional Snapshot per Slice (Approximate)
These values are estimates based on 12 slices and the base recipe without mix-ins:
- Calories: ~200–210
- Protein: ~6 g
- Carbohydrates: ~21–23 g
- Dietary Fiber: ~3–4 g
- Total Fat: ~10–12 g
- Saturated Fat: ~5–6 g
- Sugars: ~11–13 g (from bananas and maple syrup)
- Sodium: ~120–170 mg
Nutrition will vary based on brands, yogurt type, and optional add-ins. Using nuts or chocolate will increase calories and fat; dairy-free yogurt may slightly adjust protein and fat.
Questions Bakers Often Ask
Can I make this banana bread vegan?
Yes. Replace the eggs with 2 flax eggs (2 tablespoons ground flaxseed + 6 tablespoons warm water; rest 10 minutes to gel) and use dairy-free yogurt. Bake times may extend by 5–10 minutes; use the toothpick or temperature test to be sure it’s done.
How do I keep my banana bread from turning out gummy?
Use accurate measurements, avoid overmixing, and bake until the center reaches 200–205°F. Very moist mix-ins or underbaking often cause gumminess, so tent with foil if the top darkens before the center sets, and give it a few more minutes.
Can I freeze the loaf?
Absolutely. Let it cool completely, then wrap the loaf or individual slices tightly and freeze for up to 3 months. Thaw at room temperature or rewarm gently in a low oven or toaster.
A Warm Send-Off: Enjoy Every Slice
There’s a special joy in baking something simple that feels both nourishing and celebratory. This Healthy Banana Bread, gluten-free and full of comfort, brings that feeling to your kitchen. It’s the kind of recipe you can return to again and again, swapping in your favorite add-ins and sharing slices with people you love. Take your time, breathe in the aroma as it bakes, and enjoy the small, grounding ritual of slicing into a loaf you made yourself. May each bite remind you that wholesome and delicious can be one and the same — and that a cozy, homemade treat is always worth the few extra minutes in the kitchen.