No Bake Chocolate Cheesecake: Easy, Creamy Recipe & Tips
There’s something wildly satisfying about bringing a rich, silky dessert to the table with almost no fuss. This No Bake Chocolate Cheesecake is exactly that kind of treat: impressive to look at, decadent to eat, and surprisingly easy to make. No oven, no water baths, no cracking tops—just a smooth, deeply chocolatey cheesecake that sets up beautifully in the fridge and slices like a dream.
In this guide, I’ll walk you through each step with friendly, practical tips, so you can relax and enjoy the process. Expect a tender, chocolate-cookie crust, a velvety chocolate filling with just the right balance of sweetness and tang, and a finish that begs for fresh berries or a sprinkle of flaky salt. If you’ve ever wanted a show-stopping dessert that you can make ahead and serve with pride, this is it.
- What Makes This No-Bake Chocolate Cheesecake Irresistible
- What You’ll Need: Ingredients for a No-Bake Chocolate Cheesecake
- How to Make It: A Step-by-Step Guide
- Timing & Prep Details to Keep You On Track
- Pro Tips for Consistently Great Results
- Nutritional Snapshot (Per Slice, Approximate)
- Frequently Asked Questions
- Closing Notes: A Sweet Finish
What Makes This No-Bake Chocolate Cheesecake Irresistible
This recipe delivers the full cheesecake experience with none of the oven stress. The crust is buttery and crisp, the filling is lush and creamy, and the chocolate flavor is rich without being overwhelming. It’s sturdy enough to hold a clean slice, but still melts in your mouth. Even better, it’s a perfect make-ahead dessert because it tastes best after a long chill. No egg, no bake, no worry—just a beautifully set, chocolate-forward cheesecake that feels like a celebration.
What You’ll Need: Ingredients for a No-Bake Chocolate Cheesecake
- Chocolate cookie crumbs (2 cups / about 220 g) – Forms the base; chocolate wafers or finely crushed sandwich cookies deepen the cocoa flavor.
- Unsalted butter, melted (6 tbsp / 85 g) – Binds the crumbs so the crust holds together and slices cleanly.
- Fine sea salt (a pinch) – Balances sweetness and makes the chocolate taste fuller.
- Full-fat cream cheese, room temperature (24 oz / 680 g) – The heart of the filling; full-fat gives the creamiest, most stable texture.
- Powdered sugar (3/4 cup / 90 g), sifted – Sweetens gently and dissolves smoothly without grittiness.
- Sour cream or Greek yogurt, room temperature (1/2 cup / 120 g) – Adds a gentle tang that brightens the rich chocolate.
- Pure vanilla extract (1 tsp) – Rounds out flavors and adds warmth.
- Fine sea salt (1/4 tsp) – A tiny extra boost to heighten the chocolate.
- Dark or semisweet chocolate, finely chopped (8 oz / 225 g) – The chocolate backbone; 60–70% cacao works best for balance and set.
- Unsweetened cocoa powder, sifted (1/4 cup / 20 g) – Deepens chocolate flavor and helps thicken the filling.
- Cold heavy whipping cream (1 cup / 240 ml) – Whipped and folded in to create an airy, mousse-like texture.
- Optional: Unflavored powdered gelatin (1 tsp) + cold water (2 tbsp) – For extra-firm slices in warm climates or for travel; not required if chilling thoroughly.
- Optional toppings: Chocolate shavings, fresh berries, or flaky sea salt – For visual flair and a lovely finish.
How to Make It: A Step-by-Step Guide
- Prepare the pan. Line the bottom of a 9-inch (23 cm) springform pan with parchment. Lightly grease the sides if you like for smoother release.
- Make the crust. In a bowl, stir together the chocolate cookie crumbs, melted butter, and pinch of salt until the mixture looks like damp sand. Pour into the pan and press firmly into an even layer using the bottom of a measuring cup. Tip: Take your time to compact the crumbs—this prevents crumbling when slicing.
- Chill the crust. Place the crust in the fridge (or freezer for speed) while you prepare the filling. This helps it set and stay crisp.
- Melt the chocolate. Place the chopped chocolate in a heatproof bowl set over a pot of barely simmering water (or use the microwave in short bursts). Stir until smooth and glossy, then remove from heat and let it cool to lukewarm. Cool chocolate is key so it doesn’t seize when mixed with the dairy.
- Whip the cream. In a cold bowl, whip the heavy cream to soft-medium peaks. You want structure, not stiffness, so it folds nicely. Refrigerate the whipped cream while you continue.
- Beat the cream cheese. In a separate large bowl, beat the room-temperature cream cheese until completely smooth, scraping down the sides. Add the powdered sugar, sour cream or yogurt, vanilla, and 1/4 tsp salt. Beat again until very creamy and no lumps remain. Starting with soft cream cheese is the best way to avoid lumps.
- Blend in the cocoa and chocolate. Sift the cocoa powder over the cream cheese mixture and beat until combined. With the mixer on low, stream in the melted, cooled chocolate and mix until fully incorporated. The filling will thicken and turn silky.
- Optional gelatin step. If you’re using gelatin, sprinkle 1 tsp over 2 tbsp cold water. Let it bloom for 5 minutes, then microwave for 5–10 seconds to liquefy. Stir a spoonful of the chocolate filling into the gelatin, then mix that back into the bowl. This step adds extra insurance for hot days or long transport.
- Fold in the whipped cream. Add the whipped cream in two additions, gently folding with a spatula until no streaks remain. Keep it light to preserve that mousse-like texture.
- Fill the crust. Pour the filling over the chilled crust. Smooth the top with an offset spatula. For a decorative finish, drag the spatula in gentle swirls, or tap the pan on the counter to settle.
- Chill to set. Cover the pan and refrigerate for at least 6–8 hours, preferably overnight, until firm enough to slice cleanly. Patience pays off—an overnight chill gives the best texture.
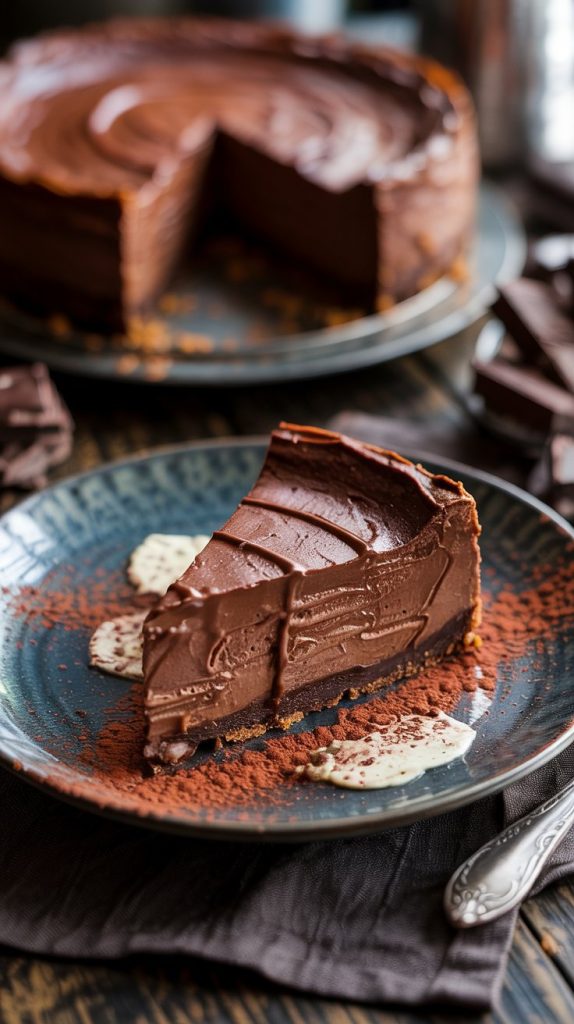
- Unmold and garnish. Run a thin knife around the edge before unclipping the pan. Transfer to a serving platter and finish with chocolate shavings, berries, or a pinch of flaky sea salt for contrast.
- Slice and serve. Use a hot, dry knife (dip in hot water and wipe between cuts) for sharp slices. Enjoy cold, with coffee or fresh fruit.
Timing & Prep Details to Keep You On Track
Active time: About 30–35 minutes. You’ll crush the crust, whip the cream, melt chocolate, and mix the filling.
Chill time: 6–8 hours minimum, ideally overnight. The filling firms as the chocolate sets and the cream stabilizes.
Total time: Around 7–9 hours including chilling.
Yield: 12 modest slices or 10 generous ones.
When is it ready? The cheesecake is set when the center looks firm and doesn’t wobble when you gently nudge the pan. It should feel cool and solid to the touch. If in doubt, give it another hour—extra chill time is always helpful and won’t harm the texture.
Pro Tips for Consistently Great Results
- Use room-temperature dairy. Soft cream cheese and slightly warm chocolate blend smoothly and prevent lumps or graininess.
- Mind your chocolate. Aim for 60–70% cacao for a balanced sweetness and solid set. If you use milk chocolate, reduce the powdered sugar slightly and expect a softer set.
- Whip cream to soft-medium peaks. Overwhipped cream can turn grainy; underwhipped won’t support the filling. Soft-medium peaks fold beautifully.
- Compact the crust well. Press firmly with a flat-bottomed glass or measuring cup, especially at the edges, to avoid crumbling.
- Consider gelatin in warm weather. It’s optional, but very helpful if the cheesecake will sit out on a buffet or travel to a party.
- Smooth slicing trick. Warm your knife in hot water and wipe between slices for pristine edges and fewer crumbs.
- Make ahead. This cheesecake shines when made the day before. The flavors deepen and the texture becomes perfectly sliceable.
- Flavor twists. Add a teaspoon of espresso powder to boost chocolate, swirl in a few tablespoons of warm raspberry jam before chilling, or finish with a simple ganache layer for extra gloss.
- Diet-friendly swaps. Use gluten-free cookies for the crust, swap Greek yogurt for sour cream, or try a sugar substitute designed for baking (expect a slightly different texture).
Nutritional Snapshot (Per Slice, Approximate)
Based on 12 servings and without optional toppings. Values are estimates and will vary with ingredient brands and exact portions.
| Calories | ~560 |
| Protein | ~8 g |
| Total Carbohydrates | ~44 g |
| Total Fat | ~43 g |
| Saturated Fat | ~26 g |
| Fiber | ~3 g |
| Added Sugars | ~30 g |
| Sodium | ~260 mg |
Note: Using milk chocolate or sweetened toppings will increase sugars and calories; using lower-fat dairy will reduce richness and may soften the set.
Frequently Asked Questions
Can I make this without gelatin and still get a firm set?
Yes. The combination of melted chocolate and whipped cream sets well in the fridge on its own. Chill at least 8 hours or overnight for clean slices. Use gelatin only if you need extra insurance in warm conditions or for a long display.
Can I use milk chocolate instead of dark or semisweet?
You can, but reduce the powdered sugar by 2–3 tablespoons and expect a slightly softer texture. Milk chocolate has more sugar and less cocoa solids, so the flavor will be sweeter and lighter.
How do I make it gluten-free?
Swap the crust for gluten-free chocolate cookies and confirm your chocolate and cocoa are certified gluten-free. The filling is naturally gluten-free when using these ingredients.
Closing Notes: A Sweet Finish
There’s a quiet joy in making a dessert that feels luxurious without complicating your life. This No Bake Chocolate Cheesecake delivers exactly that—rich, elegant, and wonderfully shareable. It chills while you go about your day, it slices beautifully when guests arrive, and it invites a moment of celebration at the table. Take a breath, take a bite, and enjoy how something so simple can bring people together. If you try a fun twist—espresso, a swirl of jam, or a ganache top—make it your own and enjoy every forkful.