Creamy Crème Brûlée Cheesecake Recipe | Silky & Easy + Tips!
What can you expect from this recipe? A silky cheesecake with a clean slice, a reliable water bath method that prevents cracks, and a golden glassy topping that you’ll caramelize just before serving. With straightforward directions, helpful tips, and achievable techniques, you’ll get bakery-level results in your own kitchen. Take your time, enjoy the process, and get ready for a dessert that makes any moment feel special.
- Why This Creamy Crème Brûlée Cheesecake Will Win You Over
- Your Ingredient Lineup for Creamy Crème Brûlée Cheesecake
- Step-by-Step Guide to Making Your Creamy Crème Brûlée Cheesecake
- Timing and Preparation Details You’ll Want to Know
- Tips That Make All the Difference
- A Quick Nutritional Snapshot
- Frequently Asked Questions
- Closing Thoughts to Send You Off Confidently
Why This Creamy Crème Brûlée Cheesecake Will Win You Over
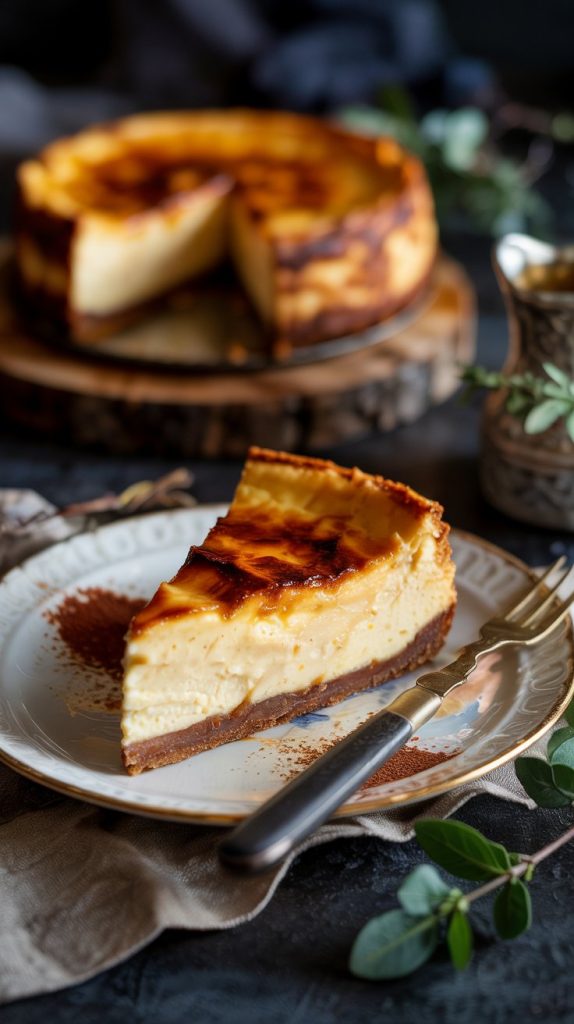
This dessert brings together the best of two beloved classics. The cheesecake base is intentionally plush and custard-forward, like the interior of a traditional crème brûlée, with gorgeous vanilla notes and a gentle tang from sour cream. The caramelized sugar lid adds a textural contrast that’s irresistibly fun to crack with a spoon. The magic is in the balance: a buttery, lightly salty crust; a smooth, stable filling; and a glossy, amber top that perfumes each bite with toasted caramel.
It’s also a showstopper that’s surprisingly practical. You can make it ahead, chill it overnight, and brûlée the top right before serving. The result is a dessert that looks and tastes like it came from a pastry case but fits seamlessly into your home baking routine.
Your Ingredient Lineup for Creamy Crème Brûlée Cheesecake
For the crust
- 1 1/2 cups (about 180 g) graham cracker crumbs — Provides a toasty, slightly sweet base that complements the creamy filling.
- 1/4 cup (50 g) granulated sugar — Sweetens the crust and helps it crisp as it bakes.
- 6 tablespoons (85 g) unsalted butter, melted — Binds the crumbs and adds buttery richness.
- Pinch of fine sea salt — Balances sweetness and enhances flavor.
For the filling
- 32 oz (900 g) full-fat cream cheese, room temperature — The creamy backbone of the cheesecake; room temp ensures a smooth batter.
- 1 cup (200 g) granulated sugar — Sweetens the custard and helps achieve a satiny texture.
- 1/2 cup (120 g) sour cream, room temperature — Adds tang, moisture, and a custard-like consistency.
- 1/2 cup (120 ml) heavy cream, room temperature — Softens the batter and contributes to a velvety mouthfeel.
- 4 large eggs + 2 large egg yolks, room temperature — Eggs set the filling; extra yolks boost richness and silkiness.
- 2 teaspoons vanilla bean paste (or pure vanilla extract) — Infuses deep vanilla flavor reminiscent of classic crème brûlée.
- 1 tablespoon fresh lemon juice — Brightens the flavor and balances sweetness.
- 1/4 teaspoon fine sea salt — Lifts the flavors and tempers the sweetness.
For the brûlée topping
- 1/3 cup (65 g) superfine or granulated sugar — Caramelizes into a glassy, crackly layer; superfine melts a bit more evenly.
Optional garnishes
- Fresh berries — Adds a bright, juicy contrast.
- Lightly sweetened whipped cream — Soft, creamy topping beneath the crunchy sugar lid.
- Mint sprigs — For a fresh, fragrant finish.
Step-by-Step Guide to Making Your Creamy Crème Brûlée Cheesecake
- Preheat and prepare the pan: Heat your oven to 325°F (163°C). Line the bottom of a 9-inch springform pan with parchment and lock the ring. Wrap the outside of the pan with two layers of heavy-duty foil, covering the base and sides to make it leakproof. This is essential for the water bath.
- Make the crust: In a bowl, combine graham crumbs, sugar, salt, and melted butter. Stir until the mixture resembles damp sand and clumps when pressed. Press the crumbs firmly into the bottom of the prepared pan, using the bottom of a measuring cup to compact and level the surface.
- Par-bake the crust: Bake the crust for 10 minutes until lightly set and fragrant. Remove to a rack to cool slightly while you prepare the filling. Keep the oven at 325°F (163°C).
- Beat the cream cheese and sugar: In a large mixing bowl (stand mixer with paddle or hand mixer on low-medium speed), blend the cream cheese and sugar until completely smooth and lump-free, 2–3 minutes. Scrape the bowl and paddle often to prevent streaks.
- Add sour cream and heavy cream: Mix in the sour cream and heavy cream on low speed until silky and homogenous. Avoid whipping in too much air; keeping the speed low helps prevent cracks.
- Incorporate eggs and yolks: Add the eggs and yolks one at a time, blending on low and scraping after each addition. Mix just until combined. The batter should be glossy and pourable, without bubbles.
- Flavor the custard: Stir in the vanilla bean paste (or extract), lemon juice, and salt. Taste a tiny dot for balance—you’re looking for gently sweet, fragrant, and slightly tangy.
- Pour and prepare the water bath: Pour the filling over the par-baked crust. Tap the pan lightly on the counter a few times to coax out air bubbles. Set the foil-wrapped pan in a large roasting pan and place it on the oven rack. Carefully pour hot water into the roasting pan to come halfway up the sides of the springform.
- Bake: Bake at 325°F (163°C) for 60–75 minutes. The edges should look set, and the center should still have a gentle wobble about 2–3 inches across. If the top is browning too quickly, tent loosely with foil.
- Cool gradually: Turn off the oven, crack the door, and let the cheesecake sit in the oven for 45 minutes. This slow cool helps prevent surface cracking by reducing temperature shock.
- Chill completely: Remove the pan from the water bath, unwrap the foil, and run a thin knife around the inside edge of the pan to loosen the cheesecake. Cool to room temperature on a rack, then cover and chill at least 6 hours, preferably overnight, until thoroughly set.
- Release and prep for brûlée: Remove the ring and transfer the cheesecake to a serving plate. If condensation has formed, gently blot the surface with a paper towel; the top must be dry to brûlée evenly.
- Brûlée the sugar (torch method): Sprinkle an even, thin layer of sugar over the chilled cheesecake—aim for a coverage that just hides the custard, about 1–2 teaspoons per slice area. Using a kitchen torch, move the flame in small circles until the sugar melts, bubbles, and turns a deep amber. Allow it to harden for 1–2 minutes. Work in sections for even control.
- Brûlée the sugar (broiler alternative): Place the cheesecake on a chilled, sturdy sheet pan. Sprinkle the sugar as above. Set under a preheated broiler on the top rack and watch constantly. Rotate as needed, removing the cheesecake as soon as the sugar has melted and caramelized. Return it to the fridge for 10–15 minutes to re-firm before slicing.
- Serve and enjoy: Dip a knife in hot water, wipe, and slice cleanly through the crackly top. Serve as is, or garnish with berries and a dollop of softly whipped cream. Enjoy the contrast of the glassy caramel and plush custard in every bite.
Timing and Preparation Details You’ll Want to Know
| Prep time | 25 minutes |
| Crust par-bake | 10 minutes |
| Bake time (filling) | 60–75 minutes |
| Gradual cool in oven | 45 minutes |
| Chill time | 6–12 hours (overnight recommended) |
| Brûlée topping | 5–10 minutes |
| Total time | 8–14 hours (mostly unattended) |
| Yield | 12 generous slices |
The cheesecake is ready to enjoy once the sugar sets on top after torching—about 1–2 minutes for the sugar to harden. If you’ve broiled it, allow a brief chill to re-firm the custard before slicing. For best texture and clean slices, brûlée just before serving.
Tips That Make All the Difference
- Bring everything to room temperature. Soft cream cheese and room-temp eggs blend smoothly, preventing lumps and overmixing.
- Mix low and slow. Use low speed and scrape the bowl often to avoid incorporating too much air, which can cause cracks.
- Water bath wisdom. Double-wrap the pan with foil to keep water out. The gentle, humid heat keeps the custard silky.
- Check for the right jiggle. The cheesecake is done when the edges are set and only the center wobbles slightly—like soft Jell-O.
- Cool gradually. Letting the cheesecake rest in a cracked oven prevents temperature shock and cracking.
- Dry surface = better brûlée. Blot gently if needed. Moisture can cause the sugar to bead before it caramelizes.
- Thin, even sugar layer. Too thick and the sugar may burn before melting; too thin and it won’t fully glass over. Aim for a uniform veil.
- Torch technique. Keep the flame moving and avoid lingering in one spot to prevent bitter, scorched patches.
- Slice smart. Use a hot, clean knife for each cut: dip in hot water, wipe dry, slice, repeat.
- Make ahead. Bake a day ahead and chill overnight. Brûlée right before serving for the most satisfying crack.
A Quick Nutritional Snapshot
The following values are approximate and will vary with ingredient brands and exact slice size. Calculated for 1 slice (1/12 of the cheesecake):
| Calories | ~550 |
| Protein | ~9 g |
| Total Carbohydrates | ~53 g |
| Total Fat | ~39 g |
| Saturated Fat | ~24 g |
| Fiber | ~1 g |
| Total Sugars | ~38 g |
| Sodium | ~360 mg |
These numbers are general estimates meant to guide your planning. If you need precise nutrition, consider using a calculator with your specific ingredients.
Frequently Asked Questions
Can I make this cheesecake without a water bath?
Yes, but a water bath provides the most reliable texture and helps prevent cracking. If you skip it, bake at 300–315°F (150–157°C), place a pan of hot water on a lower rack to add humidity, and watch closely for doneness. Do not overbake; the center should still wobble slightly.
What if I don’t have a kitchen torch?
Use your oven’s broiler. Chill the cheesecake well, sprinkle a thin, even layer of sugar, and broil on the top rack, rotating as needed. Keep the door slightly ajar and watch constantly to avoid burning. Chill briefly afterward to re-firm before slicing.
Can I freeze the cheesecake?
Absolutely—freeze the baked, cooled, un-brûléed cheesecake. Wrap tightly in plastic, then foil, and freeze up to 2 months. Thaw overnight in the fridge, remove wraps to prevent condensation, pat the surface dry if needed, then add and caramelize the sugar just before serving.
Closing Thoughts to Send You Off Confidently
There’s something joyful about breaking through that shiny caramel top and discovering the creamy, custardy cheesecake beneath. This dessert feels festive yet familiar, the kind of treat that draws people to the table and invites a moment of quiet appreciation before the first bite. With a little patience and a few smart techniques, you’ll produce a showpiece that’s as delightful to make as it is to share. I hope this recipe becomes your go-to for celebrations, cozy evenings, and any day that needs a little sparkle. Enjoy every crackle, every slice, and every smile it brings.