Best Protein Bars: Healthy, Homemade Recipes & Reviews Guide
There’s something wonderfully satisfying about having a homemade snack on hand that you can trust—one that tastes good, holds together nicely, and gives you steady energy when you need it most. These no-bake Protein Bars are exactly that kind of recipe. They’re soft yet sturdy, naturally sweet, and easy to customize with your favorite flavors. If you’ve been looking for a go-to bar that you can prep once and enjoy all week, you’re in the right place.
In this guide, I’ll walk you through every step so you feel confident from start to finish. You’ll learn how to mix and press the bars so they slice cleanly, how to adjust moisture for the perfect texture, and how to tweak the recipe for special diets. Expect a friendly, flexible approach that invites you to play with flavors and make these bars your own.
- Why These Protein Bars Win You Over
- What You’ll Need: Ingredients to Make Protein Bars
- How to Make Them: A Step‑by‑Step Guide to Protein Bars
- Your Roadmap to Time: Prep and Chill Details
- Pro Tips and Smart Tweaks for Success
- Nutritional Snapshot: What One Bar Delivers
- Questions People Often Ask
- Parting Notes to Inspire Your Next Batch
Why These Protein Bars Win You Over
These bars are the ideal balance of convenience, flavor, and nutrition. They’re no-bake, so there’s no need to heat up the oven, and they come together with everyday pantry ingredients. They’re tender without crumbling, sweet without being cloying, and you can pack them with your favorite mix-ins—think mini chocolate chips, toasted coconut, or chopped nuts. Best of all, you can cut them into neat portions for a grab-and-go snack that carries well in lunch boxes and gym bags. With about 12 grams of protein per bar (depending on your protein powder), they’re a reliable, satisfying bite for busy days.
What You’ll Need: Ingredients to Make Protein Bars
- Rolled oats (2 cups / ~200 g): The hearty base that adds structure, fiber, and a pleasant chew.
- Protein powder, vanilla or chocolate (1 cup / ~90–100 g): The star that boosts protein; different powders absorb liquid differently, so you’ll fine-tune moisture.
- Natural peanut butter or almond butter (1/2 cup / ~125 g): Acts as a binder, adds richness, and helps the bars hold together.
- Honey or maple syrup (1/3 cup / ~110 g honey or 80 ml maple): Sweetens and creates stickiness for a cohesive, sliceable bar.
- Milk of choice (1/2 cup / 120 ml): Loosens the mixture; dairy or unsweetened plant-based options both work well.
- Vanilla extract (1 teaspoon): Adds warmth and rounds out the flavors.
- Fine sea salt (1/4 teaspoon): Balances sweetness and heightens flavor; a small amount makes a big difference.
- Chia seeds or ground flax (2 tablespoons): Adds texture and fiber; also helps bind.
- Mini chocolate chips or chopped dark chocolate (1/4 cup / ~40–45 g): A touch of indulgence and pleasant pops of chocolate.
- Optional spices (pinch of cinnamon): A hint of spice to make the flavor more cozy.
- Optional shredded coconut (1/4 cup): For extra chew and subtle sweetness.
- Optional topping: melted dark chocolate (1/3 cup / ~60 g): For a thin layer or drizzle that sets into a clean, glossy finish.
How to Make Them: A Step‑by‑Step Guide to Protein Bars
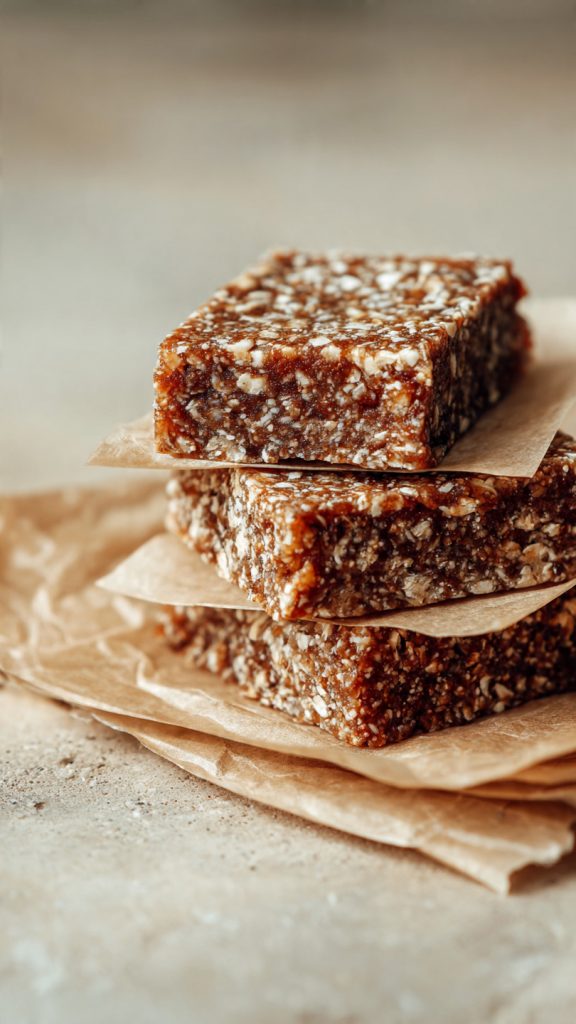
- Prepare your pan. Line an 8×8-inch (20×20 cm) pan with parchment, leaving an overhang on two sides to create a sling. This makes it easy to lift the slab out for clean slicing.
- Combine the dry ingredients. In a large bowl, stir together the rolled oats, protein powder, chia or flax, salt, and cinnamon (if using). Break up any protein powder clumps with a whisk or fork.
- Warm the sticky ingredients. In a small saucepan (or microwave-safe bowl), gently warm the peanut butter and honey until loosened, 20–30 seconds at a time. Stir until smooth. This step helps them blend easily with the dry mixture.
- Bring it together. Pour the warm peanut butter-honey mixture over the dry ingredients. Add the vanilla. Start mixing, then drizzle in the milk gradually. You’re aiming for a thick, cohesive dough that holds when pressed. If it’s crumbly, add more milk 1 tablespoon at a time; if it’s sticky, add a few tablespoons of oats or a spoonful of protein powder.
- Fold in mix-ins. Stir in chocolate chips (and coconut, if using). Mix just until evenly distributed; overmixing can melt the chips if the dough is warm.
- Press firmly into the pan. Transfer the dough to your lined pan. Use a sheet of parchment on top and press down very firmly with your palms or the flat bottom of a measuring cup. Compression is key for neat, non-crumbly bars. Take a minute to press into the corners and create an even surface.
- Optional chocolate finish. Melt the dark chocolate (a tiny splash of neutral oil can help it spread). Drizzle or spread a thin layer over the top. This creates a lovely snap and helps hold bars together.
- Chill to set. Refrigerate for 1–2 hours, or until the slab is fully firm. For faster setting, you can freeze for 25–30 minutes.
- Slice and store. Lift the slab out using the parchment sling. Cut into 12 bars or 16 squares with a sharp knife. For the cleanest cuts, warm the knife under hot water, wipe dry, and slice with steady pressure.
- Enjoy and plan ahead. Store bars in an airtight container in the refrigerator for up to 1 week, or in the freezer for up to 3 months. If stacking, separate layers with parchment or wax paper.
Your Roadmap to Time: Prep and Chill Details
Since these bars are no-bake, your effort goes into mixing and pressing. Expect about 15 minutes of hands-on prep time, plus a 1–2 hour chill to set the bars. They’re ready to enjoy once firm to the touch and easy to lift from the pan without bending. If you’re in a rush, a short freeze speeds things up; just move the bars back to the refrigerator afterward so they slice cleanly and don’t become too hard.
For weekday planning, I like to make a batch on Sunday, cut them after chilling, and store individually wrapped portions in the fridge. That way, there’s always a balanced snack within reach—great with coffee in the morning, before a workout, or as a mid-afternoon boost.
Pro Tips and Smart Tweaks for Success
- Use a scale when you can. Protein powders vary in scoop sizes and density. Weighing your powder and oats helps ensure the right moisture balance.
- Adjust moisture thoughtfully. Dry, crumbly dough? Add milk 1 tablespoon at a time or a little warmed nut butter. Too sticky? Sprinkle in 1–2 tablespoons of oats or extra protein powder and fold again.
- Press firmly—really firmly. This is the difference between bars that slice cleanly and bars that crumble. Use a parchment sheet and the bottom of a glass to compress evenly.
- Mind your protein powder. Whey tends to make a slightly softer, chewier bar; many plant-based powders absorb more liquid and set firmer. Start with a touch less powder if using an especially absorbent brand and add as needed.
- Flavor ideas. Try mocha (add 1–2 teaspoons instant espresso), PB&J (use almond butter, swap chocolate chips for chopped freeze-dried berries), or coconut-chocolate (stir in coconut and top with a thin chocolate layer).
- Keep it balanced. A small pinch of salt can transform the flavor and tame sweetness. Taste and adjust before pressing the mixture into the pan.
- Diet-friendly swaps. Vegan? Use maple syrup, plant milk, and dairy-free chocolate. Gluten-free? Choose certified gluten-free oats. Nut-free? Use sunflower seed butter, pumpkin seeds, or hemp hearts instead of nuts.
- Clean cuts every time. Chill thoroughly, then slice with a warmed, dry knife. If the topping is cracking, let the slab sit at room temperature for 5 minutes and try again.
Nutritional Snapshot: What One Bar Delivers
Nutrition will vary with your protein powder, nut butter, and mix-ins. The estimates below are based on the ingredient amounts listed (using whey protein, peanut butter, honey, 2% milk, and mini chocolate chips), yielding 12 bars.
| Nutrient | Approx. per bar (1/12 of recipe) |
|---|---|
| Calories | ~215 |
| Protein | ~12 g |
| Carbohydrates | ~25 g |
| Dietary Fiber | ~3 g |
| Total Fat | ~9 g |
| Sugars | ~13 g |
| Sodium | ~70 mg |
Tip: To lower sugar, reduce the honey/maple slightly and replace some chocolate chips with nuts or seeds. If you do, add a splash more milk so the mixture stays cohesive.
Questions People Often Ask
Can I use a different type of protein powder?
Yes. Whey, pea, and blends all work. Because absorption varies, start with the listed amount and adjust the milk as needed. If your dough is dry or sandy, add milk by the tablespoon until it presses together without crumbling.
How long do these bars keep, and can I freeze them?
Refrigerated in an airtight container, they keep well for up to 7 days. Freeze for up to 3 months, wrapped individually or separated by parchment. Thaw at room temperature for 20–30 minutes, or enjoy slightly chilled.
Can I make them nut-free?
Definitely. Swap peanut or almond butter for sunflower seed butter, and use dairy-free chocolate or seeds instead of nuts. Check labels on protein powders and oats if you need to avoid cross-contact.
Parting Notes to Inspire Your Next Batch
There’s a particular joy in opening your fridge and seeing a neat stack of homemade bars waiting for you. It’s a small thing, but it has a way of smoothing out the rough edges of a busy day—an easy, delicious choice you can feel good about. With this recipe, you have a template that invites creativity: swap flavors, fold in new textures, and find the balance you love most. And if you share a few bars with a friend or tuck them into a family snack box, you’ll see how something simple can bring a moment of comfort and connection. Here’s to a batch that suits your life, fuels your goals, and tastes great every time.