Strawberry Oatmeal Crumble Bars Recipe | Easy & Irresistible
There’s something irresistibly cozy about a tray of homemade Strawberry Oatmeal Crumble Bars cooling on the counter. They smell like sunshine and early summer mornings, taste like comfort, and slice into tidy little squares that are just as welcome at a brunch spread as they are tucked into a lunchbox. In this recipe, sweet strawberries get tucked between a buttery oat crust and a nubbly, golden crumble. The result is tender, jammy fruit with a crisp, toasty top—simple, beautiful, and so satisfying. You can expect clear, friendly steps, flexible ingredient options (fresh or frozen strawberries both work), and plenty of tips to help you nail that perfectly set, sliceable bar every time.
- Why These Strawberry Oatmeal Crumble Bars Win Hearts
- What You’ll Need for Strawberry Oatmeal Crumble Bars
- How to Make Strawberry Oatmeal Crumble Bars, Step by Step
- Time, Temperatures, and Make-Ahead Notes
- Helpful Tips for Foolproof Bars
- Nutrition at a Glance
- Questions You Might Be Asking
- A Sweet Closing Note
Why These Strawberry Oatmeal Crumble Bars Win Hearts
These bars are a charming balance of wholesome and indulgent. The oats bring hearty texture, the crust holds up beautifully, and the strawberry layer bakes into a glossy, jam-like filling without a long list of fuss. They’re weeknight-friendly, but special enough for sharing, and the recipe adapts well to your pantry—use fresh berries at their peak or lean on frozen when you need a burst of berry brightness out of season. They slice cleanly after cooling, pack and travel like a dream, and taste even better the next day. With a short ingredient list and mostly hands-off baking time, they’re the kind of treat you’ll make once and then keep coming back to.
What You’ll Need for Strawberry Oatmeal Crumble Bars
- 1 1/2 cups (150 g) old-fashioned rolled oats — Adds hearty, toasty texture and helps the crust hold together.
- 1 cup (125 g) all-purpose flour — Provides structure for a sturdy base and crisp crumb topping.
- 1/2 cup (100 g) light brown sugar — Sweetens the crust and topping while adding caramel notes and moisture.
- 1/2 teaspoon baking powder — Lends a touch of lift to keep the crumb from becoming dense.
- 1/2 teaspoon fine sea salt — Balances sweetness and brightens the berry flavor.
- 1/2 teaspoon ground cinnamon (optional) — A warm, subtle spice that complements strawberries beautifully.
- 1/2 cup (113 g) unsalted butter, melted and slightly cooled — Binds the dry ingredients into a cohesive, buttery crumble.
- 1 teaspoon pure vanilla extract — Rounds out the flavors in the crust and topping.
- 3 cups (about 1 lb/450 g) strawberries, hulled and chopped — The star of the show; fresh or frozen both work.
- 1/3 cup (65 g) granulated sugar — Sweetens the fruit without overpowering its flavor.
- 2 1/2 tablespoons (20 g) cornstarch — Thickens the berry juices so the bars slice cleanly.
- 1 tablespoon (15 ml) lemon juice — Adds brightness and helps the filling set.
- 1 teaspoon lemon zest (optional) — Enhances the strawberry flavor with citrusy freshness.
- 1 tablespoon chia seeds (optional) — Extra insurance for a thick, jammy filling (especially helpful with extra-juicy berries).
- Pinch of salt for the filling — A tiny pinch sharpens the fruit’s natural sweetness.
- 1 tablespoon coarse sugar (optional) — Sprinkled on top for a sparkling, crunchy finish.
How to Make Strawberry Oatmeal Crumble Bars, Step by Step
- Preheat and prepare the pan: Heat the oven to 350°F (175°C). Line an 8-inch or 9-inch square baking pan with parchment, leaving overhang on two sides for an easy lift. Lightly grease the parchment and exposed sides.
- Whisk the dry ingredients: In a medium bowl, combine the oats, flour, brown sugar, baking powder, salt, and cinnamon (if using). Break up any sugar lumps with your fingers to keep the crumb even.
- Add butter and vanilla: Pour in the melted, slightly cooled butter and the vanilla extract. Stir with a fork until the mixture is evenly moistened and holds together when squeezed. You should see sandy bits and larger clumps.
- Set aside the topping: Scoop out about 1 to 1 1/4 cups of the crumb and set it aside for the topping. The rest will form your base.
- Press the crust: Tip the remaining crumb mixture into the prepared pan. Press it firmly and evenly into a compact layer using your fingertips or the bottom of a measuring cup. Firm packing helps create a crisp, sliceable base.
- Par-bake the base: Bake the crust for 10 minutes. This quick head start keeps the bottom from getting soggy once you add the fruit.
- Mix the filling: While the crust bakes, stir together the chopped strawberries, granulated sugar, cornstarch, lemon juice, lemon zest (if using), chia seeds (if using), and a pinch of salt. Toss until the fruit is evenly coated and glossy. If your berries are very juicy, let the mixture sit for 5 minutes so the cornstarch can hydrate.
- Layer the fruit: Remove the pan from the oven. Spoon the strawberry mixture over the warm crust and spread it into an even layer. If there’s a lot of liquid at the bottom of the bowl, spoon the berries first and then drizzle over just enough liquid to lightly moisten the layer—leave any excess behind.
- Add the crumble: Scatter the reserved crumb evenly over the fruit, squeezing it in your hands to create some larger clumps. For a little sparkle and crunch, sprinkle with coarse sugar.
- Bake until bubbling: Return the pan to the oven and bake for 30 to 35 minutes, or until the topping is golden and the filling bubbles thickly at the edges and in a few spots near the center. Those steady bubbles are your sign the cornstarch has activated and the filling will set.
- Cool to set: Transfer the pan to a wire rack and cool completely, at least 2 hours. For the neatest slices, refrigerate the cooled pan for 1 hour to firm up the filling.
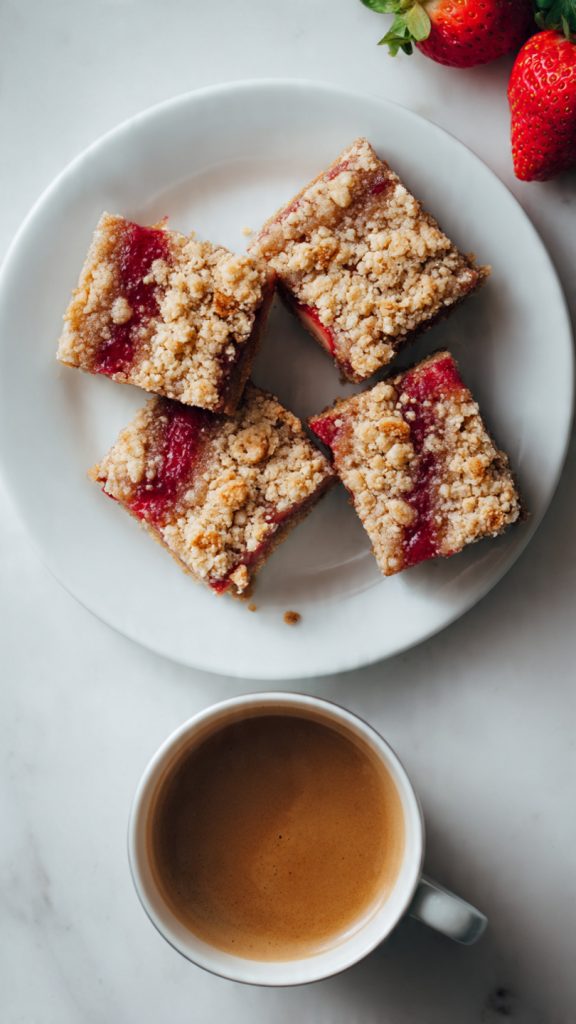
- Slice and serve: Use the parchment overhang to lift the bars from the pan. Cut into 12 to 16 squares with a sharp knife. If you like, dust with powdered sugar or drizzle a light lemon glaze right before serving.
- Store well: Keep bars in an airtight container at room temperature for up to 1 day, then refrigerate for up to 5 days. They also freeze well for up to 3 months—thaw overnight in the fridge, then rewarm at 300°F (150°C) for 8 to 10 minutes to revive the crispness.
Time, Temperatures, and Make-Ahead Notes
- Prep time: About 20 minutes (includes mixing crumble and tossing the berries).
- Par-bake base: 10 minutes at 350°F (175°C).
- Bake time: 30 to 35 minutes, until golden and bubbly.
- Cooling: Minimum 2 hours at room temperature; 1 additional hour in the fridge for very clean slices.
- Total time: About 3 hours, factoring in cooling (hands-on time is under 30 minutes).
- Yield: 12 large or 16 smaller bars in an 8- or 9-inch square pan.
When are they ready to eat? Once the bars are completely cool, the filling will be set, and you’ll get tidy slices that hold their shape. If you cut while warm, the fruit may still be soft and jammy. They’ll taste wonderful either way, but for picture-perfect squares, wait for that full cool-down.
Make-ahead tip: Bake the bars the day before. Cool, cover, and refrigerate. Slice just before serving, or slice and store between parchment layers. A brief warm-up in a low oven restores the crumble’s gentle crisp.
Helpful Tips for Foolproof Bars
- Use old-fashioned rolled oats: They give the best texture. Quick oats can make the crumble a bit too soft and uniform.
- Measure accurately: If possible, weigh flour for consistency. If using cups, spoon flour into the cup and level—don’t scoop directly from the bag.
- Cool the butter slightly: Very hot butter can make the crumb greasy; slightly cooled butter yields better clumps.
- Par-bake the crust: This quick step is your shield against a soggy bottom. Ten minutes makes a difference.
- Adjust sweetness: Strawberries vary. Taste a piece and adjust sugar in the filling up or down by a tablespoon to suit your fruit.
- Don’t skip a thickener: Cornstarch (or arrowroot) ensures the filling sets. Juicier or frozen berries need the full amount.
- Look for the bubble cue: Bake until the filling bubbles at the center; it signals the starch has properly thickened.
- Let them cool fully: It’s tempting to dig in, but cooling is what transforms a delicious fruit crumble into clean-cut bars.
- For frozen strawberries: Use them straight from the freezer, increase cornstarch to 3 tablespoons, and bake 5 to 10 minutes longer.
- Slice smart: For tidy edges, chill first, then use a sharp knife wiped clean between cuts. A serrated knife can glide through the crumble nicely.
- Make it yours: Add a handful of chopped almonds or pecans to the topping, or whisk a quick lemon glaze (powdered sugar + lemon juice) for a bright finish.
Nutrition at a Glance
These values are estimates for 1 of 16 bars, prepared as written and without optional glaze or nuts. Exact numbers will vary based on brands and portion sizes.
| Calories | ~180 |
| Protein | ~2–3 g |
| Total Carbohydrates | ~27–29 g |
| Dietary Fiber | ~2 g |
| Total Fat | ~6 g |
| Saturated Fat | ~3.5 g |
| Sugars | ~14–16 g |
| Sodium | ~80–100 mg |
Note: If you add nuts or a glaze, the calorie and fat content will increase slightly.
Questions You Might Be Asking
Can I use frozen strawberries?
Yes. Use frozen berries straight from the freezer; do not thaw. Increase the cornstarch to 3 tablespoons to account for extra moisture, and extend the bake time by 5 to 10 minutes. Bake until you see steady bubbles near the center—that’s your best indicator the filling has thickened properly.
How do I make these gluten-free or vegan?
For gluten-free bars, use certified gluten-free rolled oats and a 1:1 gluten-free baking flour blend. For a dairy-free/vegan version, swap the butter with vegan butter or refined coconut oil (melted); if using coconut oil, add a pinch more salt to balance the flavor. The rest of the recipe remains the same—just keep an eye on texture as some GF blends absorb moisture differently.
How do I know when the bars are done?
Look for two cues: a deeply golden crumble and thick, steady bubbling in the fruit layer, not just at the edges but also in a few spots toward the center. If the topping browns too quickly before the filling bubbles, tent loosely with foil and continue baking until you see those reliable bubbles.
A Sweet Closing Note
There’s a little magic in simple bakes like these Strawberry Oatmeal Crumble Bars. A few pantry staples and a bowl of berries become something comforting and shareable, the kind of treat that nudges people to gather around the counter for “just one more square.” I hope this recipe brings that same easy joy to your kitchen—gentle to make, fragrant as it bakes, and utterly satisfying to slice and share. When you find a combination of flavors you love, make it yours: add zest, switch fruits, sprinkle nuts, or drizzle a bit of glaze. However you serve them, these bars have a way of turning an ordinary moment into a sweet, memorable one.