Amish White Bread Recipe: Soft, Fluffy & Easy Homemade Loaf
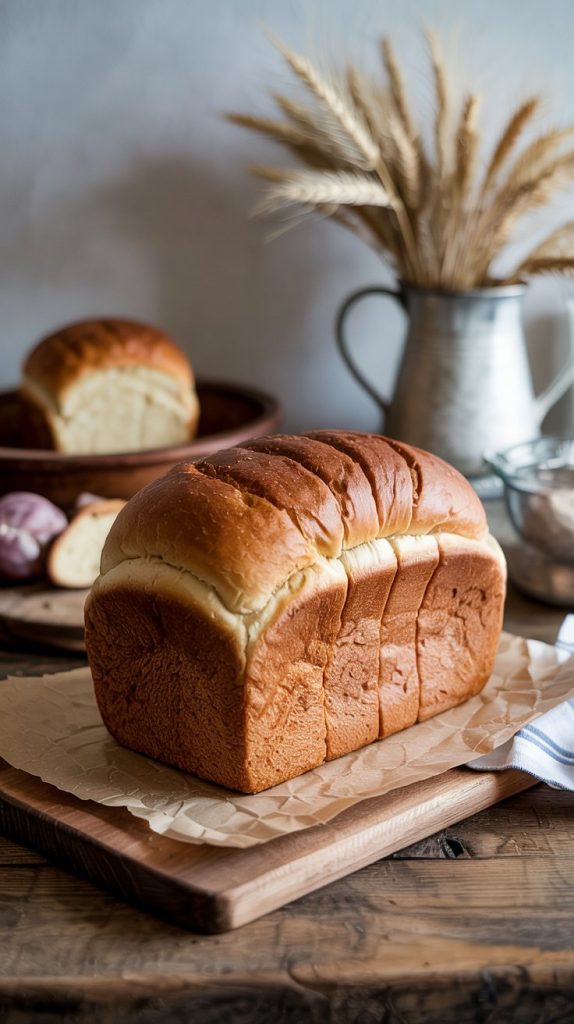
If you’ve ever wanted a loaf of bread that feels like a warm hug, Amish White Bread is it. It’s soft, slightly sweet, and incredibly comforting—perfect for sandwiches, toast, or simply tearing off a piece while it’s still warm. This is the kind of bread that fills your kitchen with a buttery, bakery-style aroma and makes everyone wander over to see what’s baking.
In this guide, I’ll walk you through every step with clear instructions and plenty of friendly tips. You’ll learn how to mix, knead, proof, and bake a loaf that’s beautifully risen and tender. If you’re new to breadmaking, don’t worry—you’ve got this. And if you’ve baked a few loaves before, this classic recipe may become the one you reach for again and again.
What Makes This Amish White Bread So Irresistible
Amish White Bread stands out for its delicate sweetness, pillowy crumb, and golden crust. It’s versatile enough for everyday sandwiches yet special enough to serve at family gatherings. The dough is forgiving, the steps are straightforward, and the results are consistently wonderful. Expect a loaf that slices neatly, toasts beautifully, and stays soft for days.
What You’ll Need: Ingredients and Their Roles
- Warm water (2 cups, 105–110°F) — Activates the yeast; the right temperature helps the dough rise properly.
- Granulated sugar (2/3 cup) — Feeds the yeast and adds a gentle sweetness that defines this bread’s flavor.
- Active dry yeast (1 1/2 tablespoons or 4 1/2 teaspoons) — The leavening agent that makes the bread rise and gives it a light texture.
- Salt (1 1/2 teaspoons) — Enhances flavor and helps regulate the yeast so the dough doesn’t overproof.
- Vegetable oil (1/4 cup) — Adds moisture and tenderness, helping the bread stay soft longer. Melted unsalted butter also works.
- Bread flour or all-purpose flour (about 6 cups) — Provides structure. Bread flour yields a slightly chewier crumb; all-purpose gives a softer bite.
- Optional: Softened butter for brushing — A light post-bake brush adds sheen and an extra-soft crust.
Your Step-by-Step Path to Perfect Loaves
- Proof the yeast: In a large mixing bowl, combine warm water and sugar. Stir to dissolve. Sprinkle the yeast over the top, stir gently, and let it sit for 5–10 minutes until foamy.Tip: If it doesn’t foam, the water may have been too hot or the yeast inactive. Try again with fresh yeast and check the temperature.
- Add oil and salt: Stir in the vegetable oil. Add the salt and mix again.Avoid adding salt directly to the yeast alone—it can slow yeast activity. Mixing it into the liquid first is best.
- Bring in the flour gradually: Add 3 cups of flour and mix until a thick batter forms. Continue adding flour, about 1/2 cup at a time, until a soft, slightly tacky dough comes together.You may not need all 6 cups, or you might need a touch more, depending on humidity and the flour type.
- Knead the dough: Turn the dough onto a lightly floured surface and knead for 6–8 minutes. Aim for a smooth, elastic ball that springs back when gently pressed.If the dough sticks too much, dust with tiny amounts of flour as you go—but avoid over-flouring to keep the loaf tender.
- First rise: Place the dough in a lightly oiled bowl, turning it once to coat all sides. Cover with a clean towel or plastic wrap and let rise in a warm spot until doubled, about 60–90 minutes.
- Prepare the pans: Grease two 9x5-inch loaf pans. This recipe yields two generous loaves, perfect for gifting or freezing one for later.
- Divide and shape: Gently deflate the dough and divide it into two equal pieces. For each piece, pat into a rectangle, then roll it up tightly like a jelly roll. Pinch the seam closed and tuck the ends under. Place seam-side down in the prepared pans.
- Second rise: Cover the pans and let the dough rise until the rounded tops are about 1 inch above the pan’s rim, 30–45 minutes. It should look puffy and feel airy when gently touched.
- Preheat the oven: Heat to 350°F (175°C) while the loaves finish their second rise. An evenly preheated oven helps the crust bake golden and the crumb set properly.
- Bake: Bake the loaves for 27–32 minutes, until deep golden and fragrant. They’re done when the bottoms sound hollow when tapped or the internal temperature reaches 190–195°F (88–90°C).
- Finish the crust (optional): Immediately brush the tops with softened butter for a glossy finish and extra-soft crust.
- Cool before slicing: Transfer loaves to a wire rack. Let cool at least 45–60 minutes before slicing to avoid a gummy texture.Resist the urge to cut early; patience here truly pays off with beautiful slices.
Timing and What to Expect Along the Way
This bread is mostly hands-off, but it does ask for a little patience as it rises. Here’s a helpful breakdown so you can plan your day:
- Active prep and kneading: 20–25 minutes
- First rise: 60–90 minutes (depends on room temperature)
- Shaping: 10 minutes
- Second rise: 30–45 minutes
- Baking: 27–32 minutes
- Cooling: 45–60 minutes
That puts the total time around 3 1/2 to 4 1/2 hours, with most of it being rest time. You’ll know it’s ready to enjoy once the crust is golden, the loaf feels light for its size, and it cools enough to slice cleanly. Serve warm with butter, honey, or your favorite jam. It also makes excellent toast and fabulously plush sandwiches.
Pro Tips to Make Your Loaves Shine
- Measure flour accurately: Spoon flour into your measuring cup and level off with a straight edge. Packing flour can lead to dense bread.
- Mind the water temperature: Aim for 105–110°F. Too hot can kill yeast; too cool can slow it down.
- Watch the dough, not the clock: Rising times are guidelines. Dough is ready when doubled, puffy, and aerated.
- Knead to windowpane: A small piece of dough should stretch thin without tearing. This signals good gluten development for a soft, even crumb.
- Control the sweetness: For a less sweet loaf, reduce sugar to 1/3 cup; for a honey version, use 1/2 cup honey and reduce the water by 2–3 tablespoons.
- Try bread flour for structure: Using bread flour gives a slightly chewier, more structured loaf; all-purpose creates a very tender crumb. Both are delicious.
- Don’t over-bake: Aim for 190–195°F inside. Over-baking dries out the crumb and hardens the crust.
- Brush with butter: For that classic soft top, brush while hot. For a firmer crust, skip the butter.
- Storage: Keep tightly wrapped at room temperature for 3–4 days. For longer storage, slice and freeze up to 3 months; toast straight from frozen.
- Serving ideas: Toast with cinnamon sugar, grilled cheese, French toast, or a thick PB&J. This bread truly does it all.
Nutrition at a Glance
These numbers are approximate and will vary slightly based on ingredients and slice thickness. Calculated for about 24 slices (two loaves):
- Calories: ~150–170 per slice
- Carbohydrates: ~28–31 g
- Protein: ~3–4 g
- Fat: ~2.5–3.5 g
- Fiber: ~1 g
- Sugar: ~6–8 g
- Sodium: ~150–180 mg
Note: Brushing with butter adds a small amount of fat and calories. If you’re moderating sugar, reducing it won’t affect the structure significantly, only sweetness and browning.
Questions Bakers Often Ask
Can I use instant yeast instead of active dry yeast?
Yes. Substitute the same amount of instant yeast and skip the initial proofing step. Mix instant yeast directly with the flour, then add the warm water, sugar, oil, and salt. The dough may rise a bit faster, so keep an eye on it.
Why did my bread turn out dense?
Common causes include adding too much flour, under-kneading, or letting the dough rise in a room that’s too cool. Measure flour lightly, knead until elastic, and ensure a warm, draft-free rise. Also, double-check that your yeast is fresh and active.
Can I make just one loaf or add variations?
Absolutely. Halve all ingredients for a single loaf. For variations, swirl in cinnamon-sugar before shaping, replace some water with milk for richer flavor, or swap sugar for honey. Just remember to reduce the water slightly if using honey.
Parting Notes and a Warm Encouragement
There’s something wonderfully grounding about baking Amish White Bread from scratch. The simple ingredients, the gentle rise, and the moment you pull two golden loaves from the oven—it all adds up to a small celebration at home. Whether it’s buttered slices for breakfast or a sturdy base for your favorite sandwich, this bread has a way of gathering people around the table.
Take your time, trust your senses, and enjoy the process as much as the result. With a few turns of the dough and a warm kitchen, you’ll have loaves that make every day feel a little cozier. And once you’ve baked it once, don’t be surprised if friends start asking for a loaf of their own—the joy is deliciously shareable.