Easy Biscoff Cheesecake Recipe: Creamy No-Bake Dessert Guide
If you’ve ever dipped a spoon into a jar of Biscoff spread and thought, “This should be a dessert,” you’re exactly where you need to be. This Biscoff Cheesecake is a dreamy, no-bake showstopper with a buttery Biscoff cookie crust, a silky cheesecake filling infused with cookie butter, and a glossy layer of melted Biscoff on top. It’s rich but balanced, familiar yet special, and the kind of dessert that quietly steals the spotlight at any gathering.
Expect a creamy, sliceable texture that holds its shape without the fuss of baking, a robust caramelized-spice flavor from the speculoos cookies, and a finish that’s elegant enough for celebrations but simple enough for weeknight cravings. I’ll walk you through every step—pan prep, the best way to whip cream, and how to get those clean, café-style slices—so you can serve this with confidence and pride. It’s the kind of recipe you’ll make once and then tuck into your “keeper” folder, right next to your most-loved classics.
Why This Biscoff Cheesecake Wins Hearts
This cheesecake marries the cozy, brown-sugar warmth of Biscoff with the softness of a classic, creamy cheesecake—no oven required. The crust is sweet and crisp, the filling is lush and smooth, and the topping adds unmistakable speculoos flair. It’s a dessert that feels both comforting and indulgent. Best of all, it’s reliable: it sets beautifully in the fridge, slices like a dream, and tastes even better the next day.
What You’ll Need for a Biscoff Cheesecake Dream
For the crust:
- Biscoff cookies (300 g; about 32–34 cookies) – Provide that caramelized, spiced crunch that defines the crust.
- Unsalted butter (90 g), melted – Binds the crumbs together for a sturdy, sliceable base.
- Pinch of fine salt – Balances sweetness and brightens the cookie flavor.
For the filling:
- Full-fat cream cheese (600 g), room temperature – The creamy backbone of the cheesecake; full-fat ensures proper richness and set.
- Smooth Biscoff spread (cookie butter, 250 g) – Infuses the filling with deep speculoos flavor and a velvety texture.
- Powdered sugar (120 g) – Sweetens without grittiness; helps stabilize the filling.
- Vanilla extract (1 tsp) – Gently rounds out flavors and adds a warm aroma.
- Fresh lemon juice (1 tbsp; optional) – A touch of brightness to cut through richness.
- Fine salt (a pinch) – Enhances flavor complexity.
- Heavy or double cream (240 ml), cold – Whipped to stiff peaks to lighten the filling and help it set.
For the topping and garnish:
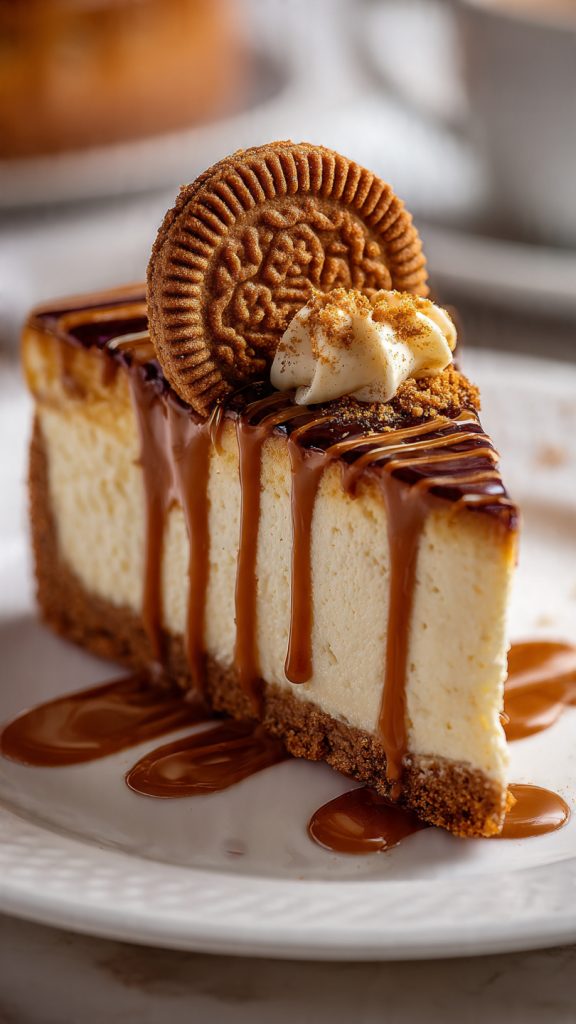
- Smooth Biscoff spread (120 g), gently melted – Creates a glossy, signature finish.
- Extra Biscoff cookies (4–5), crushed – Adds texture and a pretty, inviting look.
- Optional: softly whipped cream or piped rosettes – A decorative flourish and a creamy contrast to the topping.
Equipment:
- 9-inch (23 cm) springform pan – Allows easy release for clean edges.
- Food processor or rolling pin – For crushing cookies efficiently.
- Hand mixer or stand mixer – Ensures a smooth filling and perfect whipped cream.
- Rubber spatula – For gentle folding and smooth layering.
- Offset spatula (optional) – Helps achieve a flawlessly smooth top.
- Acetate cake collar (optional) – For picture-perfect sides and easy unmolding.
How to Make It, Step by Step
- Prep the pan. Lightly grease the bottom and sides of a 9-inch (23 cm) springform pan. Line the base with parchment for easy removal. If you have an acetate cake collar, line the inside of the ring now for extra-smooth edges.
- Make the crust. Pulse the Biscoff cookies in a food processor until very fine. If using a rolling pin, seal cookies in a zip-top bag and crush thoroughly. Stir in the melted butter and a pinch of salt until the mixture feels like damp sand and holds together when pressed.
- Press and chill the base. Pour the crumb mixture into the pan. Use the bottom of a flat measuring cup to press it firmly into an even layer. Aim for uniform thickness with a clean, compact edge. Refrigerate while you prepare the filling.
- Soften the cream cheese. Ensure your cream cheese is at room temperature—this avoids lumps and overmixing. If it’s cool, let it sit out for 20–30 minutes, or cut into cubes to speed it up.
- Blend the base flavors. In a large bowl, beat the cream cheese and Biscoff spread together on medium speed until very smooth and airy, about 1–2 minutes. Scrape the sides and bottom of the bowl so nothing sticks.
- Sweeten and balance. Add powdered sugar, vanilla, lemon juice (if using), and a pinch of salt. Beat again until fully incorporated and silky. The mixture should be thick yet spreadable.
- Whip the cream. In a separate chilled bowl, whip the cold heavy cream to stiff peaks. When you lift the beaters, the peaks should stand straight and look glossy. Avoid overwhipping—if it becomes grainy, you’ve gone too far.
- Fold with care. Using a spatula, fold the whipped cream into the Biscoff-cream cheese mixture in two or three additions. Use gentle, sweeping motions to keep the filling light and airy. Do not stir vigorously—you want to preserve the structure.
- Fill the pan. Pour the filling over the chilled crust. Smooth the top with an offset spatula. Tap the pan gently on the counter to pop any hidden air bubbles and level the surface.
- Chill to set. Cover the pan and refrigerate for at least 6–8 hours, ideally overnight. The long chill ensures a firm, clean slice and deep, mingled flavors.
- Add the glossy topping. Warm the Biscoff spread in short bursts in the microwave or over a gentle double boiler until it’s pourable but not hot. Pour over the chilled cheesecake and tilt the pan to coax it into an even layer. Return to the fridge for 20–30 minutes to set the glaze.
- Unmold and garnish. Run a thin knife around the edge if you didn’t use acetate. Release the springform. Sprinkle crushed Biscoff cookies around the rim or center. Add whipped cream rosettes if you like. Slice with a warm, dry knife for clean edges, wiping between cuts.
Timeframe and Make-Ahead Plan
| Active prep | 25–30 minutes |
| Chill to set | 6–8 hours (overnight preferred) |
| Total time | About 8½–10 hours (mostly hands-off) |
| Yield | 12 slices |
This is a no-bake recipe, so your refrigerator does the heavy lifting. Plan to make it the day before serving for best flavor and structure. It’s ready when the center feels set to the touch and the edges are firm. Add the topping once it’s fully chilled, then chill briefly again to set the glaze before slicing.
Storage tips: Keep covered and refrigerated for up to 5 days. You can also freeze individual slices, well wrapped, for up to 1 month; thaw overnight in the fridge for best texture.
Pro Tips for Cheesecake Perfection
- Use full-fat cream cheese. It sets better and gives the lush texture you want. Low-fat versions can turn watery or soft.
- Start with room-temperature cream cheese. This is key to avoiding lumps and minimizing mixing time, which keeps your filling light.
- Whip cream to stiff peaks—but stop there. Overwhipped cream can separate and affect texture. Look for glossy, firm peaks.
- Fold, don’t beat. When combining whipped cream with the base, fold gently to keep the filling airy and stable.
- Pack the crust tightly. A firmly pressed crust won’t crumble when you slice. Use a flat-bottomed cup to compress the crumbs.
- Chill long enough. Overnight is ideal. The filling continues to firm up, and the flavors meld beautifully.
- Warm the knife for slicing. Dip a sharp knife in hot water, wipe dry, and cut. Repeat between slices for crisp edges.
- Work with gently warmed Biscoff for the topping. If it’s too hot, it can melt the cheesecake surface; if it’s too thick, it won’t spread smoothly.
- Make it your own. Add a pinch of cinnamon to the crust, swirl a little melted dark chocolate over the topping, or finish with a sprinkle of flaky sea salt for contrast.
- Hot climate tip. If your kitchen runs warm, chill the mixing bowl and beaters for the cream, and keep ingredients cool. You can also stabilize the filling with 1 tsp powdered gelatin bloomed in 1 tbsp cold water and melted gently, folded in before the whipped cream.
Nutrition at a Glance
Approximate values per slice (1 of 12), will vary by ingredients and portion size:
- Calories: ~650
- Protein: ~7 g
- Total Carbohydrates: ~54 g
- Total Fat: ~45 g
- Saturated Fat: ~24 g
- Sugars: ~38 g
- Fiber: ~1 g
- Sodium: ~320 mg
These numbers are estimates and meant for guidance. For more precise nutrition, input your specific brands and quantities into a nutrition calculator.
Your Questions, Answered
Can I make this without a springform pan?
Yes. Use a deep 9-inch pie dish or an 8-inch square pan lined with a parchment sling. You won’t be able to release the sides, but you can lift or scoop neat slices. Just press the crust firmly and chill thoroughly for clean cuts.
Can I use low-fat cream cheese or swap the cream?
For the best set and flavor, stick to full-fat cream cheese. Low-fat versions often contain more water and can make the filling loose. Heavy or double cream is important for structure—substituting milk or half-and-half won’t whip properly.
Why didn’t my cheesecake set?
Common reasons include underwhipped cream (it should be stiff), overmixing after adding the whipped cream, or not chilling long enough. Warm kitchens can also slow setting; in that case, extend the chill and consider the gelatin tip for next time.
A Sweet Note to Finish
There’s something quietly irresistible about Biscoff Cheesecake: it feels nostalgic and new at once, with smooth, spiced sweetness in every bite. Whether you’re celebrating a birthday, bringing dessert to a friend, or simply treating yourself, this is a recipe that invites people to gather, to pause, and to savor. I hope you enjoy making it as much as you enjoy sharing it—and that it becomes one of those desserts you pull out whenever you want smiles around your table.