Cheesy Garlic Bread Recipe - Crispy & Buttery, Ultra Cheesy!
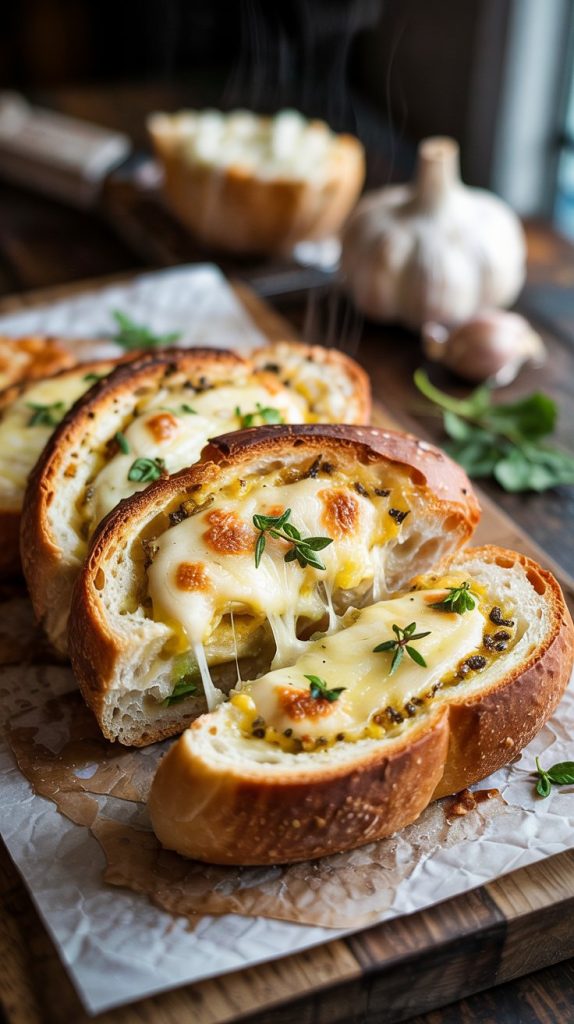
If your idea of comfort is the aroma of toasty bread, warm butter, and bubbling cheese drifting through the kitchen, then you’re in exactly the right place. Cheesy Garlic Bread is the kind of simple, feel-good recipe that turns an ordinary meal into something a little celebratory. It’s crisp at the edges, soft inside, and generously blanketed with a garlicky, herby, melty cheese layer that’s impossible to resist. Whether you’re pairing it with a cozy pasta, serving it alongside soup, or setting it out for a game night, this version is crafted to be reliably delicious and surprisingly easy. Think of this as your friendly, step-by-step guide to the kind of garlic bread that disappears fast—and gets requested even faster.
Why This Cheesy Garlic Bread Wins Hearts
There’s a reason garlic bread is one of those universal crowd-pleasers: it’s familiar, dependable, and absolutely indulgent. This recipe leans into what makes it special—plenty of real garlic, a balance of melty mozzarella and nutty Parmesan, and a buttery spread with just enough freshness from parsley to keep every bite bright. The result is a beautiful contrast: crispy edges, a tender center, and a golden layer of gooey, stretchy cheese.
It’s also wonderfully adaptable. Use a rustic Italian loaf for a substantial bite, a baguette for snackable pieces, or even a sturdy sourdough for a little tang. You can scale it up for a party or fold in extras like a touch of lemon zest, red pepper flakes, or a sprinkle of smoked paprika. Best of all, it comes together fast—perfect for busy weeknights and last-minute gatherings.
What You’ll Need: Ingredients for Cheesy Garlic Bread
- 1 large Italian loaf or baguette — A sturdy, crusty bread holds up to the garlic butter and cheese without getting soggy.
- 6 tablespoons unsalted butter, softened — Softening helps it blend smoothly with garlic and herbs for even spreading.
- 1 tablespoon extra-virgin olive oil — Adds a touch of richness and helps prevent the butter from burning.
- 4–6 cloves garlic, finely minced — Fresh garlic is key to bold, aromatic flavor. Adjust to your preference.
- 1/4 cup fresh parsley, finely chopped — Brings a fresh, herbaceous lift to the buttery, cheesy richness.
- 1 1/2 cups low-moisture mozzarella, shredded — Melts beautifully and creates that classic stretchy cheese pull.
- 1/2 cup Parmesan, finely grated — Adds savory depth and a lightly salty, nutty finish.
- 1/2 teaspoon kosher salt — Enhances the overall flavor; adjust if your Parmesan is very salty.
- 1/4 teaspoon black pepper — A gentle warmth that rounds everything out.
- 1/4–1/2 teaspoon red pepper flakes (optional) — For a subtle, pleasant heat if you love a little kick.
- 1 teaspoon lemon zest (optional) — Brightens the richness without making it taste lemony.
- 2 tablespoons grated provolone or cheddar (optional) — A small addition for extra melt and flavor complexity.
- 1–2 teaspoons garlic powder (optional) — A backup for boosting garlic flavor if your cloves are mild.
How to Make Cheesy Garlic Bread, Step by Step
- Preheat and prepare your pan. Heat the oven to 425°F (220°C). Line a baking sheet with foil or parchment for easy cleanup. This temperature ensures a crisp exterior and fully melted cheese without over-drying the bread.
- Make the garlic butter. In a bowl, stir together the softened butter, olive oil, minced garlic, parsley, salt, pepper, and optional lemon zest and red pepper flakes. Mix until smooth and spreadable. Tip: If the butter is cold, warm it briefly at room temperature or microwave in 5-second bursts—don’t melt it fully.
- Prep the bread. Slice the loaf lengthwise to create two long halves (or cut into thick slices for individual pieces). If the crumb is very tight, lightly score the surface in a crosshatch pattern so the butter seeps in without soaking the bread.
- Spread the garlic butter evenly. Use a spatula or the back of a spoon to coat each cut side generously, reaching all the way to the edges so they don’t dry out. Even coverage is essential for consistent flavor in every bite.
- Add the cheese. In a separate bowl, toss the mozzarella with the Parmesan (and provolone or cheddar, if using). Distribute the cheese mixture evenly over the buttered bread. Keep it light near the very edges to prevent overflow onto the pan.
- Bake until melty. Place the bread cut-side up on the prepared sheet. Bake on the middle rack for 8–10 minutes, or until the cheese is fully melted and the edges look lightly golden.
- Broil for color. Switch the oven to broil and cook 1–2 minutes more to get beautiful golden spots on the cheese. Stay close and watch carefully—it can go from perfect to too dark quickly.
- Rest briefly. Remove from the oven and let the bread sit for 2–3 minutes. This lets the cheese set slightly so it slices cleanly and doesn’t slide off.
- Finish and serve. Sprinkle with a little extra parsley or a pinch of red pepper flakes. Slice into pieces (straight cuts or on a slight diagonal) and serve warm. It’s fantastic with marinara, tomato soup, or your favorite pasta.
- Optional: Air fryer method. Air fry at 360°F (180°C) for about 5–7 minutes for individual slices, or 8–10 minutes for halved loaves, until cheese is melted and edges are crisp. Work in batches if needed.
- Optional: Make-ahead and freeze. Assemble the buttered, cheesed bread, then freeze flat on a tray until firm. Wrap well and store for up to 2 months. Bake from frozen at 400°F (205°C) for 12–15 minutes, then broil briefly to finish.
Timing and Prep at a Glance
This recipe is built for convenience while still delivering fresh-from-the-oven goodness. Here’s what to expect:
- Prep time: 10–15 minutes (a few extra minutes if you’re mincing lots of garlic)
- Bake time: 8–10 minutes, plus 1–2 minutes under the broiler
- Rest time: 2–3 minutes before slicing
- Total time: About 20–25 minutes
- Yield: Approximately 8–10 pieces, depending on the size of your loaf and how you slice it
You’ll know your Cheesy Garlic Bread is ready when the cheese is fully melted, bubbling gently, and showing freckles of gold on top. The edges should be crisp but not dry, and the center soft and steamy.
Storage and Reheating: Keep leftovers in an airtight container in the fridge for up to 3 days. Reheat on a baking sheet at 350°F (175°C) for 8–10 minutes to re-crisp the crust and re-melt the cheese. You can also use an air fryer at 320°F (160°C) for 4–6 minutes. Avoid the microwave if you can—it tends to make the bread chewy rather than crisp.
Pro Tips for Foolproof Results
- Pick the right bread. A crusty Italian loaf, French bread, or sturdy sourdough works best. Slightly day-old bread actually toasts better than ultra-fresh.
- Use freshly shredded cheese. Pre-shredded cheese often contains anti-caking agents that affect melting. Shredding from a block gives smoother, stretchier results.
- Mind the butter texture. Softened (not melted) butter spreads evenly for consistent flavor. Melted butter can pool and soak into the bread unevenly.
- Balance the garlic. Fresh garlic is bold. If your cloves are ultra-pungent, a small pinch of garlic powder helps round the flavor without adding raw heat.
- Season thoughtfully. Parmesan is salty. Taste your garlic butter before adding the full measure of salt, or use a lighter hand if your cheese is particularly salty.
- Don’t skip the broil. That quick blast of high heat develops caramelized, golden spots that amplify flavor and texture.
- Keep the edges lean. A little less cheese at the very edges prevents overflow and keeps those crisp end bites intact.
- Try a hint of acidity. A touch of lemon zest or a few drops of balsamic glaze after baking brighten the richness beautifully.
- Line your pan. Foil or parchment makes cleanup easy and prevents sticking if cheese sneaks over the sides.
- Make it your own. Add finely chopped chives, a whisper of smoked paprika, or a few turns of cracked black pepper on top for a signature finish.
- Dietary tweaks: Use a gluten-free loaf with a thicker crust for structure; for dairy-free, try a high-quality plant-based butter and a meltable vegan mozzarella.
Nutrition at a Glance
Exact values depend on your bread and cheese choices, but here’s an approximate snapshot for one piece (about 1/10 of a large loaf):
- Calories: ~260
- Protein: ~11 g
- Carbohydrates: ~22 g
- Fat: ~14 g
- Saturated Fat: ~7 g
- Fiber: ~1 g
- Sugars: ~2 g
- Sodium: ~520 mg
- Calcium: ~220 mg
Note: These numbers are estimates. If you need precise nutrition details, calculate with your specific ingredients and portions.
Your Top Questions, Answered
Can I use pre-shredded cheese?
You can, but freshly shredded cheese melts more smoothly and gives a better pull. Pre-shredded cheese often contains starches that can make the texture a little less silky. If convenience is key, pre-shredded will still work—just expect a slightly different melt.
How do I make this without an oven?
A stovetop skillet or an air fryer both work. For a skillet, place the buttered-and-cheesed bread cut-side up in a covered skillet over low heat until the cheese melts and the bottom crisps; use a heat diffuser if you have one. In an air fryer, cook at 360°F (180°C) until melted and golden—about 5–10 minutes depending on thickness.
How do I keep the bread from getting soggy?
Use a sturdy, crusty loaf and softened (not melted) butter for even spreading. Avoid overloading the center with cheese, score the bread lightly so the butter penetrates without pooling, and bake at a relatively high temperature to drive off excess moisture. A brief broil at the end helps lock in crispness.
A Cozy Closing Thought
There’s something disarmingly joyful about pulling a tray of Cheesy Garlic Bread from the oven and hearing the gentle bubble of hot cheese. It invites people to gather, to reach in for a slice, and to share a moment that feels wonderfully simple. With this recipe, you’ve got a reliable method for turning everyday ingredients into a small celebration—one that pairs with almost any meal and makes it feel extra special. Keep it classic, or make it your own with little tweaks and toppings. Either way, you’ll end up with warm, garlicky, golden slices that bring smiles to the table. Happy cooking—and enjoy every bite.