Easy Chia Seed Pudding Recipe for a Healthy Breakfast Snack!
Chia Seed Pudding is one of those quietly remarkable recipes that manages to feel both wholesome and indulgent. It’s creamy without cooking, customizable without effort, and just as happy being breakfast as it is doubling as a dessert. If you’ve been looking for a make-ahead treat that’s nourishing, easy to love, and endlessly adaptable, this is it. In a few minutes of hands-on time and a little patience, you’ll have a spoonable pudding that tastes like comfort and feels like a small victory.
In this recipe, I’ll guide you through the essentials—from the right chia-to-liquid ratio to the best ways to avoid clumps—so your pudding sets perfectly every time. You’ll also find topping ideas, a gentle nudge toward your favorite flavors, and a nutrition snapshot to help you tailor it to your day. By the end, you’ll be able to make chia seed pudding by heart, adjusting it to whatever you’re craving (or whatever is in your pantry).
What Makes This Chia Seed Pudding Irresistible
Chia seed pudding works like culinary magic: when chia seeds meet liquid, they thicken into a luscious, spoonable texture that’s perfect for layering, topping, and savoring. It’s naturally gluten-free, easily dairy-free or vegan, and simple to make with everyday ingredients. What truly sets it apart is how flexible it is—change the milk, change the sweetener, swap the flavors, and it still turns out beautifully. It’s a meal-prep hero, a weeknight dessert, and an afternoon pick-me-up all in one little jar.
What You’ll Need: Ingredients & Their Purpose
Here’s the base recipe, along with why each ingredient matters. Feel free to customize and make it your own.
- Chia seeds (1/2 cup) — The star thickener. Chia seeds absorb liquid and form a gel, creating that pudding-like consistency. They’re also rich in fiber and healthy fats.
- Milk of choice (2 cups) — Your creamy base. Almond, oat, soy, or dairy milk all work. The richer the milk, the richer the pudding. Unsweetened varieties give you full control over sweetness.
- Maple syrup or honey (2–3 tablespoons) — Sweetens and adds flavor depth. Start small and adjust to taste. For sugar-free, use mashed ripe banana or a few chopped dates.
- Vanilla extract (1 teaspoon) — Rounds out the flavor and makes the pudding taste like a treat.
- Pinch of fine sea salt — A tiny amount wakes up the flavors and balances sweetness.
Optional add-ins for extra creaminess or flavor:
- Greek yogurt (1/4–1/2 cup) — Makes the pudding richer and adds protein. Stir in after initial thickening for a smooth finish.
- Cocoa powder (1–2 tablespoons) — For chocolate chia pudding; may need an extra splash of milk to keep it silky.
- Spices (cinnamon, cardamom, or pumpkin spice, 1/2–1 teaspoon) — Warm notes that make the pudding cozy and aromatic.
- Citrus zest (lemon or orange, 1/2 teaspoon) — Adds a bright, refreshing lift.
Topping and mix-in ideas (choose a few):
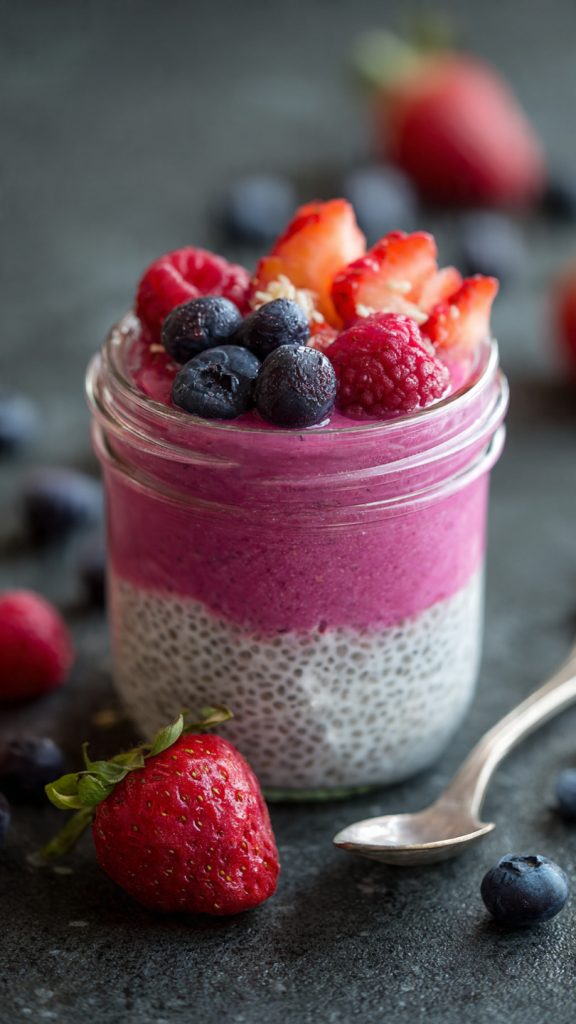
- Fresh fruit — Berries, sliced banana, mango, or chopped apple add natural sweetness and texture.
- Nut butter — Almond, peanut, or cashew butter swirl in richness and healthy fats.
- Toasted nuts or seeds — Almonds, walnuts, pistachios, pumpkin seeds, or coconut flakes give crunch.
- Granola — Adds contrast and makes it feel breakfast-y.
- Jam or fruit compote — A ribbon of concentrated fruit flavor in each spoonful.
- Dark chocolate shavings — A touch of decadence that pairs especially well with berry or banana toppings.
How to Make It: A Simple, Guided Method
- Pick your container. Use a medium bowl or a large jar with a lid. A clear jar is handy so you can see the texture as it thickens.
- Combine the base. Add the milk, maple syrup (or preferred sweetener), vanilla, and a pinch of salt to the container. Whisk or stir until well blended. If using cocoa powder, sift it in now to avoid lumps.
- Stir in the chia seeds. Sprinkle the chia seeds evenly over the liquid. Whisk steadily for 30–60 seconds so the seeds are fully moistened and evenly distributed. Thorough initial mixing is key to avoiding clumps.
- Wait and whisk again. Let the mixture sit for about 10 minutes, then whisk again. This second stir breaks up any seeds that may have settled or clumped.
- Adjust for flavor. Taste and add a little more sweetener, vanilla, or spice if you like. The flavors will mellow slightly as the pudding chills.
- Chill to set. Cover and refrigerate for at least 2 hours, or overnight for a thicker, creamier texture. The seeds continue to hydrate as they rest.
- Stir and refine the texture. After chilling, give the pudding a good stir. If it’s thicker than you like, add a splash of milk. If it’s thinner than you expected, stir in 1–2 teaspoons more chia seeds and let it sit another 15–20 minutes.
- Optional creaminess boost. For extra body, fold in Greek yogurt after the pudding has thickened. This creates a luxurious, custard-like texture.
- Serve and garnish. Spoon into bowls or jars and top with your favorite fruit, nuts, granola, or a swirl of nut butter.
- Store for later. Keep leftovers covered in the fridge for up to 4–5 days. Stir before serving each time, as natural separation can occur.
Prep, Chill, and Serve: Timing at a Glance
One of the best parts of chia seed pudding is the minimal hands-on time. There’s no cooking, no baking, and very little to clean up.
- Active prep time: About 5 minutes to measure, whisk, and mix.
- Initial rest: 10 minutes, then a quick re-whisk to prevent clumps.
- Chilling time: Minimum 2 hours for a soft-set pudding; overnight yields the best, creamiest texture.
- Serving window: Ready to enjoy as soon as it’s thick to your liking. Excellent for making the night before and grabbing in the morning.
- Storage: 4–5 days in the refrigerator, tightly covered. It’s an easy meal-prep option for the week.
Pro Tips to Nail the Perfect Pudding
- Memorize the ratio: A reliable starting point is 1/2 cup chia seeds to 2 cups milk. For extra thick pudding, edge toward 1/2 cup + 1–2 tablespoons chia; for lighter, use a touch less chia or a richer milk.
- Stir twice: The first whisk hydrates the seeds; the second whisk (after 10 minutes) breaks up early clumps. This simple step creates a silky, uniform texture.
- Choose your milk wisely: Almond or oat milk makes a lighter pudding; coconut milk (especially canned) makes a lush, dessert-like version; dairy milk lands comfortably in the middle.
- Warm liquid mixes faster: If your sweetener or cocoa is stubborn, gently warm the milk before mixing. Don’t heat it hot—just lukewarm so powders dissolve smoothly.
- Add yogurt after thickening: Stirring in Greek yogurt once the pudding has set keeps the texture stable and creamy rather than runny.
- Blend for ultra-smooth pudding: If you prefer a mousse-like texture without visible seeds, blend the fully thickened pudding in a high-speed blender until silky.
- Flavor in layers: Sweeten the base lightly and add a ribbon of jam, a dusting of cinnamon, or a drizzle of nut butter on top. Layered flavors feel more complex and special.
- Don’t over-sweeten early: The flavor concentrates slightly as the pudding chills. Start with less sweetener; you can always add a touch more before serving.
- Prep in single-serve jars: Divide into small containers before chilling. It sets faster and turns busy mornings into grab-and-go ease.
- Mind the add-ins: Cocoa, protein powder, or nut butter will thicken the pudding. Add a few extra tablespoons of milk if needed to keep the texture spoonable.
Nutrition At a Glance
These numbers are approximate and will vary depending on the milk and sweetener you use. The estimate below is for the base recipe (1/2 cup chia seeds, 2 cups unsweetened almond milk, 2 tablespoons maple syrup, vanilla, and a pinch of salt), divided into 4 servings without toppings.
- Calories: ~140 per serving
- Protein: ~4 g
- Total fat: ~7 g
- Carbohydrates: ~16 g
- Fiber: ~7 g
- Net carbs: ~9 g
- Omega-3s: Chia seeds are a rich source (ALA), contributing to heart-healthy fats.
Note: Using regular dairy milk or canned coconut milk will increase calories and fat; adding Greek yogurt boosts protein. Toppings like nuts, nut butter, granola, or chocolate will also change the numbers, so adjust as needed for your goals.
Common Questions, Answered
Why didn’t my chia pudding thicken?
Usually it’s a ratio or mixing issue. Ensure you’re using enough seeds (about 1/2 cup per 2 cups milk) and whisk thoroughly, especially during the first 10 minutes. If it’s still thin, stir in 1–2 teaspoons more chia seeds and let it rest another 15–20 minutes. Check that your milk isn’t extremely thin or diluted, which can affect the set.
Can I make it without added sugar?
Yes. Sweeten with a mashed ripe banana, blended dates, or simply rely on naturally sweet toppings like fruit and a sprinkle of cinnamon. You can also skip sweeteners entirely and add a drizzle of maple syrup just before serving if you decide it needs it.
How long will chia seed pudding keep?
Stored in an airtight container in the refrigerator, it lasts 4–5 days. If you’re prepping for the week, keep toppings separate until serving for the best texture and freshness.
A Sweet Send-Off
There’s something quietly joyful about spooning into a chilled jar of chia seed pudding you made the night before. It’s simple, nourishing, and endlessly adaptable, whether you’re dressing it up with berries and toasted almonds or keeping it plain and comforting. With just a few pantry ingredients and a handful of minutes, you’ve got a little ritual that supports busy mornings and cozy evenings alike. I hope this recipe becomes a staple at your table—easy to make your own, easy to love, and always ready to share.