Fluffy Ricotta Pancakes Recipe: Light, Tender, Super Fluffy!
There’s something especially comforting about a stack of fluffy ricotta pancakes: tender in the center, lightly golden at the edges, and subtly creamy without feeling heavy. This recipe is the sweet spot between weekend-brunch indulgence and weekday practicality. You’ll whisk together simple ingredients, fold in airy egg whites, and watch the batter transform into tall, pillow-soft pancakes that practically melt on your fork. Expect a balanced flavor—just a touch of sweetness, a hint of vanilla, and the gentle richness of ricotta—plus a texture that’s irresistibly light. Whether you crown them with maple syrup and berries or a spoonful of honeyed yogurt, these pancakes are the kind you’ll be proud to serve and eager to make again.
- Reasons You’ll Fall for These Fluffy Ricotta Pancakes
- What You’ll Need: Ingredients and Why They Matter
- How to Make Them: A Straightforward, Step-by-Step Walkthrough
- Timing and Prep Details You’ll Appreciate
- Practical Tips to Guarantee Success
- A Quick Nutrition Overview
- Your Questions, Answered
- Wrapping Up with a Warm Note
Reasons You’ll Fall for These Fluffy Ricotta Pancakes
These pancakes deliver a cloud-like texture thanks to a combination of ricotta and whipped egg whites. They’re not overly sweet, which makes them ideal for pairing with fruit, lemon curd, or a drizzle of syrup. They cook up evenly, they’re forgiving (a great choice even if you’re new to pancake-making), and they stay tender as they cool. Plus, ricotta adds a satisfying boost of protein, making the stack feel substantial without being heavy. In short: soft, lofty, creamy-centered pancakes with golden edges and a clean vanilla-citrus finish.
What You’ll Need: Ingredients and Why They Matter
- Whole-milk ricotta (1 cup / 240 g) – Adds creaminess and moisture, creating a delicate, custard-like interior without weighing the pancakes down.
- All-purpose flour (1 cup / 125 g) – Provides structure. Measuring accurately (ideally by weight) helps keep the texture light.
- Milk (3/4 cup / 180 ml) – Loosens the batter to a pourable consistency. Use dairy or a plain, unsweetened non-dairy alternative.
- Large eggs, separated (2) – Yolks enrich the batter; whites are whipped and folded in to lift and fluff the pancakes.
- Granulated sugar (2 tablespoons) – Lightly sweetens the batter so toppings can shine without the pancakes becoming cloying.
- Baking powder (1½ teaspoons) – Gives the batter a reliable rise for tall, airy pancakes.
- Fine salt (1/4 teaspoon) – Balances sweetness and enhances flavor.
- Pure vanilla extract (1 teaspoon) – Adds warmth and depth; pairs beautifully with ricotta’s gentle tang.
- Lemon zest (1–2 teaspoons, optional) – Brightens the flavor and complements the ricotta. Highly recommended if you enjoy citrus notes.
- Unsalted butter, melted (2 tablespoons), plus more for the pan – Enriches the batter and helps brown the pancakes on the griddle.
- Neutral oil or additional butter for cooking – Ensures even browning and prevents sticking; a mix of butter and oil combines flavor with heat tolerance.
- Optional add-ins (1/2–3/4 cup): blueberries, chocolate chips, or diced strawberries – Fold into the batter or scatter onto each pancake while cooking for pockets of fruit or chocolate.
- Toppings: maple syrup, fresh berries, a dollop of yogurt, or a dusting of powdered sugar – Choose your favorite finish to complement the pancakes’ delicate taste.
How to Make Them: A Straightforward, Step-by-Step Walkthrough
- Prep your tools and pan. Set out a large nonstick skillet or griddle and a flexible spatula. Preheat over medium heat so it’s ready when the batter is mixed. If serving a crowd, warm your oven to 200°F (95°C) to keep pancakes hot.
- Separate the eggs. Place yolks in a medium bowl and whites in a clean, dry bowl. Keeping whites free of fat or yolk helps them whip well.
- Whisk the wet ingredients. To the yolks, add ricotta, milk, sugar, vanilla, lemon zest (if using), and melted butter. Whisk until smooth and creamy. A few ricotta curds are fine.
- Combine dry ingredients. In another bowl, whisk together flour, baking powder, and salt. This distributes the leavener evenly and prevents clumps.
- Make the batter. Add the dry ingredients to the ricotta mixture. Whisk gently just until the flour is incorporated; overmixing can make pancakes tough. The batter will be thick and slightly lumpy—perfect.
- Whip the egg whites. Using a hand mixer or a clean whisk, beat whites until they form soft peaks—fluffy and glossy, but not dry. Soft peaks are key for a light batter that still folds well.
- Fold in the whites. Add one-third of the whipped whites to the batter and stir to lighten. Gently fold in the remaining whites with a spatula using broad, sweeping motions. Preserve as much air as possible.
- Optional rest. Let the batter sit for 5 minutes. This brief rest helps the flour hydrate and the bubbles stabilize.
- Grease and test the pan. Lightly coat the preheated pan with butter and a few drops of oil. Test heat by flicking on a drop of water; it should sizzle gently, not sputter aggressively.
- Portion and cook. Spoon about 1/4 cup (60 ml) batter per pancake onto the pan, leaving space for spreading. If adding fruit or chocolate, sprinkle it onto each pancake now rather than mixing it into the bowl—this keeps the batter light and prevents sinking.
- Watch for cues. Cook 2–3 minutes until bubbles appear and edges look slightly set. Adjust heat if browning too quickly. Flip carefully and cook 1–2 minutes more until golden and springy to the touch.
- Keep warm and repeat. Transfer cooked pancakes to the warm oven while you finish the batch. Regrease the pan lightly between rounds for even browning.
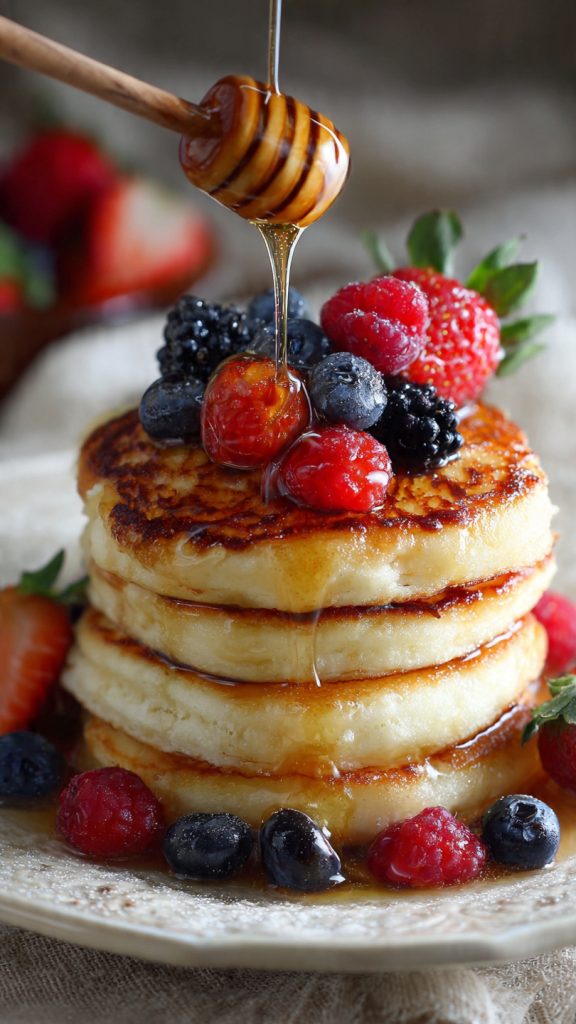
- Serve. Stack generously and finish with your favorite toppings: warm maple syrup, fresh berries, a dollop of yogurt, or a dusting of powdered sugar. Enjoy immediately for peak fluffiness.
Timing and Prep Details You’ll Appreciate
Great pancakes don’t require hours—just a bit of organization and consistent heat. Here’s a simple breakdown:
- Prep time: 10–15 minutes (separating eggs, mixing wet and dry, whipping whites)
- Rest time: 5 minutes (optional, improves texture)
- Cooking time: 10–15 minutes total, depending on pan size and number of batches
- Total time: About 25–35 minutes
- Yield: 10–12 pancakes (about 4 inches / 10 cm)
You’ll know they’re ready to eat when the pancakes are golden on both sides and lightly spring back when pressed. Serve right away for the softest, fluffiest texture.
Practical Tips to Guarantee Success
- Drain very wet ricotta: If your ricotta looks watery, spoon it into a fine sieve for 10–15 minutes. Excess moisture can make the batter runny and prevent a good rise.
- Measure flour accurately: For best results, weigh it. If using cups, fluff the flour, spoon it into the cup, and level. Too much flour leads to dense pancakes.
- Don’t overmix the batter: Mix dry into wet just until combined. A few small lumps are okay; they cook out and help keep the crumb tender.
- Whip whites to soft peaks: Overbeaten whites become dry and don’t fold in well. Stop when the tip of the peak gently curls.
- Mind the heat: Medium to medium-low is ideal. Too hot and the outsides brown before the centers set; too low and they won’t rise properly.
- Add-ins go on top, not in the bowl: Scatter berries or chocolate onto each pancake after ladling the batter. This keeps the base batter fluffy and prevents sinking.
- Grease wisely: A mix of butter (for flavor) and neutral oil (for higher smoke point) helps you avoid scorched butter while getting that golden crust.
- Make-ahead and reheat: Cook, cool on a rack, then refrigerate up to 3 days or freeze up to 2 months. Reheat in a low oven (300°F/150°C) or toaster for the best texture.
- Gluten-free swap: Use a 1:1 gluten-free all-purpose blend with xanthan gum. The ricotta keeps them moist and forgiving.
- No mixer? You can whisk egg whites by hand; it just takes a bit of elbow grease. Or, skip whipping whites and add an extra 1/2 teaspoon baking powder—the pancakes will be slightly less airy but still delicious.
A Quick Nutrition Overview
These numbers are approximate and will vary with toppings and exact ingredient brands. Calculated for a batch of 12 pancakes, with a serving of 2 pancakes (no toppings):
- Calories: ~260
- Protein: ~12 g
- Total fat: ~11 g
- Saturated fat: ~5 g
- Carbohydrates: ~26 g
- Fiber: ~1 g
- Total sugars: ~7 g
- Sodium: ~330 mg
Serving with fresh berries, a spoonful of yogurt, or a drizzle of real maple syrup adds both flavor and nutrients. If you prefer a lighter option, skip the butter on the griddle and use a light spray of oil; for more richness, serve with a pat of butter and a generous pour of syrup.
Your Questions, Answered
Can I use part-skim ricotta instead of whole-milk?
Yes, part-skim ricotta works, though results will be slightly less creamy. If it’s very watery, drain it briefly to avoid a thin batter.
Do I have to whip the egg whites?
No. Whipping whites gives the fluffiest texture, but you can skip this step and add an extra 1/2 teaspoon of baking powder. The pancakes will still rise nicely, just a bit less dramatically.
Can I freeze leftover pancakes?
Absolutely. Cool completely, layer with parchment, and freeze in an airtight bag up to 2 months. Reheat in a 300°F (150°C) oven or toaster until warmed through and lightly crisp at the edges.
Wrapping Up with a Warm Note
There’s a special kind of joy in flipping pancakes that puff before your eyes and filling the kitchen with the cozy scent of butter and vanilla. These fluffy ricotta pancakes are simple enough for a slow morning and special enough for a celebratory brunch. They invite conversation, second helpings, and a table filled with toppings and laughter. With a few thoughtful steps—whipping the whites, minding the heat, and choosing your favorite finish—you’ll have a stack that feels restaurant-worthy yet wonderfully homemade. Here’s to an easy recipe you can count on, plate after plate, weekend after weekend. Enjoy every bite.