Japanese Cotton Cheesecake Recipe: Fluffy, Jiggly Perfection
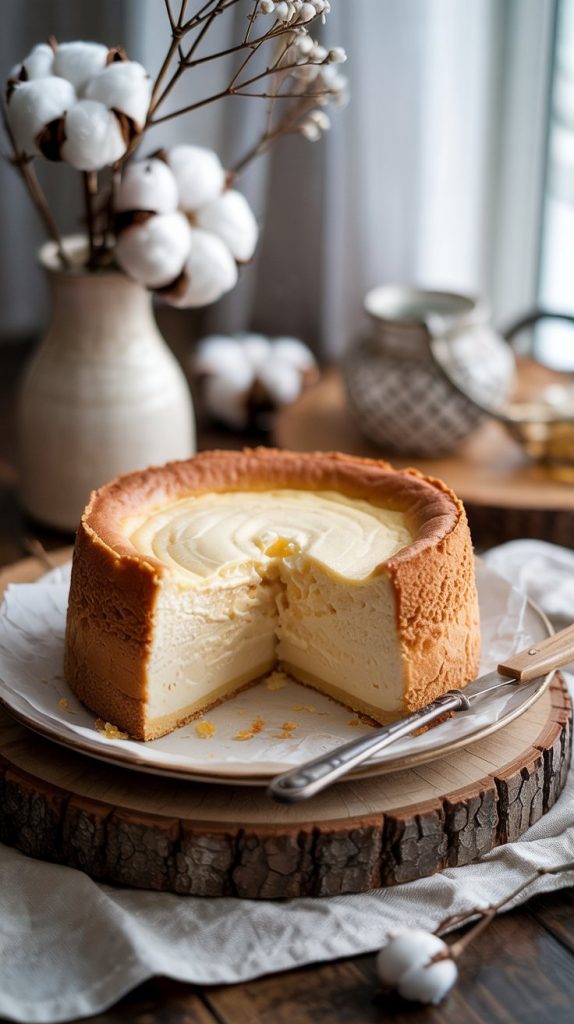
Imagine a cheesecake so light it nearly floats, with a tender, cloud-like crumb that melts the moment it touches your tongue. That’s Japanese Cotton Cheesecake—delicate, gently sweet, and wonderfully airy. In this guide, I’ll walk you through each step as if we’re baking together in the same kitchen, showing you how to create that signature wobble, achieve a smooth top, and slice into a cake that feels as comforting as it looks. Expect clear instructions, a few insider tips, and a recipe that rewards patience with truly special results.
Reasons You’ll Fall for This Cloud-Soft Cheesecake
Japanese Cotton Cheesecake is special because it blends the best of two worlds: the rich flavor of classic cheesecake and the featherlight structure of a soufflé. It’s not heavy or overly sweet, and it carries a gentle creaminess that lingers pleasantly. The texture is the star—soft, bouncy, and elegant enough for celebrations yet humble enough to enjoy with tea on a quiet afternoon. With a water-bath bake and a slow cool-down, this dessert rises tall, stays moist, and tastes like a tender whisper of vanilla and cream.
What You’ll Need: Ingredients and Why They Matter
- Cream cheese (250 g / about 9 oz, room temperature): The creamy base that gives gentle tang and body.
- Unsalted butter (60 g / 4 tbsp): Adds richness and a silky mouthfeel.
- Whole milk (120 ml / 1/2 cup): Thins the batter and promotes a soft, custardy texture.
- Large eggs (6, separated): Yolks enrich the batter; whipped whites create the signature lift and airy crumb.
- Granulated sugar (140 g / 2/3 cup, divided): Sweetens; half stabilizes the meringue, half flavors the yolk batter.
- Cake flour (60 g / 1/2 cup, spooned and leveled): Low-protein flour keeps the crumb tender and delicate.
- Cornstarch (20 g / 2 1/2 tbsp): Helps set the cake gently and maintains a light, jiggly texture.
- Cream of tartar (1/2 tsp): Stabilizes the egg whites so they whip and fold smoothly.
- Fine salt (1/4 tsp): Balances sweetness and deepens overall flavor.
- Vanilla extract (1 tsp): Bright, warm aroma that complements the subtle sweetness.
- Lemon juice (1 tbsp): A touch of acidity to balance richness and help the meringue.
- Optional lemon zest (1 tsp): Adds citrusy freshness without extra moisture.
- Powdered sugar, for dusting: A light finish that looks pretty and adds a whisper of sweetness.
- Hot water, for the water bath: Creates gentle, even heat and prevents cracking.
How to Make It: A Clear, Step-by-Step Walkthrough
- Prep your pan and oven. Line the bottom and sides of an 8-inch (20 cm), tall-sided round cake pan or springform with parchment. If using a springform, wrap the outside with two layers of heavy-duty foil to prevent water from seeping in. Preheat the oven to 325°F (163°C). Place a large roasting pan on the middle rack to serve as your water bath.
- Warm the dairy base. In a heatproof bowl set over a pot of gently simmering water (or in a heavy saucepan over very low heat), combine cream cheese, butter, and milk. Stir until completely smooth and warm, but not hot. Remove from heat and let it cool for a few minutes so it’s warm to the touch, not steamy.
- Build the yolk batter. Whisk the egg yolks into the warm cream cheese mixture until silky. Add half the sugar (70 g), vanilla, lemon juice, and salt. Sift the cake flour and cornstarch directly over the bowl. Whisk just until no streaks remain. For an extra-smooth crumb, pass the batter through a fine sieve into a clean bowl. Stir in optional lemon zest.
- Prepare for the water bath. Boil a kettle or heat plenty of water until nearly boiling. You’ll need enough to reach halfway up the sides of your cake pan when placed in the roasting pan.
- Whip the meringue. In a clean, grease-free bowl, beat egg whites on medium speed until foamy. Add cream of tartar. Gradually stream in the remaining sugar (70 g), increasing speed to medium-high. Whip to glossy medium peaks—when you lift the beaters, the peaks should curl slightly at the tip. Avoid very stiff peaks; they are harder to fold and can lead to cracks.
- Fold with care. Stir a scoop of meringue into the yolk batter to lighten it. Then fold in the remaining meringue in two more additions using a gentle, sweeping motion. Stop as soon as you no longer see streaks. Overmixing deflates the batter; undermixing leaves pockets of egg white.
- Fill the pan and release bubbles. Pour the batter into the prepared pan. Tap the pan firmly on the counter 2–3 times to pop large air pockets. Run a skewer through the batter in a gentle zigzag to further release hidden bubbles.
- Set up the bath and bake. Place the cake pan into the roasting pan and pour in hot water to reach halfway up the sides of the cake pan. Bake for 15 minutes at 325°F (163°C). Then reduce the oven to 300°F (150°C) without opening the door, and continue baking for 40–50 minutes. The cake should rise, tremble slightly, and look set around the edges with a very soft jiggle in the center.
- Check for doneness. The top should be lightly golden with no wet shine in the middle. If using an instant-read thermometer, the center should register around 155–160°F (68–71°C). If it’s pale and very wobbly, add 5–10 minutes.
- Cool gradually. Turn off the oven and prop the door open slightly with a wooden spoon. Leave the cake inside for 20–30 minutes so it deflates slowly. Remove from the water bath, unwrap any foil, and set the pan on a rack.
- Release the sides. While still warm, run a thin knife around the edge to prevent sticking. Let the cake cool to room temperature for about 1 hour.
- Chill for the perfect texture. Refrigerate for at least 4 hours, preferably overnight. To unmold, invert gently onto a plate lined with parchment, peel off the lining, then flip onto a serving plate. Dust with powdered sugar before slicing.
- Serve with care. Use a warm, dry knife and wipe between cuts for tidy slices. Enjoy plain, or pair with fresh berries, a spoonful of lemon curd, or a kiss of lightly whipped cream.
Timing, Prep, and When It’s Ready
- Prep time: 25–30 minutes (pan setup, mixing, whipping meringue)
- Bake time: 55–65 minutes total (15 minutes at 325°F, then 40–50 minutes at 300°F)
- Rest in oven: 20–30 minutes to prevent sudden collapse
- Cool at room temperature: About 1 hour
- Chill: Minimum 4 hours; overnight yields the best structure and flavor
You’ll know it’s ready to enjoy when the center is set enough to slice cleanly but still soft and slightly bouncy. The chill time is important—it lets the crumb stabilize and the flavors mingle, so try to plan ahead. The first slice should quiver just a little, then melt away into creamy lightness.
Pro Tips That Make All the Difference
- Room temperature ingredients: Soft cream cheese and room-temp eggs ensure a smooth batter with no lumps.
- Weigh for accuracy: A kitchen scale helps nail the delicate balance of flour and sugar for consistent results.
- Sift the dry ingredients: Sifting cake flour and cornstarch keeps the crumb fine and uniform.
- Meringue matters: Aim for medium peaks—glossy and flexible—to help the cake rise evenly without cracking.
- Fold gently, not endlessly: Use broad, deliberate strokes; stop as soon as the batter is homogenous.
- Use a tall parchment collar: Line the pan sides higher than the rim to support the rise and minimize sticking.
- Water bath = even baking: The steam keeps the cheesecake tender and prevents tough edges or a domed top.
- Control your oven: Ovens vary; an oven thermometer helps you keep temperatures steady and accurate.
- Prevent collapse: Cool slowly with the door ajar, then release the sides while warm so the cake doesn’t cling and shrink.
- Storage: Refrigerate, covered, for up to 4 days. You can also freeze individual slices, wrapped well, for up to 1 month.
A Quick Nutrition Overview
These numbers are approximate and will vary with brands and exact slice sizes. Based on 12 servings:
| Calories | ~220 per slice |
| Protein | ~5–6 g |
| Carbohydrates | ~17–19 g |
| Total Fat | ~14–15 g |
| Saturated Fat | ~8–9 g |
| Sugars | ~14–16 g |
| Fiber | ~0–1 g |
| Sodium | ~150–200 mg |
Japanese Cotton Cheesecake is lighter than classic, dense cheesecakes, but still treat-worthy. Pair a slice with fresh fruit to add brightness without too much extra sweetness.
Questions Bakers Often Ask
Can I use all-purpose flour instead of cake flour?
Yes. For 60 g cake flour, use 60 g all-purpose flour minus 6 g, then replace that 6 g with cornstarch (so 54 g AP + 6 g cornstarch). Sift well. The crumb may be a touch less delicate, but it will still be lovely.
How do I stop the cheesecake from cracking or shrinking?
Keep the heat gentle with a proper water bath, avoid overwhipping the meringue, and fold carefully to keep the batter airy. Line the sides with a tall parchment collar, bake low and slow, and let the cake cool gradually in the oven with the door ajar before bringing it to room temperature. Release the sides while warm so it doesn’t cling to the pan.
Can I flavor it with matcha, citrus, or chocolate?
Absolutely. For matcha, sift 1–2 tsp into the dry ingredients. For a citrus-forward cake, add 1–2 tsp finely grated lemon or yuzu zest. For chocolate, whisk in 1 tbsp cocoa powder and reduce the cake flour by 1 tbsp. Keep added liquids minimal to preserve the texture.
A Warm Send-Off
Baking a Japanese Cotton Cheesecake invites you to slow down and enjoy the process—the gentle folding, the quiet rise, and the moment it trembles on the plate before you take a bite. It’s a dessert that brings smiles without overpowering sweetness, and it shines whether you serve it after dinner or alongside afternoon tea. I hope these steps and tips help you create a cake you feel proud to share. With a little patience and care, you’ll pull from the oven a soft, golden beauty that tastes like a celebration. Happy baking, and may your cheesecake be as light as a cloud and every slice just as joyful.