Red Velvet Cheesecake Brownies Recipe: Fudgy, Swirled Bliss!
Imagine the fudgiest red velvet brownie you’ve ever tasted—deeply cocoa-kissed with that signature tang—and now picture it ribboned with a silky, vanilla-scented cheesecake swirl. That’s what you’re getting here: Red Velvet Cheesecake Brownies that look stunning, slice like a dream, and taste like a celebration. They’re the type of dessert that draws a chorus of “wow” before anyone even takes a bite.
This recipe is designed to be both impressive and approachable. You’ll get straightforward steps, clear timing cues, and plenty of helpful tips to make your brownies come out beautifully on the first try. Expect a dense, moist crumb under a creamy, marbled cheesecake top—an irresistible combo of texture and flavor that’s perfect for birthdays, holidays, or “just because” baking.
- Why These Red Velvet Cheesecake Brownies Will Win You Over
- What You’ll Need: Ingredients for Red Velvet Cheesecake Brownies
- Step-by-Step Guide to Making Red Velvet Cheesecake Brownies
- Timing & Prep at a Glance
- Helpful Tips for Flawless Results
- Your Nutritional Snapshot
- Frequently Asked Questions
- A Few Final Thoughts
Why These Red Velvet Cheesecake Brownies Will Win You Over
These brownies strike that perfect balance: rich without being heavy, sweet but not cloying, and sophisticated yet simple enough for a weekday bake. The red velvet base brings gentle cocoa notes and a soft tang, while the cheesecake layer adds smoothness and a hint of vanilla. Together, they create a show-stopping bite that feels special without demanding bakery-level effort. Even beginner bakers can nail the swirl and get gorgeous, marbled squares.
What You’ll Need: Ingredients for Red Velvet Cheesecake Brownies
For the Red Velvet Brownie Layer
- Unsalted butter, 1/2 cup (115 g), melted and slightly cooled — adds richness and helps create a fudgy crumb.
- Granulated sugar, 1 cup (200 g) — sweetens and contributes to that shiny crust.
- Large eggs, 2 (room temperature) — bind the batter and create a soft, fudgy texture.
- Vanilla extract, 2 teaspoons — rounds out the cocoa and enhances the overall flavor.
- Unsweetened cocoa powder, 2 tablespoons — provides a chocolate backbone without overwhelming the red velvet character.
- Red gel food coloring, 1 to 2 teaspoons — gives that vivid red hue; gel won’t dilute the batter like liquid dye can.
- White vinegar, 1 teaspoon — adds subtle tang and accentuates the red velvet profile.
- All-purpose flour, 3/4 cup (95 g) — provides structure while keeping the brownies tender.
- Fine sea salt, 1/4 teaspoon — balances sweetness and sharpens flavors.
For the Cheesecake Swirl
- Full-fat cream cheese, 8 ounces (226 g), very soft — the star of the swirl; softness ensures a smooth, lump-free mixture.
- Granulated sugar, 1/3 cup (65–70 g) — sweetens and helps the swirl set just right.
- Large egg, 1 (room temperature) — adds structure so the cheesecake bakes up creamy, not runny.
- Vanilla extract, 1/2 teaspoon — brings warmth and dessert-shop depth to the swirl.
- Optional: Sour cream, 2 tablespoons — for extra silkiness and a slight tang.
Optional Add-Ins & Finishes
- Mini chocolate chips, 1/2 cup — for extra pockets of chocolate in the brownie layer.
- Flaky sea salt — a light sprinkle on top to accent the sweetness.
- Beet powder, 1–2 teaspoons — optional natural boost for red color if you prefer using a bit less dye.
Step-by-Step Guide to Making Red Velvet Cheesecake Brownies
- Preheat and prepare the pan. Heat your oven to 350°F (175°C). Line an 8-inch or 9-inch square baking pan with parchment, leaving overhang on two sides for easy lifting. Lightly grease any exposed edges. A parchment sling makes clean slicing and removal much easier.
- Start the brownie batter. In a medium bowl, whisk together the melted butter and granulated sugar until glossy and combined, about 30 seconds.
- Add eggs and vanilla. Whisk in the eggs one at a time, followed by the vanilla. Beat for about 45–60 seconds until the mixture looks slightly thick and satiny. This bit of aeration helps with that coveted shiny top.
- Color and flavor. Whisk in the cocoa powder, red gel food coloring, vinegar, and salt until evenly tinted. Start with 1 teaspoon of gel and add more if you’d like a brighter red.
- Finish the batter. Gently fold in the flour just until no dry streaks remain. If using mini chocolate chips, fold them in now. Reserve about 1/4 cup of the red batter for the top swirl. Spread the rest into the prepared pan, smoothing it into the corners.
- Make the cheesecake swirl. In a separate bowl, beat the softened cream cheese until completely smooth and lump-free. Add the sugar and beat again until glossy. Mix in the egg and vanilla (and sour cream if using) just until combined. Avoid overmixing—you don’t want too much air in the swirl.
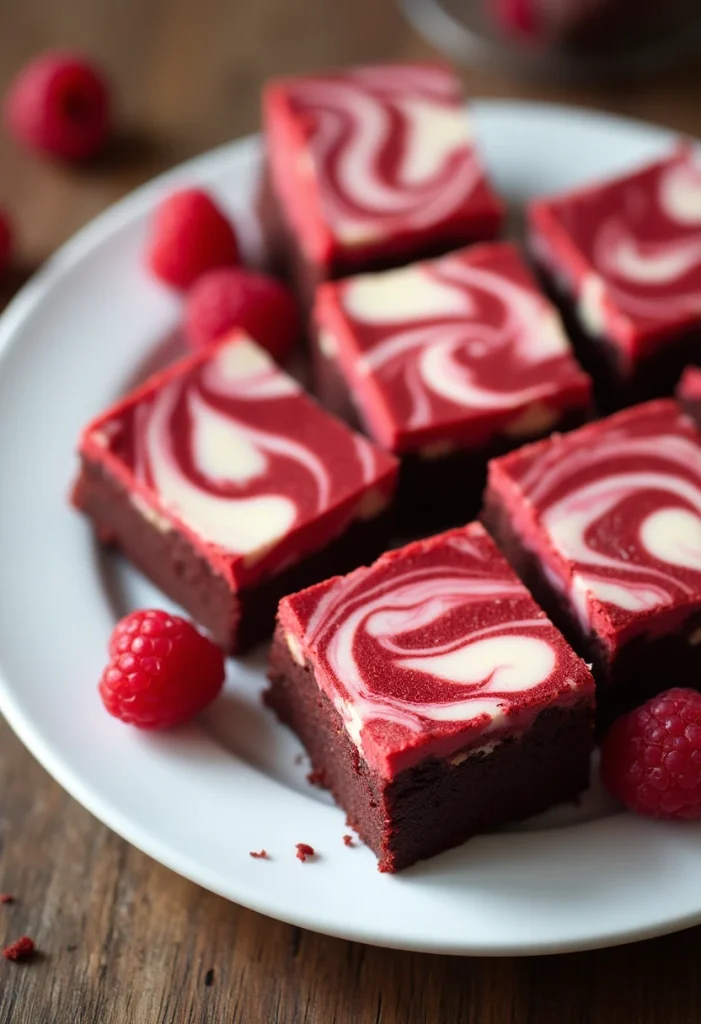
- Dollop and swirl. Spoon the cheesecake mixture in several big dollops evenly over the red batter. Add small spoonfuls of the reserved red batter on top of the cheesecake. Use a thin knife or skewer to swirl with gentle figure-eight motions. Stop when you like the pattern—over-swirling can muddy the colors.
- Tap the pan. Give the pan a couple of light taps on the counter to release any large air bubbles and level the top.
- Bake. Set the pan on the center rack. For a 9-inch pan, bake 28–33 minutes. For an 8-inch pan, bake 32–38 minutes. The edges should look set, and the center should have a slight jiggle. A toothpick inserted near (but not in) the cheesecake swirls should come out with a few moist crumbs, not wet batter.
- Cool and set. Transfer to a wire rack and cool in the pan for at least 1 hour. For the neatest slices, chill an additional 1 hour in the fridge. Cooling lets the cheesecake layer firm up for cleaner cuts and a perfect texture.
- Slice and serve. Lift the slab out using the parchment and cut into 16 squares. Wipe the knife between cuts. Sprinkle flaky salt if you like a sweet-salty finish.
- Store leftovers. Keep in an airtight container in the refrigerator for up to 5 days. They’re also freezer-friendly for up to 2 months; thaw overnight in the fridge.
Timing & Prep at a Glance
- Prep time: 20 minutes (including mixing and pan prep)
- Bake time: 28–33 minutes in a 9-inch pan; 32–38 minutes in an 8-inch pan
- Cooling: 1 hour at room temperature
- Optional chilling for clean slices: 1 hour in the fridge
- Total time: About 2 hours 30 minutes (including cooling)
These brownies are ready to enjoy once they’ve cooled fully and the cheesecake layer has set. If you love a cleaner look, plan on that extra chill hour. It’s worth it for those sharp, bakery-style squares that hold their shape and show off the marbling.
Helpful Tips for Flawless Results
- Room temperature ingredients are key. Soft cream cheese and room-temp eggs make the cheesecake swirl ultra-smooth and prevent lumps.
- Use gel food coloring. It packs more color without thinning the batter. If you prefer less dye, use beet powder to supplement the hue.
- Don’t overmix the flour. Fold just until combined to keep the brownies fudgy rather than cakey.
- Resist over-swirling. A few confident, gentle passes produce distinct ribbons and prevent colors from blending into pink.
- Watch for the jiggle. Pull them when the edges are set and the center has a slight wobble; they’ll firm up as they cool.
- Pan matters. A light-colored metal pan promotes even baking. Dark pans run hotter—check for doneness 3–5 minutes early.
- Measure accurately. If you can, weigh the flour (95 g). Too much flour is the fastest route to dry brownies.
- Clean cuts. Warm your knife under hot water, dry it, and wipe between slices for crisp, photo-ready edges.
- Flavor boost. A tiny pinch of espresso powder in the brownie batter can subtly deepen the cocoa notes without tasting like coffee.
Your Nutritional Snapshot
Approximate nutrition per serving (1 square, 1/16 of an 8–9 inch pan). Values will vary with brands and optional add-ins.
| Calories | ~200 |
| Protein | ~3 g |
| Carbohydrates | ~22 g |
| Total Fat | ~11 g |
| Saturated Fat | ~6 g |
| Fiber | ~0.5 g |
| Sugars | ~15 g |
| Sodium | ~120 mg |
Frequently Asked Questions
Can I use Dutch-processed cocoa instead of natural cocoa?
Yes. Since this recipe doesn’t rely on baking soda for leavening, either natural or Dutch-processed cocoa works. Dutch cocoa gives a deeper chocolate flavor and slightly darker hue; natural cocoa keeps the red more vibrant.
How can I make these in a 9×13-inch pan?
Double the recipe and bake in a 9×13-inch pan at 350°F (175°C) for about 35–42 minutes. Watch for set edges and a slight jiggle in the center; check doneness a bit early to avoid overbaking.
Can I reduce the food coloring?
Absolutely. Use 1 teaspoon gel color for a subtler red, and add 1–2 teaspoons beet powder to boost color naturally. The brownies will still taste just as delicious even if the color is softer.
A Few Final Thoughts
There’s something about the swirl of red velvet and cheesecake that makes people smile before they even take a bite. These brownies are a little bit dramatic and a lot comforting—familiar flavors presented in a striking, marbled package. If you’re baking for a gathering, they’re the kind of dessert that starts conversations and disappears quickly from the plate.
Most of all, I hope you feel confident as you make them. With a handful of pantry staples and a few thoughtful techniques, you’ll turn out brownies that look as good as they taste. Share them with friends, bring them to a potluck, or keep a few squares tucked in the fridge for a sweet moment after dinner. Happy baking—may your swirl be stunning and your brownies perfectly fudgy.