Red Velvet Strawberry Cheesecake Recipe: Creamy and Decadent
If you’re dreaming of a dessert that feels special but still cozy, this Red Velvet Strawberry Cheesecake is exactly that—familiar flavors dressed up for a celebration. Picture a velvety, vanilla cheesecake swirled with a ruby-red ribbon of cocoa-kissed batter, all resting on a buttery red velvet cookie crust. Then, just before serving, it’s crowned with glossy, juicy strawberries that add brightness and freshness to every bite. This recipe walks you through each step with ease, so you can feel confident from your first crumb to the final slice. Whether you’re baking for a birthday, a holiday, or simply because a weekend deserves dessert, you’ll end up with a showstopper that tastes every bit as good as it looks.
- Reasons You’ll Fall for This Red Velvet Strawberry Cheesecake
- What You’ll Need: Ingredients for a Red Velvet Strawberry Cheesecake
- Your Step-by-Step Path to Red Velvet Strawberry Cheesecake
- Timing & Preparation Details to Keep You on Track
- Tips for Success (From One Home Baker to Another)
- A Quick Nutrition Look-Through
- Frequently Asked Questions
- Final Thoughts to Send You Off Confidently
Reasons You’ll Fall for This Red Velvet Strawberry Cheesecake
This cheesecake brings together three beloved elements—red velvet, creamy cheesecake, and fresh strawberries—in a way that’s balanced rather than heavy. The red velvet swirl adds a gentle cocoa note and that signature, celebratory color without overpowering the cheesecake’s classic tang and creaminess. The strawberry topping is bright and lightly sweet, offering a refreshing contrast to the rich filling. It’s a dessert that feels indulgent but not fussy, and it’s designed to be forgiving for home bakers. Expect a smooth, crack-free top, a sturdy yet tender crust, and slices that cut cleanly after a good chill. Most of all, expect the kind of dessert that makes people pause, smile, and reach for seconds.
What You’ll Need: Ingredients for a Red Velvet Strawberry Cheesecake
- 2 cups finely crushed red velvet sandwich cookies (about 24 cookies) — provides a colorful, cocoa-vanilla base that’s slightly crisp when chilled.
- 5 tablespoons unsalted butter, melted — binds the crumbs and adds richness to the crust.
- 1/8 teaspoon fine sea salt — balances the sweetness and sharpens flavor.
For the Cheesecake Filling
- 32 ounces full-fat cream cheese, room temperature — the heart of the cheesecake; room-temp ensures a silky, lump-free batter.
- 1 cup granulated sugar — sweetens and helps the filling set with a smooth texture.
- 1/2 cup sour cream, room temperature — adds tang and a delicate softness to the filling.
- 1/2 cup heavy cream, room temperature — contributes richness and a lush mouthfeel.
- 3 large eggs, room temperature — the structure builders that set the custard gently.
- 1 teaspoon pure vanilla extract — rounds out the dairy flavors with warmth.
- 1 tablespoon fresh lemon juice (optional) — brightens the filling and balances sweetness.
- 1/4 teaspoon fine sea salt — amplifies flavor complexity without tasting salty.
For the Red Velvet Swirl
- 2 tablespoons unsweetened cocoa powder — provides that classic red velvet cocoa backbone.
- 2 tablespoons buttermilk — introduces a subtle tang and deepens color and flavor.
- 1/2 teaspoon white vinegar — reacts with cocoa for a “red velvet” signature and prevents dullness.
- 1 teaspoon red gel food coloring — lends vivid color without thinning the batter.
For the Strawberry Topping
- 1 pound (450 g) fresh strawberries, hulled and halved — juicy, bright, and elegant on top.
- 1/3 cup granulated sugar — gently sweetens the berries and helps create a glaze.
- 1 tablespoon lemon juice — adds lift and preserves color.
- 2 teaspoons cornstarch + 2 tablespoons water — thickens the syrup to a glossy, slice-friendly finish.
Optional Garnish
- Lightly sweetened whipped cream — adds airy contrast to rich cheesecake.
- White or dark chocolate curls — for a touch of drama and extra decadence.
Ingredient note: If you can’t find red velvet sandwich cookies, you can use chocolate wafer cookies for the crust. The color will be darker, but the flavor will still complement the cheesecake beautifully.
Your Step-by-Step Path to Red Velvet Strawberry Cheesecake
- Prepare your pan and oven. Line the bottom of a 9-inch springform pan with parchment and lightly grease the sides. Preheat the oven to 325°F (163°C). If using a water bath, wrap the outside of the pan with two layers of heavy-duty foil to prevent leaks.
- Make the crust. Mix the cookie crumbs, melted butter, and salt until the texture resembles damp sand. Press the mixture firmly into the bottom of the springform pan, creating an even layer. Use a flat-bottomed glass to compact the crumbs for a sturdy crust.
- Par-bake the crust. Bake the crust for 8–10 minutes, just until set and fragrant. Let it cool slightly while you make the filling.
- Set up steam for baking. For a classic water bath, place the foil-wrapped pan in a larger roasting pan and set aside. For an easier alternative, place a separate pan of hot water on the lower oven rack to create steam. Steam helps prevent cracks and yields a creamy texture.
- Beat the cream cheese. In a large bowl (or stand mixer on medium-low), beat the room-temperature cream cheese until very smooth, about 2 minutes. Scrape the bowl and paddle thoroughly to avoid lumps.
- Add sugar and salt. Sprinkle in the granulated sugar and salt and beat until creamy and combined, about 1 minute more. Avoid whipping too much air into the batter.
- Mix in sour cream, heavy cream, vanilla, and lemon juice (if using). Blend on low speed until fully incorporated, scraping the bowl as needed for a uniform texture.
- Add the eggs. Beat in the eggs one at a time on low speed, mixing just until each disappears. Tip: Overmixing at this stage can add air bubbles and encourage cracking, so keep it gentle.
- Portion for the red velvet swirl. Transfer about 1 1/2 cups of the cheesecake batter into a separate bowl. To this small bowl, add cocoa powder, buttermilk, vinegar, and red gel food coloring. Stir until smooth and richly red. The consistency should match the main batter; adjust with a teaspoon more buttermilk if needed.
- Fill the pan. Pour roughly two-thirds of the plain cheesecake batter over the par-baked crust. Dollop half of the red velvet batter on top in large spoonfuls. Add the remaining plain batter, then finish with the remaining red velvet dollops.
- Swirl it artfully. Use a butter knife or skewer to gently swirl the batters together in a figure-eight motion. Aim for 4–6 smooth passes; over-swirling can muddy the color instead of creating clean ribbons.
- Bake. If using a true water bath, set the springform (inside the roasting pan) on the oven rack and carefully pour hot water into the roasting pan to reach halfway up the sides of the springform. If using the steam method, place the water-filled pan on the lower rack and the cheesecake on the middle rack. Bake for 55–70 minutes, until the edges are set but the center still jiggles slightly like gelatin.
- Cool gradually. Turn off the oven and crack the door open 2 inches. Let the cheesecake rest inside for 45–60 minutes. This slow cooling helps prevent sudden temperature shock and cracks.
- Bring to room temperature. Remove the cheesecake from the oven and water bath, discard the foil, and run a thin knife around the edge to loosen it from the pan. Cool on a rack until it reaches room temperature.
- Chill to set. Cover the pan and refrigerate for at least 6 hours, preferably overnight. Chilling is essential for a clean slice and a fully set texture.
- Prepare the strawberry topping. In a small saucepan, combine the sugar, lemon juice, and cornstarch mixed with water. Cook over medium heat, stirring, until the syrup turns translucent and thickens slightly, 1–2 minutes. Remove from heat, fold in the strawberries, and let cool. The fruit will look glossy and lightly glazed.
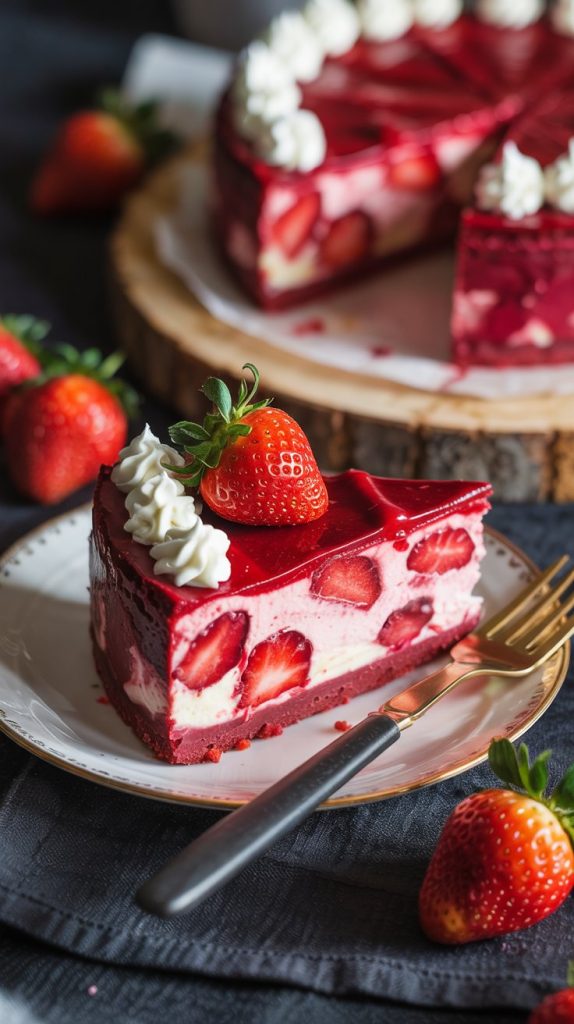
- Top the cheesecake. Unlatch the springform and transfer the chilled cheesecake to a serving plate. Spoon the cooled strawberries and their syrup over the top, letting a few tumble over the edges for a dramatic look.
- Garnish and serve. Add whipped cream rosettes and chocolate curls if you like. Slice with a sharp, thin knife run under hot water and wiped clean between cuts for picture-perfect wedges.
Timing & Preparation Details to Keep You on Track
- Prep time: about 30–40 minutes (crust, batter, and swirl).
- Active baking time: 55–70 minutes, depending on your oven and water-bath method.
- Oven resting: 45–60 minutes in a turned-off oven with the door cracked.
- Room-temperature cool: 1 hour.
- Chilling time: at least 6 hours, ideally overnight.
- Strawberry topping: 10 minutes to cook, plus cooling time.
When is it ready? Your cheesecake is set when the center jiggles softly (not sloshy) after baking, then firms up completely after chilling. Plan to make it a day ahead so you can add the strawberries just before serving for the freshest finish.
Tips for Success (From One Home Baker to Another)
- Use room-temperature dairy. Soft cream cheese and room-temp eggs blend smoothly, preventing lumps and overmixing.
- Mix on low speed. Cheesecake thrives on minimal air. Keep your mixer on low and scrape the bowl frequently.
- Choose gel coloring. Gel or paste food coloring gives vibrant red velvet hues without thinning the batter like liquid colors can.
- Mind the swirl. Stop swirling as soon as you see defined ribbons. A light hand yields the prettiest patterns.
- To water bath or not? A true water bath gives maximal silkiness, but a pan of hot water on a lower rack works well and is simpler. Either way, steam is your friend.
- Guard against leakage. If using a water bath, tightly wrap the springform with heavy-duty foil, or set the springform inside a slightly larger cake pan for extra protection.
- Let it rest slowly. The oven-cooling step helps avoid cracks caused by sudden temperature changes.
- Chill thoroughly. The difference between a good cheesecake and a great one is often an overnight chill. It sets the texture and deepens flavor.
- Slice smart. Clean the knife with hot water between cuts for crisp, bakery-style slices.
- Make ahead. You can bake the cheesecake up to 2 days in advance; add the strawberry topping the day you serve for best freshness.
A Quick Nutrition Look-Through
These values are estimates based on 12 servings, and will vary with ingredient brands and exact portions.
| Nutrient | Per Slice (Approx.) |
|---|---|
| Calories | ≈ 580 |
| Protein | ≈ 9 g |
| Carbohydrates | ≈ 45 g |
| Sugars | ≈ 33 g |
| Fat | ≈ 42 g |
| Saturated Fat | ≈ 25 g |
| Fiber | ≈ 2 g |
| Sodium | ≈ 360 mg |
Frequently Asked Questions
Can I make this without red food coloring?
Yes. The cocoa, buttermilk, and vinegar still create a delicious “red velvet” flavor. Your swirl will be cocoa-colored rather than red, but the taste remains wonderful. You can also use a natural beet-based color if you prefer, as long as it’s concentrated and gel-style to avoid thinning the batter.
Do I have to use a water bath?
No. A water bath produces the smoothest texture, but a simple steam method—placing a pan of hot water on a lower rack—works well and is less fussy. The key is moisture in the oven and gentle heat. Always cool slowly and chill thoroughly to minimize cracks.
Can I freeze the cheesecake?
Absolutely. Freeze the baked, fully cooled, and un-topped cheesecake (still in the pan or well-wrapped) for up to 2 months. Thaw overnight in the refrigerator, then add the strawberry topping before serving. For best texture, avoid refreezing after topping.
Final Thoughts to Send You Off Confidently
There’s something joyful about a dessert that looks festive but feels familiar, and this Red Velvet Strawberry Cheesecake delivers that feeling from the first glance to the last bite. It’s a recipe that asks for a bit of patience and rewards you with a creamy texture, a striking swirl, and a bright, berry-crowned finish. Share it at a gathering or make it on a quiet weekend—either way, it has a way of bringing people closer around the table. Enjoy the process, trust the steps, and celebrate each little success along the way. You’ve got this, and your cheesecake will show it.