Easy Homemade Focaccia Bread Recipe: Foolproof Tips & Guide!
If you’ve ever walked past a bakery, caught a whiff of warm olive oil and herbs, and thought, “I wish I could make that at home,” this Easy Homemade Focaccia Bread is for you. It’s rustic, inviting, and surprisingly simple — the kind of bread that makes your kitchen smell incredible and turns even a simple bowl of soup into a special meal. In this guide, I’ll walk you through a straightforward method that doesn’t require fancy equipment or advanced techniques. Expect a golden, slightly crisp crust, a tender, airy interior, and plenty of character from good olive oil and your favorite toppings. We’ll keep it friendly and practical so you feel confident from the very first mix to that satisfying first slice.
- Why This Easy Homemade Focaccia Will Win You Over
- Ingredients You’ll Need for Easy Homemade Focaccia Bread
- How to Make Easy Homemade Focaccia Bread, Step by Step
- Timing and Preparation at a Glance
- Trusty Tips for Golden, Airy Focaccia
- Nutritional Snapshot
- Your Top Questions, Answered
- Final Reflections
Why This Easy Homemade Focaccia Will Win You Over
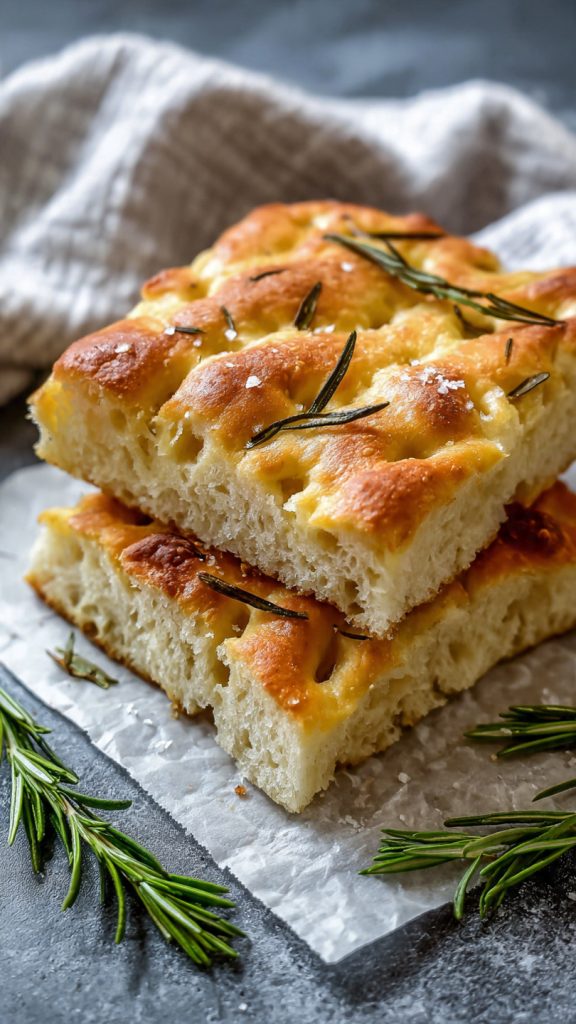
This focaccia delivers big flavor with minimal fuss. You don’t need to be a seasoned baker to pull it off — a bowl, a pan, and time are the essentials. The high-hydration dough creates that signature open, bubbly crumb, while olive oil lends richness and helps the crust crisp beautifully. Dimpling the dough isn’t just fun; it also creates little flavor pockets where oil and herbs nestle, making each bite memorable. Plus, the recipe is flexible: keep it classic with rosemary and flaky salt, or go bold with garlic, olives, or cherry tomatoes. Serve it warm as a snack, slice it for sandwiches, or pair it with soups and salads. It’s a bread that fits easily into everyday life but feels special enough for company.
Ingredients You’ll Need for Easy Homemade Focaccia Bread
- All-purpose or bread flour (4 cups / 500 g): The backbone of the dough. Bread flour yields a chewier crumb; all-purpose creates a slightly softer texture.
- Warm water (1¾ cups / 410–420 ml, about 105–110°F / 40–43°C): Hydrates the flour and activates the yeast for a light, airy crumb.
- Instant or active dry yeast (2¼ tsp / 7 g): Leavens the dough. Instant yeast can go straight in; active dry benefits from blooming in warm water.
- Fine sea salt (2 tsp): Strengthens the gluten structure and balances flavors so the bread tastes like bread, not just flour.
- Honey or sugar (1 tsp): A tiny nudge for the yeast, helping the dough rise efficiently and adding subtle sweetness.
- Extra-virgin olive oil (⅓ cup / 80 ml, plus more for the pan and drizzling): Adds richness and that signature focaccia flavor while encouraging a golden, crisp crust.
- Flaky sea salt (for topping): Finishes the bread with a gentle crunch and a pop of salinity in every bite.
- Fresh rosemary (1–2 tbsp, chopped): Classic aromatic topping that infuses the bread with herbal warmth.
- Garlic (2–3 cloves, thinly sliced; optional): Adds savory depth. Thin slices melt into the dough without overpowering it.
- Optional toppings (a handful of cherry tomatoes, olives, caramelized onions, or thinly sliced red onion): Personalize your focaccia and add color, juice, and texture.
- Coarse cornmeal (1–2 tsp; optional, for pan): Helps prevent sticking and lends a subtle crunch to the base.
How to Make Easy Homemade Focaccia Bread, Step by Step
- Get your pan ready. Generously oil a 9×13-inch (23×33 cm) baking pan or large rimmed sheet pan with 2–3 tablespoons olive oil. If you like, dust with a touch of cornmeal to prevent sticking and boost crunch. A well-oiled pan is key to a crisp, golden bottom.
- Activate the yeast (if using active dry). In a large bowl, whisk warm water with honey or sugar. Sprinkle in active dry yeast and let it sit 5–10 minutes until foamy. If using instant yeast, you can skip blooming and mix it directly with the flour and salt.
- Mix the dough. Add flour and fine sea salt to the bowl. Stir with a sturdy spoon or spatula until a shaggy dough forms and no dry streaks remain. Drizzle in about 2 tablespoons olive oil and fold the dough over itself to incorporate.
- Rest and hydrate (autolyse). Cover the bowl and let the dough rest for 10 minutes. This brief rest allows the flour to fully absorb the water, making the dough easier to handle and improving gluten development.
- Develop strength with folds. The dough will be sticky; that’s good. With damp or oiled hands, perform 3–4 sets of stretch-and-folds right in the bowl, spaced 5 minutes apart. To do one set: grab a portion of dough, stretch it up, and fold it over the center; rotate the bowl and repeat 3–4 times. You’ll feel it become smoother and bouncier.
- First rise. Cover and let the dough rise in a warm, draft-free spot until doubled, 1 to 2 hours depending on room temperature. For even better flavor and an easy schedule, you can refrigerate the dough for an overnight rise (12–18 hours). Slow, cold fermentation deepens flavor and improves texture.
- Prepare for the pan. If refrigerated, let the dough warm at room temperature for 30–45 minutes so it’s more workable. Pour 1–2 tablespoons olive oil into the prepared pan and tilt to coat the entire surface.
- Transfer and shape. Gently scrape the dough into the pan. With oiled fingertips, coax it toward the corners. Don’t force it; if it resists springing back, let it rest 10 minutes, then continue. The dough should fill most of the pan in an even layer.
- Second rise. Cover the pan loosely and let the dough puff until noticeably airy, 45–60 minutes at room temperature. You should see small bubbles forming just beneath the surface.
- Dimple and dress. Preheat your oven to 450°F (230°C). Drizzle 2–3 tablespoons olive oil over the dough. With oiled fingers, press straight down to create deep dimples all over, reaching the bottom of the pan each time. Sprinkle generously with flaky sea salt, rosemary, and any additional toppings. Press toppings gently into the dimples so they stick.
- Bake. Bake on the center rack for 20–25 minutes, until the top is golden and the edges are crisp. If your pan is dark, start checking at 18 minutes. The bottom should be well browned for that signature focaccia crunch.
- Cool and finish. Let the focaccia rest in the pan for 10 minutes, then lift it out with a spatula or turn it onto a rack. If you like, brush with a final whisper of olive oil while warm. The aroma at this moment is your reward.
- Slice and serve. Cut into squares or rectangles. Enjoy warm, at room temperature, or lightly reheated later. It pairs beautifully with soups, salads, spreads, and charcuterie — or simply dipped in more olive oil.
Timing and Preparation at a Glance
This focaccia can be made in one relaxed afternoon or split across two days for deeper flavor. Here’s a simple breakdown so you can plan with ease.
- Active prep: 20–25 minutes (mixing, folding, shaping, and topping)
- First rise: 1–2 hours at room temperature, or 12–18 hours in the refrigerator
- Second rise: 45–60 minutes after transferring to the pan
- Bake time: 20–25 minutes at 450°F (230°C)
- Cooling time: 10 minutes before slicing
If you’re aiming to serve this for dinner, start around midday for a same-day bake. For the make-ahead option, mix the dough the night before and let it cold-ferment; shape and bake the next day. The focaccia is ready to enjoy once it’s golden, the bottom is crisp, and it smells irresistible — about 10 minutes after it leaves the oven.
Trusty Tips for Golden, Airy Focaccia
- Use enough oil. Don’t skimp. Oil is the flavor carrier and your built-in nonstick layer. It helps form that crisp, deep-golden base that makes focaccia so satisfying.
- Embrace a sticky dough. A higher-hydration dough creates a more open crumb. If it sticks to your hands, lightly oil them rather than adding extra flour.
- Mind the water temperature. Water that’s too hot can harm your yeast; aim for pleasantly warm, not hot. A quick wrist test is enough if you don’t have a thermometer.
- Dimple with purpose. Press straight down with oiled fingertips to make deep, even dimples. This keeps the dough from ballooning and creates tiny pools for olive oil and flavor.
- Be thoughtful with toppings. Wet ingredients like tomatoes can weep; press them into dimples and avoid overloading the surface. Pre-cook watery vegetables or pat them dry for best results.
- Go for high heat. A fully preheated oven ensures a springy rise and a nicely caramelized crust. Rotate the pan in the last few minutes if your oven has hot spots.
- Try an overnight rest. Cold fermentation builds deeper, nuanced flavors and can make your schedule easier. The dough also becomes easier to stretch.
- Check the bottom. The underside should be well browned and crisp. If the top is done before the bottom, move the pan to a lower rack for a few extra minutes.
- Slice when it’s warm, not hot. Ten minutes of cooling lets the crumb set so slices stay neat and the interior stays pleasantly moist.
- Store and refresh smartly. Keep leftovers in an airtight container at room temperature for 1–2 days. Re-crisp in a 375°F (190°C) oven for 6–8 minutes or in a hot skillet with a drop of oil.
- Freeze for later. Wrap cooled pieces well and freeze up to 2 months. Reheat straight from frozen at 375°F (190°C) until hot and crisp.
Nutritional Snapshot
Nutrition will vary with toppings and the exact amount of olive oil you use, but here’s a general estimate for a 9×13-inch pan cut into 12 servings, made with 4 cups (500 g) flour and about ½ cup total olive oil used between the dough, pan, and finish.
- Calories: ~230 per serving
- Carbohydrates: ~30 g
- Protein: ~5 g
- Fat: ~10 g
- Saturated Fat: ~1.5 g
- Fiber: ~1–2 g
- Sodium: ~300–400 mg (varies with salt topping)
These numbers are estimates intended for guidance. If you’re tracking specific dietary needs, adjust for your toppings and oil usage, and use a nutrition calculator for precision.
Your Top Questions, Answered
Do I need bread flour, or will all-purpose work?
Both work nicely. Bread flour has a bit more protein, which can lead to a chewier texture and larger air pockets. All-purpose flour creates a slightly softer crumb that many people love. If you’re new to baking, start with what you have. You can even split the difference: half bread flour, half all-purpose.
Can I make this whole wheat or gluten-free?
For whole wheat, start by replacing 25–30% of the flour with whole wheat and add an extra tablespoon or two of water if the dough feels stiff. This maintains lightness while adding nutty flavor. For gluten-free, use a high-quality gluten-free bread flour blend designed for yeasted doughs and follow the package guidelines for hydration. The texture will differ but can still be delicious.
How should I store and reheat leftovers?
Once cooled, store at room temperature in an airtight container for up to 2 days. To refresh the crust, reheat in a 375°F (190°C) oven for 6–8 minutes, or in a hot skillet with a few drops of oil for extra crispness. For longer storage, freeze tightly wrapped pieces for up to 2 months and reheat directly from frozen until hot and crisp.
Final Reflections
Baking focaccia at home feels a bit like a celebration — the kind that starts in the mixing bowl and ends at the table, where everyone tears off a warm, fragrant piece and smiles. With just a few ingredients and a little patience, you create something generous, flavorful, and comforting. I hope this guide helps you feel confident and excited to try it, whether you keep it classic with rosemary or make it your own with favorite toppings. May your kitchen smell wonderful, your crust be golden, and your table be full. Enjoy every slice and the moments that come with it.