Apple Pie French Toast: Best Easy Recipe With Cinnamon Spice
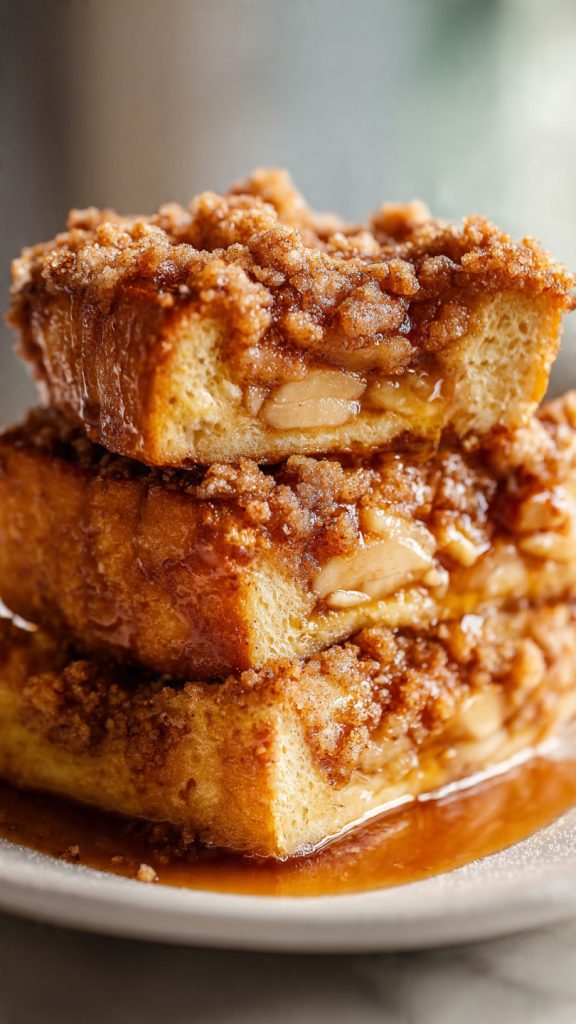
Imagine the cozy aroma of cinnamon-kissed apples and vanilla wafting through your kitchen, the gentle sizzle of butter on a hot griddle, and a plate piled high with golden slices of French toast crowned with warm apple pie filling. That’s the joy of Apple Pie French Toast—comforting, familiar, and just a little indulgent. This recipe brings together the best of two beloved classics and turns an ordinary morning into something special. Whether you’re planning a slow weekend brunch or treating guests to a memorable breakfast, you can expect a crisp-edged, custardy center, and caramelized apples that taste like the best part of pie—without needing to roll out any dough.
- What Makes This Apple Pie French Toast Irresistible
- What You’ll Need to Make Apple Pie French Toast
- Your Step-by-Step Roadmap to Apple Pie French Toast
- Timing and How Long Everything Takes
- Pro Tips to Make It Foolproof
- A Quick Nutrition Overview
- Common Questions, Answered
- Wrapping Up with a Warm Note
What Makes This Apple Pie French Toast Irresistible
This dish is all about balance. The bread is thick and custardy inside, slightly crisp outside, and scented with vanilla and warm spices. The apple topping, gently cooked with butter, brown sugar, and cinnamon, adds a cozy pie-like sweetness with just enough tartness to keep it bright. The result is a brunch-worthy plate that feels festive yet doable on any given morning. It’s comfort food with a weekend personality—simple enough to make on repeat, but special enough to serve to company.
What You’ll Need to Make Apple Pie French Toast
- Thick-sliced brioche or challah (8 thick slices) – Soft, slightly sweet breads soak up the custard while holding their shape for that classic French toast texture.
- Large eggs (3) – The backbone of the custard; they set as the toast cooks to create a plush interior.
- Whole milk (1 cup) – Adds moisture and richness without making the batter too heavy.
- Heavy cream (1/4 cup) – A touch of cream gives the custard a luxurious, dessert-like finish.
- Granulated sugar (2 tablespoons) – Light sweetness to balance the bread and spices.
- Vanilla extract (2 teaspoons) – Brings warmth and bakery-style aroma to the custard.
- Ground cinnamon (1 1/2 teaspoons, divided) – Half for the custard, half for the apples; it ties the whole “apple pie” theme together.
- Ground nutmeg (1/4 teaspoon) – A pinch adds depth and that unmistakable holiday note.
- Kosher salt (1/4 teaspoon) – Enhances flavor and keeps sweetness from becoming flat.
- Unsalted butter (4 tablespoons, divided) – For sautéing the apples and greasing the pan; it’s key for caramelization and crisp edges.
- Apples (3 medium; Honeycrisp, Granny Smith, or a mix) – Provide a sweet-tart, juicy topping that tastes like pie filling.
- Brown sugar (1/4 cup) – Helps the apples caramelize and develop a sauce.
- Lemon juice (1 teaspoon) – A small splash brightens the apple flavor and balances sweetness.
- Cornstarch (1 teaspoon) + water (1 tablespoon), optional – Forms a quick slurry to thicken the apple sauce if you prefer it glossy and jammy.
- Neutral oil or extra butter (1–2 tablespoons as needed) – Keeps the pan lubricated so each batch browns evenly.
- Maple syrup, whipped cream, toasted pecans (optional) – Finishing touches for extra texture, sweetness, and a little flourish.
Your Step-by-Step Roadmap to Apple Pie French Toast
- Prep the apples. Peel (optional), core, and slice the apples into thin wedges, about 1/4-inch thick. A mix of sweet and tart apples gives the best pie-like flavor.
- Start the apple pie topping. In a large skillet over medium heat, melt 2 tablespoons butter. Add apples, brown sugar, 3/4 teaspoon cinnamon, a pinch of salt, and lemon juice. Cook, stirring often, until the apples are tender but not mushy, 7–10 minutes.
- Thicken (if you like). If you prefer a glossy, spoonable sauce, stir together the cornstarch and water, then add to the skillet. Cook 30–60 seconds until the liquid turns syrupy. Remove from heat and cover to keep warm.
- Whisk the custard. In a wide, shallow dish (a pie plate works well), whisk the eggs, milk, cream, granulated sugar, 3/4 teaspoon cinnamon, nutmeg, vanilla, and salt until smooth and well combined.
- Preheat your cooking surface. Heat a large nonstick skillet or griddle over medium heat (about 350°F on an electric griddle). Add 1 tablespoon butter or a mix of butter and oil—oil helps prevent burning while butter adds flavor.
- Soak the bread. Dip each slice of brioche into the custard for 15–25 seconds per side, depending on thickness and staleness. You want it saturated but not falling apart. Let excess custard drip off.
- Cook the first batch. Place soaked slices onto the hot, buttered surface. Cook until the bottoms are golden brown and lightly crisp, 3–4 minutes. Flip and cook another 2–4 minutes until the centers feel set and bouncy.
- Keep warm as you go. Transfer cooked slices to a wire rack set over a baking sheet and keep in a 200°F oven while you finish the rest. This prevents sogginess and keeps the edges crisp.
- Refresh the pan. Wipe the skillet lightly if needed, then add more butter or oil for the next batch. Repeat soaking and cooking with remaining bread.
- Warm the apples. If the apple topping thickened too much while you cooked the toast, splash in a tablespoon of water and gently rewarm over low heat until glossy and spoonable.
- Plate it up. Serve 2 slices per person, spooning a generous portion of the apple pie topping over each. Finish with maple syrup, a dollop of whipped cream, and a sprinkle of toasted pecans if you like a crunch.
- Optional: Make it stuffed. For a dessert-level twist, spread a thin layer of softened cream cheese (or mascarpone) between two slices before soaking. Dip and cook as directed for a cheesecake-meets-apple-pie moment.
Timing and How Long Everything Takes
Total time: About 45 minutes
- Prep time: 15–20 minutes (slicing apples, whisking custard, preheating pan)
- Cook time: 20–25 minutes (apples 7–10 minutes; French toast 12–15 minutes in batches)
- Servings: 4 generous portions (2 slices each)
The apple topping can be made up to 3 days in advance and refrigerated. Gently rewarm on the stovetop with a splash of water. The French toast is best cooked fresh so it keeps its crisp edges and custardy center. You’ll know it’s ready to enjoy when the toast is deep golden on both sides, the centers feel set, and the apple topping is tender, glossy, and spoonable.
Pro Tips to Make It Foolproof
- Choose the right bread: Thick-sliced brioche or challah, slightly stale (1–2 days old), soaks better and doesn’t fall apart. Aim for 3/4-inch slices for the perfect custard-to-crisp ratio.
- Mind the soak: If your bread is fresh, keep the soak short so it doesn’t get mushy. If dry or day-old, give it a few extra seconds per side to fully hydrate.
- Use a mix of fat in the pan: A little oil with butter helps prevent burning while still delivering that buttery flavor. Re-grease the pan between batches for even browning.
- Don’t rush the apples: Medium heat is key. Too hot and the sugar will burn before the apples soften; too low and they’ll steam instead of caramelize.
- Keep it crisp: Move cooked slices to a wire rack in a warm oven. Stacking on a plate traps steam and softens the crust.
- Brighten the flavor: A squeeze of lemon in the apples adds a subtle lift that keeps the topping from tasting too sweet.
- Season with a pinch of salt: It might seem small, but salt sharpens all the flavors, especially the cinnamon and vanilla.
- Make it your own: Add a dash of apple pie spice to the custard, stir in chopped pecans with the apples, or finish with a drizzle of caramel sauce for a full-on dessert vibe.
- Use the right heat: Medium to medium-low gives the custard time to set before the outside over-browns. On a griddle, 325–350°F is a good range.
A Quick Nutrition Overview
These values are approximate and will vary based on your bread, apples, and toppings. The estimates below are for one serving (2 slices with apple topping), without syrup, whipped cream, or nuts.
| Nutrient | Per Serving (approx.) |
|---|---|
| Calories | ~620 |
| Protein | ~15 g |
| Total Carbohydrates | ~90 g |
| Dietary Fiber | ~5 g |
| Total Fat | ~29 g |
| Saturated Fat | ~16 g |
| Sugars | ~34 g |
| Sodium | ~420 mg |
Note: Additions like maple syrup, whipped cream, or nuts will increase calories, sugar, and fat accordingly.
Common Questions, Answered
Can I make any part of this ahead?
Yes. The apple topping can be cooked 1–3 days ahead and refrigerated; reheat gently with a splash of water to loosen. You can also whisk the custard the night before and keep it covered in the fridge. For best texture, cook the French toast just before serving so it stays crisp at the edges and soft inside.
What apples work best for the topping?
Choose varieties that hold their shape and offer a sweet-tart balance. Honeycrisp, Granny Smith, Pink Lady, and Braeburn are excellent. Using a mix—one sweet and one tart—adds complexity and a pie-like flavor profile.
How do I store and reheat leftovers?
Let cooked slices cool completely on a wire rack, then refrigerate in an airtight container for up to 3 days. Reheat in a 350°F oven for 8–10 minutes or in an air fryer at 325°F for 5–6 minutes to restore crispness. The apple topping can be warmed on the stovetop over low heat; add a splash of water to loosen if needed.
Wrapping Up with a Warm Note
Apple Pie French Toast is the kind of breakfast that slows everyone down—in the best way. It invites people to linger at the table, share stories, and go back for just one more bite of those cinnamon-glossed apples. With a handful of pantry staples and a few simple steps, you’ll be plating up something that tastes like it was made for celebrations—even on an ordinary morning. Here’s to buttery edges, cozy spice, and the joy of cooking for the people you love. May this recipe become your go-to for weekend brunches, holiday mornings, and any time you want your kitchen to feel like home.