Biscoff Banana Bread: Best Moist, Easy Recipe to Make Today!
If you’re searching for a banana bread that feels a little extra-special—something cozy yet indulgent—this Biscoff Banana Bread might become your new favorite. Think of a plush, tender crumb infused with caramelized banana sweetness, ribbons of warm cookie butter swirled through the batter, and a delicate crunch from crushed Biscoff cookies on top. It’s the kind of bake that makes your kitchen smell like a bakery and has everyone hovering by the oven waiting for that first, still-warm slice. In this guide, I’ll walk you through every step so your loaf turns out beautifully moist with a stunning swirl every time.
- What Makes This Biscoff Banana Bread Irresistible
- What You’ll Need: Ingredients That Make It Shine
- Your Step-by-Step Path to Perfect Biscoff Banana Bread
- All the Details: Timing, Yield, and When It’s Ready
- Helpful Tips to Guarantee Success
- A Quick Nutrition Overview
- Common Questions, Answered
- A Parting Note to Inspire Your Baking
What Makes This Biscoff Banana Bread Irresistible
This loaf takes everything you love about classic banana bread and gives it a cozy, spiced cookie twist. Biscoff cookie butter brings a deep caramel flavor with hints of cinnamon, which pairs naturally with ripe bananas. The batter comes together easily, the swirl is fun (and forgiving!), and the crumb stays moist for days. Whether you’re baking for weekend coffee, gifting to a friend, or treating yourself after dinner, this is comfort baking at its best—no complicated techniques, just honest, delicious results.
What You’ll Need: Ingredients That Make It Shine
- 3 large very ripe bananas (about 340 g without peel) — Provide natural sweetness, moisture, and banana flavor; speckled or spotty bananas are best.
- 1/2 cup (120 g) smooth Biscoff cookie butter, room temperature — Adds the signature caramel-spice flavor right into the batter for depth and richness.
- 1/3 cup (75 g) unsalted butter, melted and slightly cooled — Gives tenderness and a buttery finish; or use 1/3 cup neutral oil for a moist, dairy-light option.
- 1/2 cup (100 g) packed light brown sugar — Enhances caramel notes and keeps the crumb soft.
- 1/4 cup (50 g) granulated sugar — Balances sweetness and supports structure.
- 2 large eggs, at room temperature — Bind the batter and help the bread rise and set.
- 1 teaspoon pure vanilla extract — Lifts aroma and complements the cookie spices.
- 1/2 cup (120 g) plain yogurt or sour cream — Adds moisture, gentle tang, and a tender crumb.
- 1 3/4 cups (220 g) all-purpose flour — Creates structure while keeping the crumb soft.
- 1 teaspoon baking soda — Reacts with the yogurt and bananas to give lift.
- 1 teaspoon baking powder — Adds extra rise for a nicely domed loaf.
- 1/2 teaspoon fine sea salt — Balances sweetness and heightens flavor.
- 1 teaspoon ground cinnamon (optional) — Brings a warm spice that echoes the Biscoff profile.
- For the swirl: 1/3 cup (80 g) Biscoff cookie butter, gently warmed — Creates luscious ribbons of cookie butter throughout.
- For the topping (optional): 4–5 Biscoff cookies, coarsely crushed — Adds a light crunch and a bakery-style finish.
- Optional mix-ins: 1/2 cup (60 g) toasted walnuts or 1/2 cup (90 g) chocolate chips — Customize for texture or extra indulgence.
Pan: 9 × 5-inch (23 × 13 cm) loaf pan, greased and lined with a parchment “sling” for easy removal.
Your Step-by-Step Path to Perfect Biscoff Banana Bread
- Preheat and prep the pan. Heat the oven to 350°F (175°C). Grease a 9 × 5-inch loaf pan and line it with a parchment sling, leaving overhang on the long sides for lifting. This prevents sticking and keeps the loaf intact.
- Warm the swirl. Gently warm 1/3 cup Biscoff cookie butter until just pourable—about 10–15 seconds in the microwave. Stir to smooth and set aside; it will be easier to marble through the batter.
- Mash the bananas. In a large mixing bowl, mash the bananas with a fork until mostly smooth with a few small lumps. You want an even mixture that still shows it’s banana-based rather than completely pureed.
- Whisk the wet ingredients. To the bananas, add the melted butter (cooled slightly), 1/2 cup Biscoff cookie butter, brown sugar, granulated sugar, yogurt, eggs, and vanilla. Whisk until silky and well combined. The batter should look cohesive and glossy.
- Combine the dry ingredients. In a separate bowl, whisk together the flour, baking soda, baking powder, salt, and cinnamon (if using). This step distributes leaveners evenly for a consistent rise.
- Bring it together. Add the dry mixture to the wet mixture. Using a spatula, fold gently until the flour is just incorporated. Do not overmix; stop as soon as no dry streaks remain. If using walnuts or chocolate chips, fold them in now.
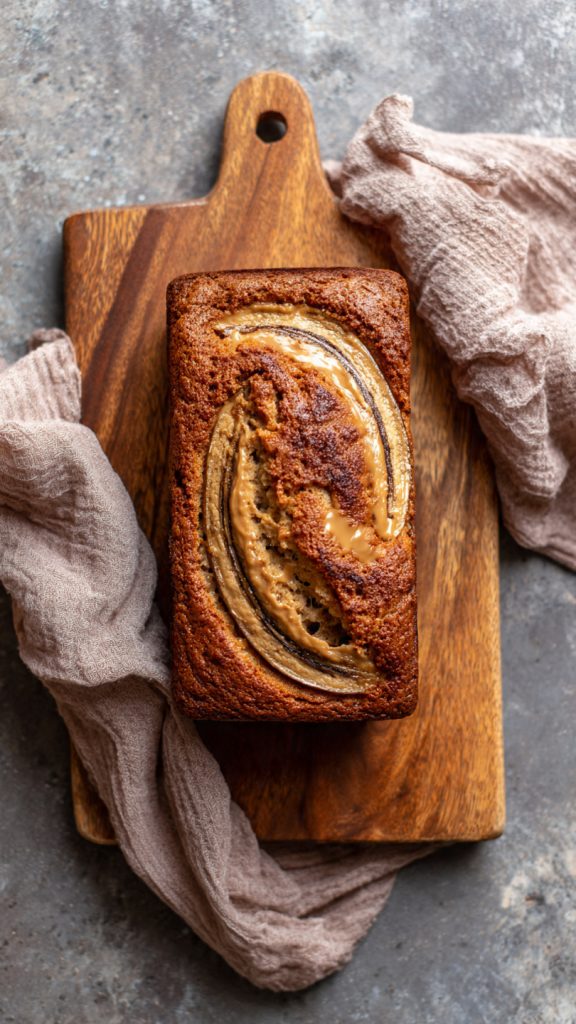
- Layer and swirl. Spread about half the batter into the prepared pan. Dollop half of the warmed Biscoff swirl over the batter in small spoonfuls. Add the remaining batter, then dollop the rest of the swirl over the top. Use a butter knife or skewer to marble the swirl with gentle S-shaped motions—2–3 passes are enough for clean ribbons.
- Top for texture (optional). Scatter the crushed Biscoff cookies over the surface. They’ll toast slightly in the oven and add a delicate crunch.
- Bake. Place the loaf on the center rack and bake for 55–65 minutes. Check at 50 minutes; if the top is browning quickly, tent with foil. It’s done when a toothpick inserted in the center comes out with a few moist crumbs (not wet batter), or when the center reads 200–205°F (93–96°C) with an instant-read thermometer.
- Cool with care. Let the loaf rest in the pan for 10–15 minutes, then lift it out using the parchment and transfer to a wire rack. Cool for at least 45 minutes before slicing. This sets the crumb and gives cleaner slices.
- Serve and enjoy. Slice with a serrated knife. It’s lovely slightly warm, and even better with a little extra Biscoff spread or a swipe of butter. A cup of coffee or tea seals the moment.
All the Details: Timing, Yield, and When It’s Ready
- Active prep time: 20–25 minutes
- Baking time: 55–65 minutes
- Cooling time: 1 hour (minimum 45 minutes for slicing)
- Total time: About 1 hour 45 minutes
- Yield: 1 loaf; approximately 10–12 slices
You’ll know the bread is ready to enjoy once the loaf has cooled enough to slice cleanly without compressing—about 45 minutes after baking. If you can wait until it’s completely cool, the flavor settles and the slices look bakery-neat. Pro tip: For ultra-clean cuts, chill the loaf for 20–30 minutes after it reaches room temperature, then slice.
Helpful Tips to Guarantee Success
- Choose very ripe bananas. The darker the peel, the sweeter and more flavorful the loaf. If your bananas are pale, mash them and warm briefly in the microwave to intensify their aroma before baking.
- Measure flour accurately. Lightly spoon flour into your measuring cup and level it with a knife, or use a scale. Too much flour leads to a dense, dry crumb.
- Use room-temperature ingredients. Eggs, yogurt, and cookie butter blend more evenly when not cold, which means a smoother batter and consistent bake.
- Don’t overmix. Overworking the batter develops gluten, making the loaf tougher. Stir just until the dry streaks disappear.
- Mind your pan color. Dark metal pans bake faster and brown more deeply; start checking a few minutes early. Glass pans may require a slightly longer bake.
- Tent if needed. If the loaf browns quickly while the center is still baking, loosely cover with foil to protect the top and continue baking until done.
- Swirl with restraint. A little marbling goes a long way. Too much swirling blends the Biscoff into the batter; fewer strokes keep bold, distinct ribbons.
- Test for doneness carefully. Aim for a toothpick with moist crumbs or a center temperature of 200–205°F (93–96°C). Testing in multiple spots avoids hitting a Biscoff pocket that can appear streaky.
- Storage. Wrap tightly and store at room temperature for up to 3 days or refrigerate up to 5 days. For longer storage, freeze slices individually (wrapped well) for up to 2 months; thaw at room temperature or warm briefly in the microwave.
- Dietary tweaks. Swap butter for oil to make it dairy-light, use dairy-free yogurt for a fully dairy-free loaf, or try a 1:1 gluten-free all-purpose flour blend for a gluten-free version (texture may vary slightly).
A Quick Nutrition Overview
Approximate nutrition per slice, based on 12 slices and the recipe as written (without optional mix-ins or toppings):
- Calories: ~390
- Protein: ~5 g
- Carbohydrates: ~52 g
- Total Fat: ~17 g
- Saturated Fat: ~6 g
- Fiber: ~2 g
- Total Sugars: ~28 g
- Sodium: ~260 mg
These values are estimates and will vary based on specific brands, exact portion sizes, and any add-ins or toppings you choose.
Common Questions, Answered
Can I use oil instead of butter?
Yes. Use 1/3 cup neutral oil (like canola, avocado, or sunflower) in place of the melted butter. Oil makes the loaf slightly more moist, while butter gives a richer flavor—both work beautifully.
How can I quickly ripen bananas for this recipe?
If your bananas aren’t ready, bake them on a parchment-lined tray at 300°F (150°C) for 15–20 minutes until the skins turn black and the fruit softens. Let them cool, then peel and mash. The flavor won’t be identical to naturally ripened bananas, but it works in a pinch.
Can I make muffins instead of a loaf?
Definitely. Divide the batter among a lined 12-cup muffin tin, add small dollops of warmed Biscoff on top, swirl lightly, and bake at 350°F (175°C) for 18–22 minutes. Start checking at 16 minutes and remove when a toothpick comes out with moist crumbs.
A Parting Note to Inspire Your Baking
There’s something quietly joyful about baking a loaf like this—simple ingredients, a few easy steps, and a result that fills the room with warmth. Biscoff Banana Bread is the kind of treat that makes ordinary moments feel special, whether you’re sharing slices at the table or sneaking one as an afternoon pick-me-up. I hope this recipe brings that cozy, contented feeling into your kitchen and becomes the loaf you reach for when you want comfort with a twist. Happy baking, and enjoy every last crumb.