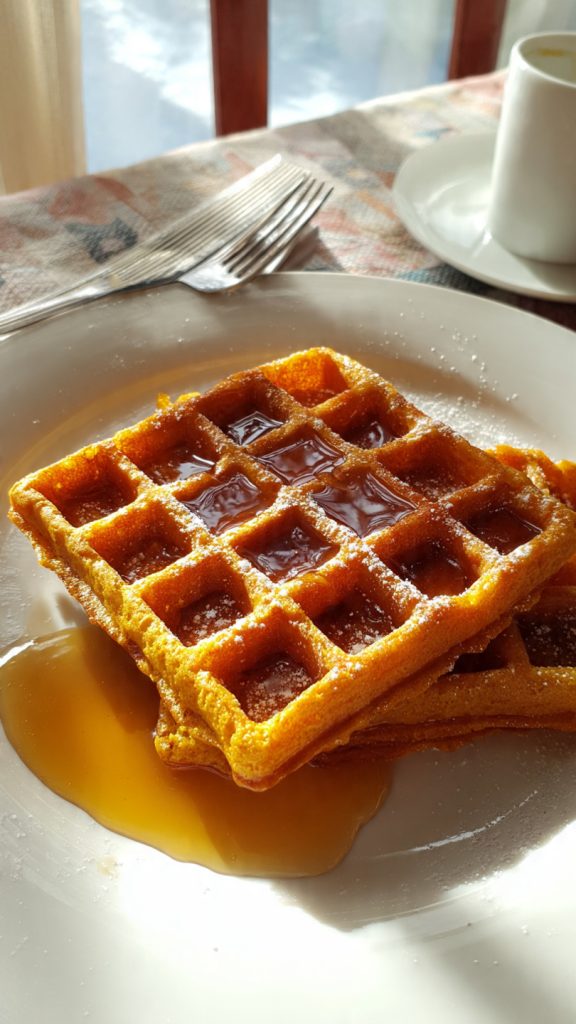
Perfect Pumpkin Waffles: Crispy Fluffy Fall Breakfast Recipe
There’s something about a batch of pumpkin waffles that transforms an ordinary morning into a cozy occasion. Warm spices drift through the kitchen, the iron clicks shut, and a few minutes later you’re rewarded with golden squares that are crisp at the edges, tender in the middle, and perfectly scented with cinnamon and vanilla. These Perfect Pumpkin Waffles deliver on all of that and more. Expect a batter that’s easy to whisk together, a texture that stays light without getting soggy, and flavors that strike the right balance between gently sweet and warmly spiced. Whether you’re cooking for a fall brunch or simply treating yourself, this recipe will become a comforting ritual you’ll look forward to all season long.
Why These Pumpkin Waffles Will Win You Over
These waffles are the happy intersection of deep autumn flavor and fuss-free technique. Pumpkin adds moisture and body without heaviness, while a thoughtful blend of spices brings complexity without overpowering. A touch of cornstarch and the right balance of leavening help the waffles crisp beautifully on the outside and stay pillowy inside. They freeze and reheat like a dream, too, making them a smart make-ahead breakfast that still feels special. If you’ve ever wished for waffles that stay crisp long enough to sit down and savor, this is your recipe.
What You’ll Need for Pumpkin Waffle Perfection
- All-purpose flour (1 2/3 cups / about 210 g): The base that provides structure while keeping the crumb tender.
- Cornstarch (1 tablespoon, optional but recommended): Helps achieve a crispier exterior without drying the interior.
- Baking powder (2 teaspoons): Lifts the batter so the waffles puff and stay light.
- Baking soda (1/2 teaspoon): Reacts with the buttermilk’s acidity for extra lift and browning.
- Fine sea salt (1/2 teaspoon): Balances sweetness and brightens the spices.
- Ground cinnamon (2 teaspoons): The anchor spice that brings warmth and familiarity.
- Ground ginger (1/2 teaspoon): Adds a gentle zing that wakes up the pumpkin flavor.
- Ground nutmeg (1/4 teaspoon): A subtle, nutty perfume that rounds out the spice blend.
- Ground cloves (1/8 teaspoon): A little goes a long way—adds depth and autumnal character.
- Pumpkin puree (1 cup; not pumpkin pie filling): Provides moisture, color, and mild sweetness.
- Buttermilk (1 1/2 cups): Tenderizes the batter and boosts lift; adds a slight tang for balance.
- Large eggs (2): Bind the batter and contribute richness and structure.
- Brown sugar (1/3 cup, lightly packed): Sweetens with a hint of molasses that complements pumpkin.
- Neutral oil or melted butter (1/3 cup): Prevents sticking and keeps waffles plush; oil yields more crisp, butter adds flavor.
- Vanilla extract (2 teaspoons): Enhances the overall aroma and rounds the spices.
- Optional add-ins (about 1/2 cup): Chopped pecans, mini chocolate chips, or dried cranberries for extra texture.
- For serving: Warm maple syrup, a pat of butter, whipped cream, yogurt, toasted pecans, or a sprinkle of cinnamon sugar.
How to Make Pumpkin Waffles, Step by Step
- Preheat your waffle iron. Heat it to medium or the manufacturer’s “waffle” setting. A properly preheated iron is key to crisp edges and even browning.
- Combine the dry ingredients. In a large bowl, whisk the flour, cornstarch, baking powder, baking soda, salt, cinnamon, ginger, nutmeg, and cloves until no streaks remain.
- Whisk the wet ingredients. In a separate bowl, whisk the pumpkin, buttermilk, eggs, brown sugar, oil or melted butter, and vanilla until smooth and glossy.
- Bring the batter together. Pour the wet mixture into the dry. Whisk gently or fold with a spatula until the flour is just hydrated. A few small lumps are fine. Do not overmix—it can make waffles tough.
- Rest the batter for 5–10 minutes. This short rest lets the flour fully hydrate and gives the leaveners a head start, leading to better lift and texture.
- Prepare the iron. Lightly grease the hot waffle plates with oil or nonstick spray, especially if your iron isn’t nonstick. Greasing helps the first waffle release cleanly.
- Cook the first waffle. Scoop batter into the center—usually about 1/2 to 3/4 cup for a standard iron, or as your model requires. Close the lid and cook until deeply golden and the steam mostly subsides, about 4–5 minutes.
- Check for doneness. When the steam slows and the edges look set, lift the lid. If the waffle resists, give it another 30–60 seconds. You’re aiming for crisp edges and a softly set interior.
- Hold finished waffles in a warm oven. Place them directly on a wire rack set over a baking sheet in a 200°F (95°C) oven to keep them crisp while you finish the batch. A rack prevents sogginess by allowing air to circulate.
- Repeat with remaining batter. Re-grease the plates lightly between waffles if needed. If adding mix-ins like pecans or chocolate chips, sprinkle them onto the batter in the iron for even distribution.
- Serve warm. Top with butter and warm maple syrup, or go for yogurt and berries, toasted nuts, or a swirl of cinnamon honey for a lighter touch.
- Store leftovers smartly. Cool waffles completely on a rack, then refrigerate up to 3 days or freeze up to 2 months in a single layer (or separated by parchment). Reheat in a toaster or 350°F oven until crisp.
Timing, Yields, and When They’re Ready
From start to finish, you’ll need about 35–40 minutes, including a brief batter rest. Actual cook time per waffle can vary—most irons take 4–5 minutes per cycle, depending on thickness and heat. This recipe yields about 6–8 waffles, depending on the size of your iron. If you’re feeding a crowd, double the recipe and keep finished waffles warm on a rack in the oven. You’ll know the waffles are ready when the steam slows, the outside is a deep golden brown, and the waffle lifts away from the plates with minimal resistance. Letting them sit for 1–2 minutes on a rack after cooking enhances crispness—perfect for stacking without turning soggy.
Pro Tips for Golden, Crispy Success
- Measure carefully, especially flour. If you don’t weigh your flour, spoon and level it to avoid excess density. Too much flour means heavy waffles.
- Don’t skip the rest. A quick 5–10 minute rest makes a noticeable difference in lift and tenderness.
- Use cornstarch for extra crisp. That small spoonful tightens the exterior for a delicate crunch without drying the inside.
- Oil vs. butter: Oil tends to crisp better; butter brings rich flavor. Use a blend if you’d like both benefits.
- Mind the moisture. Pumpkin puree varies. If yours looks watery, blot it briefly with a paper towel; if the batter seems too thick after resting, stir in 1–2 tablespoons of buttermilk.
- Keep heat steady. Resist the urge to crank the iron to maximum—medium to medium-high usually yields the best color and cook-through without scorching.
- No peeking early. Opening the iron too soon can tear the waffle. Wait until the steam subsides.
- Rack, not plate. Transfer hot waffles to a wire rack instead of stacking them on a plate to preserve crisp edges.
- Belgian vs. classic irons: Belgian irons need slightly more batter and time; classic irons cook a bit faster. Adjust quantities and time accordingly.
- Flavor twists: Swap the spice blend for 2 1/2 teaspoons pumpkin pie spice; add orange zest for brightness; or fold in toasted pecans for nutty crunch.
- Diet-friendly swaps: Use a 1:1 gluten-free flour blend and keep the cornstarch; choose dairy-free milk with 2 teaspoons of lemon juice or vinegar; for egg-free, try two “flax eggs” (2 tablespoons ground flax + 6 tablespoons water), knowing the waffles will be slightly less crisp.
- Make-ahead and freeze: Cool completely, freeze in a single layer, then store in bags. Reheat straight from frozen in a toaster or 350°F oven until hot and crisp.
Nutrition at a Glance
Nutrition will vary with portion size, mix-ins, and whether you use oil or butter. Based on eight waffles and using neutral oil, each serving is approximately:
- Calories: ~260
- Protein: ~6 g
- Carbohydrates: ~35 g
- Total Fat: ~11 g
- Saturated Fat: ~2 g (higher if using butter)
- Fiber: ~2 g
- Sugars: ~10–12 g
- Sodium: ~350–400 mg
These figures are estimates meant for general guidance. Add nuts, chocolate, or extra toppings and you’ll want to adjust accordingly.
Your Questions, Answered
Can I make the batter ahead of time?
Yes. For best lift, whisk the dry ingredients and wet ingredients separately and store them covered in the refrigerator up to 24 hours. Combine just before cooking. If you prefer to mix the batter fully in advance, expect slightly less rise; let it sit at room temperature for 10 minutes, then stir gently. If it thickens, add a splash of buttermilk.
How do I keep waffles crisp for serving?
Place cooked waffles directly on a wire rack in a 200°F (95°C) oven. Avoid stacking on a plate—the trapped steam softens them. For leftovers, reheat in a toaster or hot oven to revive crispness.
Can I substitute pumpkin pie spice for the individual spices?
Absolutely. Use 2 1/2 teaspoons pumpkin pie spice in place of the cinnamon, ginger, nutmeg, and cloves. Taste the batter and add an extra pinch of cinnamon if you love a warmer profile.
A Cozy Note to Finish
There’s a quiet joy in turning simple ingredients into something that invites everyone to linger at the table. These Perfect Pumpkin Waffles deliver that feeling with every batch—comforting, celebratory, and just a little indulgent. Whether you serve them on a slow weekend or bring a plate to the office to share, they have a way of making a moment feel special. Here’s to warm kitchens, crisp edges, and the simple pleasure of cooking for yourself and the people you love. Enjoy every bite.