Homemade Crusty Italian Bread Recipe | Easy, Authentic Loaf!
There’s something quietly magical about pulling a loaf of homemade crusty Italian bread from your oven. The crackle as it cools, the deep golden color, and that irresistible aroma promise a loaf with a shattering crust and a tender, slightly chewy crumb inside. This recipe keeps things simple and approachable, guiding you step by step to a reliable, bakery-style result. Whether you’re new to bread making or simply want a go-to loaf for soups, sandwiches, and Sunday dinners, this one is warm, welcoming, and wonderfully doable.
What Makes This Homemade Crusty Italian Bread Irresistible
Italian bread is beloved for its modest ingredients that transform into something extraordinary with a little patience and heat. This loaf has a crackly crust and a soft, open interior that’s perfect for dipping in olive oil, scooping up sauce, or partnering with your favorite cheeses. You’ll love how flexible the method is: shape it into a round, a long batard, or even two smaller loaves to share. The recipe uses pantry staples, offers an option for overnight chilling to deepen flavor, and includes practical tricks to help you master steam and scoring. The result is a loaf that’s simple enough for a weekday and impressive enough for company.
What You’ll Need to Make Crusty Italian Bread
This ingredient list is straightforward, with a couple of optional extras to tailor the crust and flavor to your taste.
- Bread flour (500 g, about 4 cups): High-protein flour develops strong gluten, giving the bread its chewy, structured crumb and helping it rise well.
- Water (325–350 g, about 1 1/3–1 1/2 cups), room temp or slightly warm: Hydrates the flour and regulates dough consistency. Slightly warmer water helps activate yeast; cooler water works well for slow fermentation.
- Active dry yeast (2 tsp, 7 g) or instant yeast (2 tsp, 6 g): The leavening that lifts your loaf. Active dry benefits from blooming; instant can be mixed right into the flour.
- Fine sea salt (10 g, about 1 3/4 tsp): Enhances flavor and strengthens gluten. It also helps regulate yeast activity so the dough rises evenly.
- Sugar or honey (1 tsp): Optional but helpful; it gives the yeast a quick boost and promotes a beautifully browned crust.
- Olive oil (1 tbsp): Optional for a touch of softness and a subtle Italian character without sacrificing a good crust.
- Semolina or cornmeal (for dusting): Helps keep the dough from sticking and adds a delicate crunch on the bottom.
- Egg white + 1 tsp water (optional wash): For a glossy finish; use if you prefer sheen over a more rustic matte crust.
- Sesame seeds (optional): A classic Italian bakery touch for nutty aroma and extra crunch.
Yield: 1 large loaf (about 2 lb/900 g) or 2 medium loaves.
Helpful tools (optional but useful): Kitchen scale, large mixing bowl, dough scraper, stand mixer with dough hook, baking stone or steel (or a sturdy sheet pan), parchment paper, razor or sharp serrated knife for scoring, spray bottle with water, and an oven-safe pan to create steam.
Step-by-Step Guide to Baking Your Italian Loaf
- Wake the yeast (if using active dry): In a bowl, whisk together the water (about 100–105°F/38–41°C if using active dry), sugar or honey, and active dry yeast. Let sit for 5–10 minutes until foamy. If using instant yeast, skip blooming and add it directly with the flour in the next step, using room-temperature water.
- Combine the base dough: Add the flour to a large bowl. Pour in the yeast mixture (or water if using instant), and add the olive oil if you’re using it. Stir with a spoon or hand until a shaggy, rough dough forms. It may look dry in spots—that’s fine.
- Rest for an autolyse (optional, but helpful): Cover and let the dough rest for 20 minutes. This simple pause hydrates the flour, making kneading easier and improving the loaf’s texture.
- Add the salt and start kneading: Sprinkle the salt over the dough. Knead by hand on a lightly damp surface (not floured) for 8–10 minutes, or in a stand mixer on low for 5–7 minutes. You’re aiming for a smooth, slightly tacky dough that springs back when poked. If it’s very sticky, add no more than a teaspoon of flour at a time; too much flour can make the loaf dense.
- Check the gluten: Do a quick “windowpane” test. Stretch a small piece of dough—if you can pull it thin enough to see light through without tearing, you have good gluten development. If it tears quickly, knead another minute or two.
- First rise (bulk fermentation): Shape the dough into a ball and place it in a lightly oiled bowl. Cover and let rise at warm room temperature (75–78°F/24–26°C is ideal) until roughly doubled, 60–90 minutes. Halfway through, you can give it a gentle stretch-and-fold to boost structure.
- Optional for deeper flavor—cold proof: After a 30–45 minute start to the rise, cover tightly and refrigerate the dough for 8–24 hours. This slow fermentation adds complexity. When ready to bake, let the dough come back to room temperature for about 45–60 minutes before shaping.
- Preheat the oven with steam setup: Place a baking stone or steel on the middle rack and an empty metal pan on a lower rack. Preheat to 475°F (246°C) for at least 45 minutes so the stone is thoroughly hot. If you don’t have a stone, preheat your oven with a sturdy sheet pan inside.
- Pre-shape and rest: Turn the dough onto a lightly floured surface and gently press out large air bubbles. For two loaves, divide the dough in half. Pre-shape each piece into a loose round and let rest, covered, for 10 minutes. This relaxes the gluten and makes final shaping easier.
- Shape your loaf: To make a batard (football-shaped loaf), flatten the dough gently into a rectangle, fold the top third down, the bottom third up, and roll it tightly. Seal the seam with the heel of your hand. Place seam-side down on a parchment-lined peel or sheet of parchment for easy transfer. Alternatively, shape a round boule by tucking edges under to build surface tension.
- Second rise (proof): Cover the shaped loaf lightly and let it rise until puffy, 30–45 minutes. When gently pressed with a fingertip, the dough should spring back slowly and leave a faint indentation.
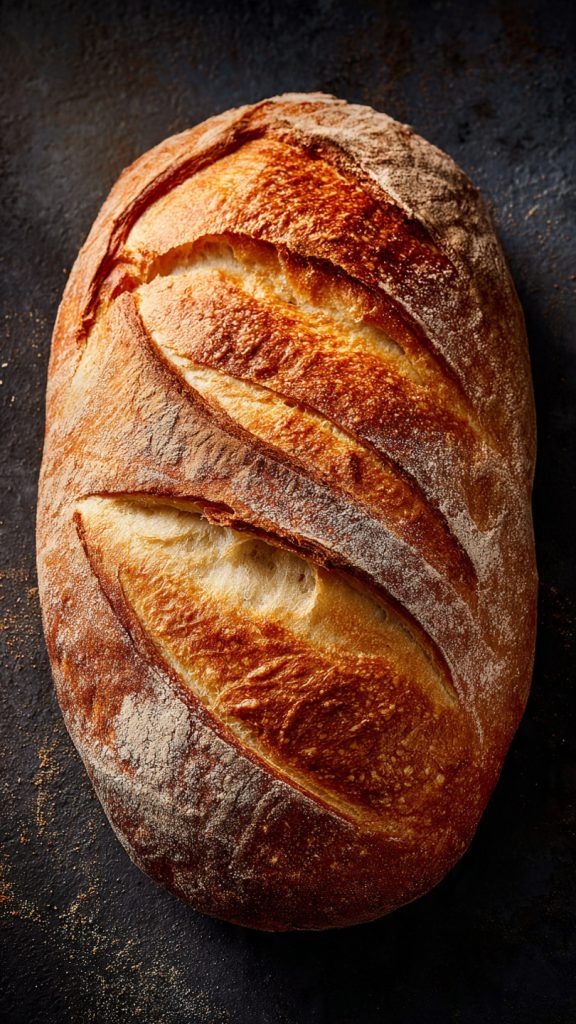
- Score for expansion: Dust the top with a bit of flour. Using a razor or sharp serrated knife, make 2–4 shallow slashes at a 30–45° angle along the loaf. This directs the rise in the oven. If using sesame seeds, lightly mist the loaf and sprinkle them on now.
- Load the oven and steam: Slide the loaf (on its parchment) onto the hot stone or pan. Carefully pour a cup of hot water into the empty steam pan and quickly close the oven door. You can also mist the oven walls with a spray bottle. Lower the temperature to 450°F (232°C).
- Bake to golden-crackly perfection: Bake for 15 minutes with steam, then open the oven briefly to vent moisture and rotate the loaf for even browning. Continue baking 10–20 minutes more, until the crust is deep golden and the internal temperature reaches 205–210°F (96–99°C).
- Cool before slicing: Transfer to a wire rack and cool at least 45–60 minutes. The crust will “sing” as it cools. Resist cutting too soon; cooling sets the crumb and preserves that crisp crust.
- Enjoy: Slice thick for dunking in olive oil and balsamic, or cut thinner for sandwiches and bruschetta. This loaf pairs beautifully with soups, roasted vegetables, or a classic bowl of pasta.
Time & Preparation At-a-Glance
- Active prep: 25–30 minutes (mixing, kneading, shaping)
- First rise (bulk): 60–90 minutes at warm room temperature
- Second rise (proof): 30–45 minutes
- Baking: 25–35 minutes total
- Cooling: 45–60 minutes
- Total same-day time: About 3–4 hours
- Overnight option: Add 8–24 hours for refrigerated fermentation; flavor improves and schedule becomes more flexible.
The bread is ready to enjoy once it has cooled enough for the crumb to set and the crust to firm—usually about an hour after baking. If you love it slightly warm, slice after 45 minutes using a sharp serrated knife, taking care to preserve the crust’s texture.
Practical Tips for Standout Results
- Weigh your ingredients: A scale provides consistency, especially for flour and water. Aim for a hydration around 65–70%; the dough should be slightly tacky but not gluey.
- Mind water temperature: Warmer water (100–105°F/38–41°C) helps active dry yeast bloom quickly; room-temperature water suits instant yeast or an overnight rise.
- Use the autolyse: That 20-minute rest before adding salt makes kneading easier and improves the final crumb.
- Knead to smooth, not stiff: Over-flouring leads to dense bread. If the dough sticks a little to your fingers, you’re likely in the right zone.
- Master steam: Steam in the first part of baking is key for a thin, crisp crust. Use a preheated pan for water or drop a handful of ice cubes into a hot pan to create sustained steam.
- Score with confidence: Quick, deliberate slashes at a shallow angle help the loaf expand. A razor blade (lame) works best.
- Consider a Dutch oven: For a round loaf, bake in a preheated Dutch oven at 450°F (232°C) covered for 20 minutes, then uncovered 10–15 minutes. The enclosed steam yields exceptional crust.
- Try semolina or whole wheat: Swap in 10–20% semolina for a golden hue and sweet nuttiness, or a small amount of whole wheat for complexity. Add a tablespoon more water if the dough feels dry.
- Storage: Keep at room temperature in a paper bag or cut-side down on a board for 1–2 days; then transfer to a bread bag or wrap lightly. Avoid the refrigerator. For long-term storage, slice and freeze. Refresh in a 375°F (190°C) oven for 8–10 minutes to re-crisp the crust.
- Patience pays: Allow proper rises and a full cool. Rushing either step can compress the crumb and soften the crust.
Nutritional Snapshot
Approximate nutrition per serving for the base loaf (no egg wash, no sesame), assuming 12 slices per loaf. Values are estimates and will vary based on size and optional ingredients.
| Nutrient | Per slice (1/12 loaf) |
|---|---|
| Calories | 160–170 kcal |
| Carbohydrates | 33–35 g |
| Protein | 5–6 g |
| Total Fat | 1–2 g (add ~10 kcal per slice if using 1 tbsp olive oil) |
| Fiber | 1–2 g |
| Sodium | 250–300 mg |
Note: Adding sesame seeds, egg wash, or substituting some whole grains will slightly change these numbers.
Questions Bakers Often Ask
Can I use all-purpose flour instead of bread flour?
Yes. All-purpose flour makes a slightly softer loaf with a bit less chew. Start with the lower end of the water range and add a teaspoon at a time until the dough is tacky, not sticky. Expect a slightly less open crumb, but still a delicious result.
How do I get a crisp crust if I don’t have a baking stone?
Preheat a heavy sheet pan in the oven and bake the loaf on parchment set directly atop it. Create steam by pouring hot water into a preheated oven-safe pan on a lower rack. A thorough preheat and steam in the first 10–15 minutes are the keys to a brittle, glassy crust.
Why did my bread come out dense?
Common culprits include under-kneading, too little hydration, and insufficient rise. Make sure the dough reaches a smooth, elastic stage (windowpane test), keep the dough slightly tacky, and allow it to rise until doubled in bulk. Also check that your yeast is fresh and active.
A Warm Send-Off
There’s a special comfort in a loaf of Italian bread cooling on the counter, promising a shared meal and simple pleasures. With a handful of ingredients and a little practice, you’ll get a crust that crackles, a crumb that invites another slice, and a flavor that suits everything from weeknight soup to celebratory spreads. I hope this recipe becomes one you return to often—adapt it, make it your own, and enjoy the joy it brings to your table and the people around it. Happy baking—your home is about to smell amazing.